. Remove carton top. 1. Remove set up instructions, owners manual and parts. 2. Locate white moisture absorbing packet and discard. Note: This packet is for shipping purposes only. Rev.
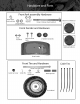
Front fork assembly Hardware 10mm Front Fork Lock Nut 2 Beveled Washers __ Yellow Front Reflector lOmm X 165mm Front Fork Bolt 2 large Washers Front Fender and Hardware O0 8mm lock Nuts 8mm X 25mm Bolts 2 Rubber Grommets Red Rear Reflector Front Fender Front Tire and Hardware 12mm Front Axle bolt Castle nut cover Cotter Pin 12mm Castle Nut Washer Wheel Spacers Front Wheel Cable Ties
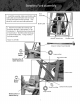
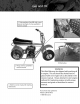
1. Install fork assembly. Make sure throttle cable, brake cable, and on/off switch wire are routed Fork Assembl correctly through front fork assembly. (See photo for correct wire and cable placement) Brake Cable 2. Attach fork assembly by inserting fork bolt down through 1-large washer, 2-Top fork bracket, 3- Beveled washer facing down 4- Down tube, 5- Beveled washer facing up, 6- Bottom fork bracket, 7-large washer, 8lock nut provided.
. Use 3 plastic cable ties provided to secure brake cable and engine ON/OFF switch wire to mini bike frame (See photo for correct placement of cable ties) Make sure there are no kinks and that brake cable and wiring have free movement when handle bars are ON/OFF switch wire Brake cable turned left and right. Apply brakes making sure brakes work properly with free movement. Plastic cable ties Plastic cable ties Plastic cable ties . Run throttle cable along top of mini bike frame.
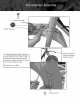
8mmX25mmbolt RubberGrommets FenderOrientation. Largerparttoward frontoverwheel. 1. Installfrontfender.Makesurelarge portionoffenderisoverwheel. Install with rubbergrommetbetweenframe andfender.Tightenwith 8mmNutsand 8mmX25mmboltsprovided.
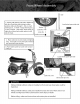
Axle 1. Startingwith leftside(leftsideisdefinedas leftsideof minibikewhilesittingin riding position),slideaxlethrough 1-fork,2-small wheelspacer,3-wheel.4- largewheelspacer, 5-fork,6-washer.Note:Placelargespaceron rightsideof wheelandsmallerspaceron left sideofwheel. Smallwheelspacerleftside. CotterPin Left cover 2. Placecastlenut onendof axleandtighter snug. Oncetight, insertcotterpinandbend overendswith a pairof pliers. 3.
Red Rear Reflector 1. There are three red reflectors. These reflectors need to be attached to the rear of the minibike, one on each side and one on the rear. Screw each reflector onto the welded bracket clockwise (CW). Yellow Front Reflector 2. There are two yellow reflectors. These reflectors need to be attached to the front of the minibike, one on each side. Screw each reflector onto the welded bracket clockwise (CW).
1. Drainpackingoil andfill with correct amountandtypeof oilasspecifiedin owners manual Oil Fill Plug Oil Drain plug 2. Fill gas tank as specified in owners manual. WARNING! This Mini Bike may be shipped in engine. with packing This oil should be drained oil and re- placed with new engine oil as described in the owners manual. Never attempt to start engine without first replacing engine oil with proper amount and grade as described manual. instructions 3.