
Owner`s manual


WARNING
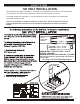
1. 120 Volt Units: Make sure the power supply cord is "unplugged" 240 Volt Units: Make
sure the power supply is "OFF".
2. Check to see that the Drain Valve (located to the left side of Equipment Module) is closed.
3. The slide valves on each side of the Equipment Module should be open.
(The valve is open when the handle is pulled out, closed when it is pushed in).
NOTE: Valves snap lock into place in both "open" and "closed" positions.
4. Fill the spa water to 1" above the center line of the skimmer located inside spa. Bleed air
from the filter and equipment module by opening the air relief plug (located on the top of
the filter). Tighten plug when finished. (See pg. 15 Cleaning the Filter)
IMPORTANT NOTE: The Equipment Module must never be operated without water in the spa,
or serious damage to the heater and/or pump could result.
5. Check all plumbing connections for water leaks.
6. Familiarize yourself with controller operations (Pages 9-10).
7. Apply power to the Equipment Module. 120 Volt Units: Plug cord into dedicated 15 amp
outlet.
240 Volt Units: Turn the main disconnect switch to the "ON" position.
8. Push the JET button located on the topside SPORTUB™ control panel. The pump will
ow operate at high speed.
9. Set desired temperature.
IMPORTANT NOTE: It is very important the pump be operated on high speed for several
minutes to assure that all air has been removed from system. The thermostat may only be
"turned up" after full water flow has been established.
10. Check for any leaks.
11. Open valves for operation. Close valves for maintenance.
FOR YOUR INFO
If your new spa pump does not prime (flow) on the initial start-up...
You may be experiencing “air lock”
This normal occurrence can be easily corrected by loosening the
plumbing union on the left side of the pump’s suction (your left as you
face the equipment) until the water flows into the pump. Then quickly re-
tighten fitting taking care that the O-ring stays in place. Turn on the LOW
SPEED pump setting and you should now have normal flow through the
jets.
Note: OPEN AIR RELIEF VALVE on the top of the filter when filling spa.
INITIAL STARTUP
8
IN ORDER TO CHECK FOR POSSIBLE LEAKS, THE FOLLOWING STEPS ARE PERFORMED
WITHOUT THE WOOD SKIRTING IN PLACE. TO PREVENT RISK OF ELECTRICAL SHOCK, DO
NOT USE SPA AT THIS TIME.