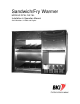
Sandwich/Fry Warmer MODELS SFW, FW-15L Installation & Operation Manual Serial Numbers 121866 and Higher
Warranty Information LIMITED ONE YEAR WARRANTY BKI (The "Company") warrants to the original purchaser that at time of shipment from the Company factory, this equipment will be free from defect in materials and workmanship. Written notice of a claim under this warranty must be received by the Company within ONE YEAR from the date of installation, but no longer than ONE YEAR AND THREE MONTHS from date of shipment from the factory.
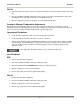
Sandwich/Fry Warmer Table of Contents Table of Contents Table of Contents .................................................................................................................................................... 1 Introduction.............................................................................................................................................................. 2 Safety Precautions .............................................................................................
Sandwich/Fry Warmer Introduction Introduction Congratulations! You have chosen a Sandwich/Fry Warmer that will give you many years of fine service from the original manufacturer, BKI. The BKI name and trademark on this unit assures you of the finest in design and engineering — that it has been built with care and dedication — using the best materials available.
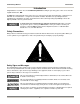
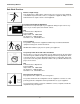
Sandwich/Fry Warmer Introduction Safe Work Practices Beware of High Voltage This equipment uses high voltage. Serious injury can occur if you or any untrained or unauthorized person installs, services, or repairs this equipment. Always Use an Authorized Service agent to Service Your Equipment. Keep this manual with the Equipment This manual is an important part of your equipment. Always keep it near for easy access. If you need to replace this manual, contact: BKI Technical Services Department P.O.
Sandwich/Fry Warmer Introduction Know your responsibilities as an Employer • Make certain your employees know how to operate the equipment. • Make certain your employees are aware of the safety precautions on the equipment and in this manual. • Make certain that you have thoroughly trained your employees about operating the equipment safely. • Make certain the equipment is in proper working condition.
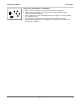
Sandwich/Fry Warmer Introduction Safety Labels 5
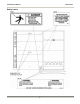
Sandwich/Fry Warmer Operation Operation Controls and Indicators 6
Sandwich/Fry Warmer Item # 1 2 3 4 5 6 7 8 9 10 11 Description Upper Sandwich Warmer TOP HEAT temperature control Upper Sandwich Warmer TOP HEAT pilot light Upper Sandwich Warmer BOTTOM HEAT temperature control Upper Sandwich Warmer BOTTOM HEAT pilot light LIGHTS ON/OFF Switch for Upper and Lower Sandwich Warmer Lower Sandwich Warmer TOP HEAT temperature control Lower Sandwich Warmer TOP HEAT pilot light Lower Sandwich Warmer BOTTOM HEAT temperature control Lower Sandwich Warmer BOTTOM HEAT pilot ligh
Sandwich/Fry Warmer Operation FW-15L 1. Connect the plug of the power cord into a receptacle that matches the power rating specified on the rating tag. 2. Place the Fry Warmer ON/OFF switch to the ON (1) position. The switch should illuminate red, the bulb should light and the chute and perforated pan should begin to heat up. 3. Allow the equipment to preheat for 30 minutes before loading it with product.
Sandwich/Fry Warmer Installation Installation Instructions For Shipping Damage You are responsible for filing all freight claims with the delivering truck line. Inspect all cartons and crates for damage when they arrive. If there is damage noted to shipping crates or cartons, or, if a shortage is found, note this on the bill of lading (all copies) before signing.
Sandwich/Fry Warmer Installation 3. Place the blower pan into the hole making sure that open side of the pan fits over the two tabs on the louvered blower box. 4. Place the perforated pan insert into the blower pan. Left-Sided SFW 1. Obtain a suitable countertop location and place the entire unit in position. 2. Measure, mark and cut a hole in the countertop for the Fry Warmer blower pan to fit in according to the following drawing. 3.
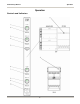
Sandwich/Fry Warmer Installation FW-15L 1. Obtain a suitable countertop location for the unit that will provide a clearance of 4” from the side louvers. 2. Cut a hole in the countertop to fit the collar weldment according to the drawing below. 3. Using a 2” hole saw, drill a hole in the countertop (under where the louvered blower box will be positioned) for the power cord to pass through. 4. Position collar weldment into the cutout area with slotted holes toward the main unit. 5.
Sandwich/Fry Warmer Installation 8. Using a 1/8” drill bit, drill holes in countertop through existing holes in the main unit and collar weldment flanges. 9. Secure main unit and collar weldment to countertop using #8 sheet metal screws. 10. Feed power cord (supplied), down through hole in countertop. 11. Reattach louvered blower box to main unit. 12. Seal main unit to the countertop to conform to NSF Standard 4, Item 4.28. (Dow Corning RTV #732 Multi purpose Sealant.) 13.
Sandwich/Fry Warmer Maintenance Maintenance Failure to comply with the maintenance below could result in a serious accident. Electrocution, equipment failure or property damage could result if an unlicensed electrician performs electrical repair. Ensure that a licensed electrician perform electrical repair. Scheduled Maintenance This unit should be cleaned at the end of each working day. Use the following procedure: Failure to remove power from this unit may cause severe electrical shock.
Sandwich/Fry Warmer Maintenance 4. Allow the equipment to cool to room temperature. 5. Remove and clean the Fry Warmer blower pan and pan insert. 6. Clean around the slotted holes at the air discharge on the blower box. 7. Clean the air intakes using a mild soap and water solution. 8. Sponge the inside and outside of the unit with a mild soap and water solution, being sure to clean all areas. Avoid getting water in the interior of the unit. 9.
Sandwich/Fry Warmer Maintenance Repair Before replacing any parts, make sure the power has been turned off and the unit has cooled down. Lamp Replacement Only use Teflon-coated lamp to prevent glass contamination. 1. Make sure power to the unit is OFF and the unit has cooled down. 2. Carefully remove the faulty lamp. 3. Replace with the new lamp.
Sandwich/Fry Warmer Notes Notes 16
Sandwich/Fry Warmer Notes 17
P.O. Box 80400, Simpsonville, S.C. 29680-0400, USA http://www.bkideas.com Made and printed in the U.S.