
Instructions / Assembly

3
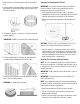
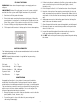
ADDITIONAL TOOLS AND SUPPLIES
• Hammer
• Flat Shovel
• Masonry String with Level
• 2 x 4 (12' long)
• Carpenter's Level
• Phillips Head Screwdriver (#2)
• Duct Tape
• Leveling Rake
• Tamper or Sod Roller
• Wooden Stake
• Utility Knife with New Blade
• Spray Paint
• Push Broom
• Clothes Pins
PREPARATION OF POOL SITE
Identifying a Good Location
WARNING: The location of the pool should never be under high
power lines or placed over, underground utilities. Contact your
utility supplier if you are unsure of the location of your electrical
service lines.
• Contact your local municipality to ensure the desired pool site is
within boundary limitations.
• Level ground is important, choosing an area that does not need
excavation is recommended.
• Do not choose an area that needs to be filled in to make level.
• Do not place the pool over a septic system.
• Do not place the pool on a soft, sandy or potentially marshy area.
• It is recommended to keep the pool from treed areas as roots can
disturb the pool structure or pierce the liner.
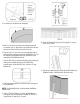
Marking and Leveling the Pool Area
IMPORTANT: Leveling the pool area is vital to the integrity of the
pool structure. The entire pool area must be level within 1". Take
the proper amount of time necessary to ensure the area is prepared
properly before any assembly of the structure takes place.
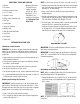
1. Drive a stake in the center of the desired area.
2. Tie a string to the stake and measure the string the length of the
radius of the pool, plus 12".
NOTE: For an 18' pool, measure 10' and for a 24' pool, measure 13'
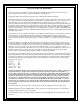
3. Hold the string tight at the measured length for the specified pool
and using spray paint, walk around the center point to draw the
pool area ("A" as shown below).
4. Using a level and a 2x4, identify the lowest point within the
marked pool area.
5. Starting at the lowest point, scrap or dig out the pool area, using
the level and 2x4 to ensure the area is flat/level. DO NOT FILL IN
THE LOW AREAS TO BRING THE GROUND TO LEVEL.
6. Ensure all grass, rocks and other debris, especially anything that
can pierce the liner is removed from the pool area.
7. Using the string and spray paint, measure the pool radius (9' for
an 18' pool and 12' for a 24' pool) and walk around the center
stake to mark the footprint of the pool ("B" as shown below).
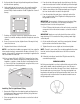
ASSEMBLING THE POOL
IMPORTANT: Prior to assembling the pool, place the sand and
pool carton inside the pool area.
IMPORTANT: Assembling and installing the pool on a day that is
above 70°F is recommended. The liner will be easier to work with
in warmer temperatures.
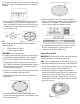
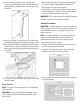
Assembling and Setting the Pool Base Rail
NOTE: While assembling the Base Rail, place the connected rails
along the painted outline of the pool footprint.
1. Connect the blue Rails (H) using Rail Clips (G) to form the base
for the wall leaving a small gap between rails of approximately
0.5"as shown.
NOTE: 18' pools will use 12 rails and 24' pools will use 16 rails
for the base
• Masonry/Sifted Sand
for Pool Floor (ask
supplier for proper
amount for 2" base)
• Optional: 8" x 8" x 2"
Patio Blocks (see
quantity in Assembling
and Setting the Pool
Base Rail)