
Instructions / Assembly

4
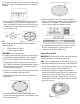
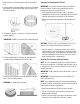
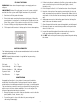
2. Once all the connections are made, seat the rail inside the metal
bracket (E) as shown. Ensure the gap left in the rail is centered in
the bracket.
3. Once all brackets are installed, adjust the Base Rail by moving
the metal brackets in and out to ensure the pool is round as
shown. The diameter of the pool must be consistent all the way
around the pool. Check the diameter of the pool using a tape
measure (Distance A = B).
OPTIONAL: 8" x 8" x 2" patio blocks can be used to provide
added support under the metal brackets that will support the
Uprights of the pool.
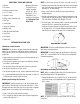
• 18' Pool will require 12 blocks
• 24' Pool will require 16 blocks
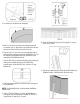
IMPORTANT When Using Patio Blocks:
• The block must be level with the ground (sunk into the ground)
and should be level from block to block to ensure the overall
pool is level. Level included side to side and front to back.
• The patio block should not protrude far into the inside of the
pool. The block should be placed to provide adequate support to
the entire metal bracket but the excess patio block should be
favored to the outside of the pool.
• A minimum of a 2" base of sifted sand should be installed inside
the pool to cover the block and protect the liner.
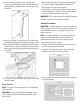
1. Temporarily layout the Base Rail and mark the location of the
Metal Brackets.
2. Dig out the marked areas where the Metal Brackets will be
positioned and install the patio blocks. Ensure the block is level
with the ground around it.
3. Check that each block is level. Level includes the individual
block is level with the ground and from side to side/front to back.
In addition, ensure each block is level to the block next to it,
using a 2x4 to span the distance between each block.
4. Once the blocks are installed and level is checked, install the
Base Rail and Metal Brackets as shown in Steps 1-3 of
Assembling and Setting the Pool Base Rail.
Installing The Pool Wall
IMPORTANT: The location of the filtration system/pool equipment
should be decided prior to moving onto the next step.
NOTE: It is recommended to place the Pool Wall (N) on a piece of
cardboard or plywood to limit the disruption of the leveled pool area.
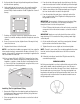
1. Remove the Pool Wall (N) from the carton and ensure the square
skimmer hole in the wall is toward the top of the wall.
2. Starting where the filtration system/pool equipment will be
located, place the end of the wall in the center of a bottom metal
bracket. This is critical to align the skimmer and return of the
pool with the filtration system. Placing the wall in the center of
the bracket will ensure the upright, when installed, will cover the
bolts of the wall seam.