
Instructions / Assembly

6
4. Use clothes pins to hold the liner temporarily.
5. Work in 3' increments, pulling the liner toward the pool wall,
ensuring the seam is staying even in the middle of the cove and
there are no wrinkles forming in the wall of the liner.
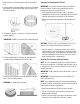
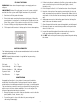
6. Once the liner is fit, start at the seam of the pool wall (next to
pool equipment location) and install the Top Wall Rails (H). This
will allow the spacing between the blue Top Wall Rails to be
covered by the Top Metal Brackets (D).
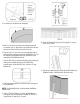
7. Insert the Rail Clips (G) and work around the pool, removing the
clothes pins and replacing them with the Top Wall Rail
connecting each section with Rail Clips, leaving a ~0.5" gap
between rails.
8. Install the Top Metal Brackets (D) over the center of the gaps in
the Top Wall Rails.
NOTE: The Top Metal Brackets should be aligned with Bottom
Metal Brackets
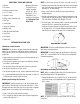
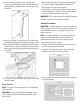
9. Install (2) Top Rails/Platforms (F) to the Top Metal Bracket
covering the seam of the pool wall using Bolt (U), Washer (T),
Spring Washer (P) and Nut (S) as shown.
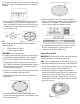
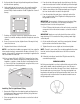
10. Connect (1) Bottom Rail Cap (I) with (1) Upright (C) using (2)
Screws (R) as shown.
11. Align the assembled Upright and Rail Cap with the Bottom and
Top Metal Brackets, covering the bolts of the wall seam.