
Instructions / Assembly
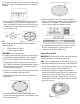
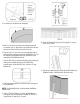

12. Prior to securing the Upright, ensure it is vertically level.
Secure the assembled Upright and Rail Cap to the Bottom and
Top Metal Brackets, covering the bolts of the wall seam, using
(6) Bolts (Q).
13. Once the first Upright is installed, secure all Top Rail/Platforms
(F), followed by the Upright and Top Rail Cap Assembly (I and C).
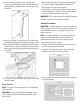
14. Once all Top Rails/Platforms and Uprights are installed, install
the Top Rail Caps (J) but first hooking the front of the cap to the
underside of the joining Top Rails and then pushing the back of
the cap down.
15. Insert (2) screws (R) in the bottom cap and tighten to secure the
two halves together.
Fitting The Liner
NOTE: This section is to ensure the pool liner is smooth on both
the floor and walls.
IMPORTANT: Ensure you do NOT have an sharp edges of your
shoes or any objects that can fall off/out of clothing that could
pierce the liner.
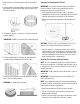
1. Walk around the perimeter of the inside of the pool and gently
push the liner toward the pool wall at the base of the liner.
2. Place a garden hose in the pool and turn it on.
3. While the hose is running, walk around the inside perimeter of
the pool and gently push the base of the liner outward, toward
the wall to smooth any wrinkles that may be left.
IMPORTANT: Do NOT pull or tug on the liner when filling with water.
4. Move to installing the skimmer and return fittings.
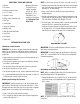
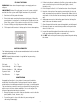
Installing The Skimmer
IMPORTANT: It is recommended to use a manual screw driver to
install the skimmer. Using a manual screwdriver will provide more
control and reduce the chances of slipping off the screw and
puncturing the liner.
NOTE: The following instructions will require one person to be
inside the pool and another on the outside of the pool. The
following can be done with a few inches of water in the pool.
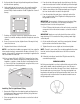
1. Remove the skimmer from its carton.
2. From the inside of the pool, gently step at the base of the liner
under the skimmer to pull the liner tight.
3. Feel for the screw holes of the skimmer under the liner and
identify the top left hole of the skimmer location.
4. Fit one of the gaskets on the skimmer plate and place them over
the skimmer opening.
7