
Instructions / Assembly

8
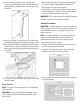
5. On the outside of the pool, align the other gasket and skimmer
with the skimmer opening .
6. Starting with the top left corner, press the screw through the
skimmer faceplate and secure it to the skimmer by using a
manual Phillips head screwdriver. Do NOT tighten the screw all
the way.
7. Continue securing the skimmer by starting with the corner
screws first and then working around the faceplate to secure the
skimmer.
8. Once all screws are in place, tighten them all the way to firmly
secure the skimmer.
9. Step back from the base of the liner/wall.
NOTE: A small wrinkle or bubble may appear in the liner, under the
skimmer when footing is removed from the base of the wall. This is
normal. As the pool fills and more pressure/weight is applied to the
liner, the wrinkle will flatten out.
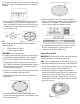
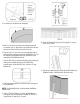
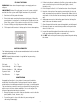
10. Using a sharp utility knife, CAREFULLY remove the liner from
the center of the skimmer, following the inside perimeter of the
faceplate as a guide as shown. Be careful not to drop the knife
as it can cut the liner. Immediately after using the knife, ensure
it is removed from inside the pool area.
Installing The Ez Light Return Fitting
1. Remove the EZlight from the carton by gently pulling back on
the battery pack, then removing the retaining nut, gasket and
washer from the EZ Return.
2. Place one gasket on the return to create a seal on the inside of
the pool wall.
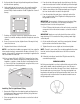
3. From the inside of the pool, gently step at the base of the liner
under the circled, return line hole in the wall to pull the liner tight.
4.
Feel for return line hole under the liner from the inside of the pool.
5. Take the return fitting of the EZlight and gently push it against
the liner into the return line hole of the pool wall.
6. From the outside of the pool, take a sharp knife and cut the
liner, using the inside of the EZlight return fitting impression
being made in the liner.
IMPORTANT: Keep constant, slight pressure on the return fitting
inside of the pool. As the hole is cut, the fitting should push
through the return line hole in the pool wall.
7. Fit the EZ Return into the center of the wall cut-out; ensure that
one gasket is left on the return to create a seal on the inside of
the pool.
IMPORTANT: Apply pressure to the front of the return until the
large retaining nut is secured to the fitting, creating a water tight
seal to the pool.
8. On the outside of the pool, install the second gasket, followed
by the washer and nut on the return fitting.
9. Tighten the nut to ensure a tight seal; do not over tighten.
NOTE: The wall is now sealed. Pressure being applied to the return
from the inside of the pool and the base of the liner can now be
removed.
10. Follow the instructions found in the EZlight manual to fully
assemble the pool light.
WARNING LABELS
No Diving warning labels must be installed at the entry point of the
pool (next to ladder or deck) and directly across from the access
point, visible from the inside of the pool. These labels should never
be removed under any circumstance. The entry warning label can
be placed on the exterior wall of the pool and the labels across the
entry point can be installed on the liner above the waterline or on
the top ledge of the pool.