
Owners manual

11. Install the driverside TorqueTube
from underneath the vehicle. Install
the TorqueTube and gasket onto the
head. Be sure the gasket is properly
aligned as the exhaust ports are not
centered. Retain the TorqueTube
with eight (8) of the supplied 8mm
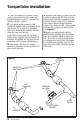
bolts. Torque bolts to 20 ft-lbs in the
sequence shown in Figure 3. Re-install
the dipstick between the 2 and 3 ports
on the head and guide it into the hole on
the block. You can use a small hammer
and a small screw driver to tap it all the
way into the hole and then re-use the
bolt that was removed in step 6 and bolt
it to the original location on the head.
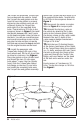
12. Install the passenger side
TorqueTube through the rear of the
front wheel-well, lift the AC dryer filter
to allow for clearance. See Figure 4.
Place the gasket on the cylinder head
and thread the two (2) rear upper
bolts about
1
⁄2-way into the cylinder
head. Slide the TorqueTube slotted
bolt flange on the two (2) rear bolts
and install the remaining bolts onto
the TorqueTube and gasket assembly.
Retain the TorqueTube with eight (8) of
the supplied 8mm bolts. Torque bolts
to 20 ft-lbs in the sequence shown in
Figure 3.
13. Reconnect the starter to engine.
Refer to Figure 2 for torque specs.
14. Reinstall the factory y-pipe to
the vehicle by attaching the y-pipe
outlet to the exhaust system, place
the factory clamp on the y-pipe outlet.
Reattach the two (2) bolts on the
y-pipe support hanger bracket and
Torque to 18 ft-lbs.
15. Bolt the two (2) floating flanges
of the factory head-pipes to the outlet
of the TorqueTubes using the supplied
3
⁄8—16 bolts, washers and nuts. Insert
the bolt up through the flange of the
y-pipe and through the Torque Tube
flange, with one washer on the head
of the bolt and a washer under the
nut.
Evenly torque
3
⁄8” hardware to 32
ft-lbs. Torque the clamps to 18 ft-lbs.
See Figure 1.
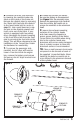
7
5
3
1
8
6
4
2
TORQUE SEQUENCE
(TORQUE TO 20 FT-LBS)
Figure 3
6 96316 v.3.0