Advanced User Manual Banks SpeedBrake For use with Palm® Tungsten™ E2 2006-2008 Chevy/GMC 6.6L (LBZ/LMM) Turbo-Diesel Pickup THIS MANUAL IS FOR USE WITH KITS 55423, 55424, 55429 & 55430 Gale Banks Engineering 546 Duggan Avenue • Azusa, ca 91702 (626) 969-9600 • Fax (626) 334-1743 Product Information & Sales: (888) 635-4565 bankspower.com ©2009 Gale Banks Engineering 09/04/09 PN 97233 v.3.
Table of Contents Section 1 . . . . . . . . . . . . . . . . . . . . . . 3 Banks SpeedBrake Function Overview Section 2 . . . . . . . . . . . . . . . . . . . . . . 9 Self Diagnostics Section 3 . . . . . . . . . . . . . . . . . . . . . 11 Checking and Clearing OBD II Diagnostic Codes Section 4 . . . . . . . . . . . . . . . . . . . . . 12 Updating Your Banks PowerPDA Software & Banks SpeedBrake Firmware 2 97233 v.3.
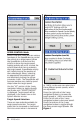
Section 1 Banks Speedbrake Function overview Figure 1 SpeedBrake PowerPDA 5-way Navigation Button Home Key Menu Key Mode Select Decrease speed in 1 MPH intervals when in Speed Control Mode or decrease Braking Strength level when in Brake Mode Center Button Startup Turn the PowerPDA on with the power button on the upper right hand corner of the PDA. Once the SpeedBrake software has been installed on the Palm Tungsten E2, the “Banks Brake” icon should appear on the Home screen of the PDA.
Figure 3 System Monitor Screen Power Vehicle Speed Operating Gear SpeedBrake braking effort Engine Temperature Transmission Temperature Speed Brake System Status SpeedBrake Mode On Screen Alert Display Brake Level/ Braking Speed PowerPDA LCD Properties SpeedBrake Modes The screen of the PowerPDA can be adjusted for brightness to accommodate the ambient light conditions as well as individual preference. From the System Menu, press the LCD Properties button (see Figure 4).
Strength Settings Foot Brake Activation While in the ON mode, there are three strength selections available; HIGH, medium (MED) and LOW. The purpose of these settings is to allow for variations in vehicle weight as well as user preference. The strength setting is displayed in the center box on the System Monitor Screen. Since the SpeedBrake is an auxiliary braking device, the user may select options that provide the best interface method for individual driving style or vehicle load conditions.
Figure 4 Figure 5 SPEED CONTROL Mode SPEED CONTROL mode will use various functions of the SpeedBrake to control the vehicle to a target speed. When the SpeedBrake is active and the vehicle is above the target speed, braking activity will occur to slow the vehicle down and then to maintain the target speed. SpeedBrake activity will include varying the position of the turbocharger vanes, selecting an appropriate transmission gear and selectively locking the torque converter clutch.
Figure 6 To change the target speed presets, from the System Monitor screen, press the center of the 5-way navigation button to access the System Menu. Press the “Speed Select” button as shown in Figure 4 to access the dialog screens. Read the text in the first screen and press “Next” to go to the second screen. Use the increase or decrease buttons to alter the values for the three speed presets as desired (See Figure 6).
To access the Foot Brake Activation selection checkbox, from the System Monitor Screen, press the center of the 5-way navigation button to access the System Menu. Press the “Foot Brake” button as shown in Figure 4. The on screen text will explain the feature. Press the “Next” button to read the remainder of the text and access the checkbox. See Figure 5. To activate the feature, press on the checkbox. Press the “Back” button once to return to the System Menu and again to return to the System Monitor screen.
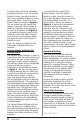
Section 2 SELF DIAGNOSTICS The SpeedBrake stores a running log of all events that affect its performance. This log may be used to identify any diagnostic concerns with the SpeedBrake. 1. Press the center button on the 5-way navigator to take you to the System Menu screen. Figure 7 2. Touch the button labeled ‘Next>’ to move to the second screen of the System Menu. 3. Next, touch the ‘Self Diagnostics’ button. See Figure 7. 4.
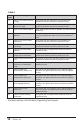
Table 1 Flash Code PDA Error Message Corrective Action- LBZ/ LMM 1.1 Code 11: VGT control input out of range Turn ignition OFF and check the 24-Pin connector. Turn ignition back ON and re-check for presence of code. 1.2 Code 12: Vane Position Sensor input out of range. Turn ignition OFF and check the 24-Pin connector. Turn ignition back ON and re-check for presence of code. 1.3 Code 13: Rear wheels slipping None required. When traction is regained, error will clear after 30 seconds. 1.
Section 3 CHECKING AND CLEARING OBD II DIAGNOSTIC Trouble CODES Diagnostic Trouble Codes (DTC) are error codes that appear when there is a problem with your vehicle. If your vehicle displays a check engine light, DTC’s will be available to assist in diagnosing the problem. You can use the PowerPDA to run a vehicle system check and display these DTC(s).
Section 4 Updating Your Banks PowerPDA Software & Banks SpeedBrake Software The Banks PowerPDA is designed such that new software updates can be easily installed. Check the BanksPower web site at for the latest version of the Banks PowerPDA software. Once you have determined that your Banks PowerPDA Should be updated, follow the instructions on the page for the appropriate software update.