
User guide
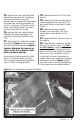


passenger side studs. The washers
should be installed in a twisting motion
to prevent tearing their sealing element.
Install the supplied
5
⁄16” flat washer on
all studs, then fasten with the supplied
5
⁄16-24 nylock nuts. The nuts should
be tightened to 12 ft-lbs (144 in-lbs).
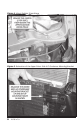
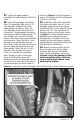
An exploded view of the High-Ram
assembly is shown in Figure 9.
42. Gently bend the engine oil dipstick
tube to it’s mounting location on
the High Ram as shown in Figure
9. Secure the dipstick tube with
the factory bolt that was previously
removed.
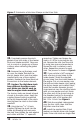
43. Remove rag that was used to
cover the boost tube opening. Make
the connection between the driver
side boost tube and the High-Ram.
Tighten all the driver side hose clamps
to 5 ft-lbs (60 in-lbs).
44. Re-install the air box and inlet
tube assembly. Secure the air box
at the radiator cross brace with
the factory nut that was previously
removed. Re-connect the Air Inlet
Temperature/ Pressure sensor at the
air box cover. Re-connect the air inlet
duct to the turbocharger inlet. Tighten
the hose clamp at the turbocharger
inlet to 8 ft-lbs (96 in-lbs).
45. Re-connect the negative battery
cables
46. Clean an area that is easily visible
on the upper radiator core support
with a non-oil based solvent, such
as Acetone, Mineral Spirits, Denatured
Alcohol or Lacquer Thinner. Allow to
dry and then attach the Banks E.O.
sticker to the upper radiator core
support.
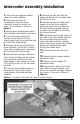
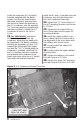
1
/
2
INTAKE HEATER
M6 NUT & M6
WASHERS (2)
M8 X 1.25 BOL
T
SAE WASHE
R
LARGER
DIAMETER
TERMINAL
GROUND STRAP
FACTORY NUTS
Figure 8. High-Ram stud installation.
96785 v.7.0 11