
User guide


15. Remove the hex head bolts that
attach the lower two A/C condenser
mounting brackets to the CAC.
Remove the torx head bolts that fasten
the lower two mounting brackets to
the A/C condenser. Discard the stock
lower mounting brackets, but retain
the torx head bolts for re-use.
16. Remove the hex head bolt that
attaches the upper passenger A/C
condenser mounting bracket to the
CAC.
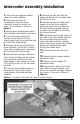
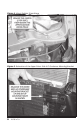
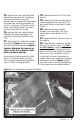
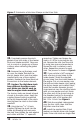
17. Swing the A/C condenser upward
as shown in Figure 4, then out away
from the vehicle as shown in Figure 5.
Caution: Minimize the amount of
stress to the A/C condenser fluid
lines to prevent damage.
An assistant could be helpful to hold
the A/C condenser while the stock
CAC is being removed and the Banks
Techni-Cooler is being installed.
18. Remove the stock CAC from the
vehicle.
19. Remove the lower saddle mount
rubber bushings from the stock CAC
and install them on the Banks Techni-
Cooler.
20. Remove the upper rubber
isolators from the stock CAC and
install them on the Banks Techni-
Cooler.
21. Install the Banks Techni-Cooler in
the vehicle.
22. Place the A/C condenser back in
front of the Techni-Cooler. For 2003
to 2005 models, Install the
5
⁄16”
bolts and washers supplied with the
Banks Techni-Cooler system to fasten
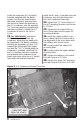
the top two A/C condenser mounts
to the Techni-Cooler. Relocate the
upper driver side condenser mounting
bracket as shown in Figure 3. Keep
the bolts loose to aid in the alignment
of the lower two mounting brackets.
Figure 4. A/C Condenser Removal Procedure
96785 v.7.0 7