
User guide

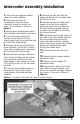
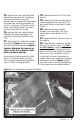

Install the lower two A/C mounting
brackets supplied with the Banks
system. Use the torx head screws
that were previously removed from
the vehicle to fasten the brackets to
the A/C condenser. Use the supplied
5
⁄16” bolts and washers supplied with
the Banks system to fasten the A/C
condenser mounts to the Techni-
Cooler.
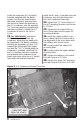
23. For 2006 Models, remove all
of the factory brackets from the
condenser, retain the torx head bolts
for reassembly. The Banks condenser
brackets are stamped such that “R.U.”
means Right (Passenger Side) Upper
and that the “R.U.” is visible when the
condenser is installed. Install the R.U.
and L.U. brackets onto the condenser
and assemble the condenser to the
banks intercooler using the
5
⁄16” button
head bolts and washers provided.
Install the R.L and L.L brackets onto the
condenser such that the intercooler
boss and condenser holes align.
24. Tighten the
5
⁄16” bolts at each of
the A/C mounting brackets and torque
to 19 ft-lbs.
25. Tighten the torx head bolts on
both of the lower and the upper A/C
mounting brackets.
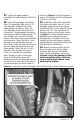
26. Install the upper radiator cross
brace. Leave the bolts loose to aid in
the alignment of the cross brace with
the radiator and Techni-Cooler.
27. Loosely install the upper CAC
mounting bolts.
28. Loosely install the upper radiator
mounting bolts.
29. Tighten the radiator cross brace
bolts and torque to 21 ft-lbs
30. Tighten the upper CAC mounting
bolts and torque to 8 ft-lbs (96 in-lbs).
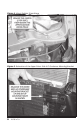
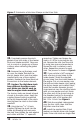
Figure 5. A/C Condenser Removal Procedure
8 96785 v.7.0