
User guide


96414 v.1.0 3
Note: Due to normal manufacturing
processes you may have “flashing”
(small fibers of plastic) around the pod
holes. Once the gauge(s) are installed
in the pod you will not be able to see
the flashing.
This mount is designed to hold gauges
with a press or friction fit. To allow you
flexibility in the positioning of your
gauges, all of the holes are cut to the
same size. Oil temperature gauges and
boost gauges should fit into this
mount with no modification. However,
pyrometer gauges and tachometers
have slightly larger cases and
therefore require the holes to be
slightly enlarged. Identify the hole that
you wish to use for the pyrometer or
tachometer. Using medium grit
sandpaper, a round file or a deburring
tool, SLOWLY enlarge the hole. BE
CAREFUL AND CHECK FIT OFTEN. The
plastic material is easily removed. We
recommend that you sand slightly and
then check the fit, repeating the
process until you have a desired fit. If
you make the hole too large, the gauge
may vibrate out. As a guide, you want
the pyrometer and tachometer to fit
the way the boost and oil temperature
gauges fit the factory-size holes.
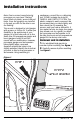
Removal and Installation
1.
Pry windshield side garnish to
remove A-pillar moulding. See
figure 1.
2. Carefully remove A-pillar moulding.
See
figure 1.
Installation Instructions
Figure 1