
Installation manual
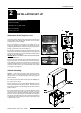
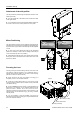
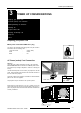
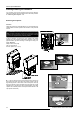


Table Of Contents

3-4 5975968A RETRO DATA 2100LC 130298
Power Up Considerations
a The hand tightable projector bracket locking screws must be
undone before the projector can be rotated to the horizontal exit
position, it may be necessary to loosen the locking nuts slightly to
facilitate untightening the bracket locking screws.
The support cross bar at the rear and its attached support cross
plate must also be removed by removing their fixing screws.
b Access will be available to remove the projector either from the
front or the back dependant on the direction of rotation.
Note: Extra care must be observed not to damage or scratch the
projector lens during the rotating process.
b. When the leftside panel is completely removed the projector
leftside bracket locking screw is visible. Again a mental note of
this screws position should be made as it requires undoing in stage
.
The two (rightside a & leftside b) bracket locking screws
must be hand untightened to release the projector from its locked
position. Once this is done the projector must be rotated on its
attached brackets from its now operating position to the horizontal
slide out position either in the clockwise (b) or counter clockwise
directions, dependant on front or rear removal, remember it is still
necessary to remove the right audio speaker if choosing to remove
from the front side. Exercise caution during this procedure as the
projector requires to be nudged slightly (just a couple of inches, but
ensure the brackets are never in danger of leaving the slide rails)
backwards or forwards to facilitate rotating and avoiding obstruc-
tions to the lens. The projector can now be pulled out and lifted clear
of the cabinet.
LEFTSIDE
BRACKET LOCKING
SCREW
b
LOCKING
NUT
RIGHTSIDE
BRACKET LOCKING
SCREW
RIGHTSIDE
BRACKET LOCKING
SCREW
a
b
OUT
OUT
Ü
Û
A B C
ABC
SUPPORT
BAR FIXING
SCREWS
SUPPORT
PLATE FIXING
SCREWS