
Installation manual
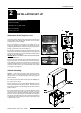
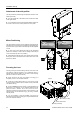
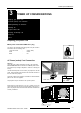
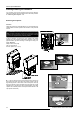


Table Of Contents

3-5
5975968A RETRO DATA 2100LC 130298
Power Up Considerations
The projector can be removed from the rear (rear slide out
position) by pulling and gripping firmly until it is fully out. Gently place
the projector on a solid stable surface.
Warning: Projector is heavy.
The projector can be removed from the front (front slide out
position) by pulling and gripping firmly until it is fully out. Gently place
the projector on a solid stable surface.
Warning: Projector is heavy.
PROJECTOR
REMOVAL POSITION
FROM REAR
ê
PROJECTOR
REMOVAL POSITION
FROM FRONT
ê
Remove the leftside (when facing the lens) fixing bracket of
the projector by unscrewing its two fixing bolts.
Remove the top cover by loosening or undoing its fixing screws as
indicated above. Then slide the cover backwards slightly and lift off,
the internal structure will be now visible.
Place the projector on a stable solid surface in preparation for
altering its password strap plug. All the fixing screws for the top
cover are indicated and are required to be removed or loosened in
step .
PROJECTOR
TOP COVER
SCREWS
PROJECTOR
TOP
COVER
PROJECTOR
FIXING
BRACKET
PROJECTOR
FIXING BRACKET
SCREWS
PROJECTOR
TOP
COVER
How to Enable or Disable the Password
The password function is enabled/disabled when the password
strap plug on the controller circuit board module is installed in the
specified way. To get access to the controller circuit board module,
proceed as follows;