
Installation manual
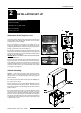
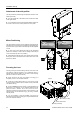
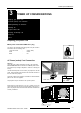
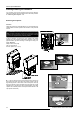


Table Of Contents

3-6 5975968A RETRO DATA 2100LC 130298
Power Up Considerations
It is necessary to remove the metal cover plate behind which the
password strap plug sits. To achieve this remove the four fixing
screws and carefully lift clear the cover plate. The password strap
on the controller circuit board module will now be visible.
METAL
COVER
PLATE
How to Change the Password Menu
b. When the password strap plug is inserted into the left pin and
the middle pin the password function is disabled.
a. When the password strap is inserted into the right pin and the
middle pin the password function is enabled.
Once the password strap plug position has been chosen it is
necessary to secure the projector. Follow the instructions in reverse
order to reassemble the projector.
It is required to enter into the Service mode (refer to the Owners
manual for exact procedural steps.)
The strap plug can be seen approximately half way down on the
left side of the circuit board. To change its position just unplug by
pulling it out of its pins. The choice of password function is a user
definable decision !
PASSWORD
STRAP
PLUG-ENABLE
PASSWORD
STRAP
PLUG-DISABLE
a
b
PASSWORD
STRAP
PLUG
CONTROLLER
CIRCUIT BOARD
MODULE
Note : When rotating the projector back to its operational (in the lower
cabinet) position you should hear a spring loaded
'click' as the
projector bracket engages with the slide rail in the correct position.
It will now be correctly positioned for the bracket locking screws to
be tightened at both sides of the projector.
Select with or
then <ENTER>
<EXIT> to return.
ADJUSTMENT MODE
Select a path from below :
GUIDED
RANDOM ACCESS
INSTALLATION
SERVICE
Source 01
First enter into the Adjustment Mode. Then press the control disc
forwards or backward (on the RCU) to highlight Service and then
press ENTER.
Some items in the Service mode are password protected (when the
password function is active.) Enter your password to continue. All
other password protected items are now also freely available if you
enter into the adjustment mode.
Select with or
then <ENTER>
<EXIT> to return.
SERVICE
IDENTIFICATION
CHANGE PASSWORD
CHANGE PROJ. ADDRESS
CHANGE BAUDRATE PC
RESET LAMP RUN TIME
LAMP RUN TIME HISTORY
PRESET INPUT BALANCE
MORE ...