
Installation manual
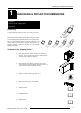
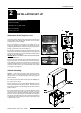
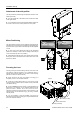
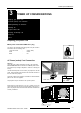
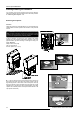

Table Of Contents

3-1
5975968A RETRO DATA 2100LC 130298
Power Up Considerations
POWER UP CONSIDERATIONS
AC Power (mains) Cord Connection
Warning !
Verify the power voltage corresponds to that of the wall outlet.
Art. No. R9001309 must be connected to a 120V AC power source.
The projector input voltage is adjusted to 120V AC on leaving the
factory
Use the delivered power cord to connect your projector to the wall
outlet. Plug the female power connector into the male connector at
the rear of the retro projector.
The power voltage for the projector is indicated on the identification
plate on the rear of the projector.
This projector may be connected to an IT-power system.
Preparing your power cord
Mains power cord with an ANSI 73.11 plug
The wires of the delivered mains lead (power cord) are colored in
accordance with the following code :
Yellow and Green : ground (earth)
White : neutral
Black : live
POWER / M
A
Power cord connection
ART N
o
-R9001309
V -120V
I -10Amp
Freq -60Hz
Ensure that the power switch is in the 'on-1' position on the rear
control panel and also ensure the internal mains power plug is in
place. The projector will not activate unless these two conditions are
correctly undertaken.
h ard wire remote
Internal mains connection
permanently connected
Internal power switch always to be
positioned in the
’1’
(
ON
)
state
3
Preparing your power cord
AC Power (mains) cord connection
Enabling/Disabling the Password
Switching On
Projector Status LED
Switching To Stand-By / Off
Lamp Life
Fuses