EN Instructions for Installation, Use and Maintenance COD.: 3000E Ed.
Thank you for choosing our appliance. The installation, use and maintenance instructions given in this manual have been prepared to ensure the long life and correct operation of your appliance. Follow these instructions carefully. We have designed and manufactured this appliance according to the latest technological developments. Now, it is in your care. Your satisfaction is our greatest reward.
TRANSLATION OF THE ORIGINAL INSTRUCTIONS EN SUMMARY Page IMPORTANT INFORMATION 22 INSTALLER SECTION 1. MACHINE INSTALLATION 25 1.1 Receipt of the appliance 25 1.2 Water connection 25 1.3 Electrical connection 25 1.4 Temperature adjustment 26 1.5 Rinse aid dispenser operation 26 2. DETERGENT DISPENSER INSTALLATION 28 2.1 Electrical connection 28 2.2 Water connection 28 2.3 Dispensing the detergent 28 3. PUMP TECHNICAL DATA AND INFORMATION 29 3.1 Emptying pump (optional) 29 3.
EN INSTRUCTIONS This instruction booklet must be kept with the dishwasher for future consultation. If the dishwasher is sold or transferred to another user, make sure the booklet always goes with the appliance so that the new owner can have the necessary information on operation and the relative instructions. The instruction booklet must be carefully read before installation and first use of the dishwasher.
EN · · · · Do not use water to put out fires on electrical parts. Do not clog the intake or dissipation grids. Only qualified personnel can access the control panel after power is switched off. The machine has an IPX3 rating of protection against accidental splashes of water. It is not protected against pressurized jets of water, so it is recommended that pressure cleaning systems not be used. CAUTION: WAIT 10 MINUTES AFTER THE APPLIANCE HAS BEEN TURNED OFF BEFORE CLEANING THE INSIDE.
EN INSTALLER SECTION ATTENTION: At the end of installation make sure to remove the parts of this booklet relevant to the installer, for future consultation. 1. MACHINE INSTALLATION 1.1 Receipt of the appliance After removing the packing, ensure that the appliance has not been damaged in transport. If it has, inform the retailer. If safety has been compromised, do not install the machine. For disposal of the packing, see ch.8. 1.
EN INSTALLER SECTION Feed cable: the retailer - importer - installer must ensure that the feed cable complies with the cable insulation category of the workplace, in conformity with current Technical Standards. 1.4 Temperature adjustment If necessary, the water temperature of the wash and rinse cycles can be adjusted by means of the fine-adjustment screws on the respective thermostats. The recommended temperatures are 55°C for the wash cycle (tub) and 85 - 90°C for the rinse cycle (boiler).
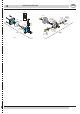
EN INSTALLER SECTION 10805 12506 10808 10705/O 10705/N 10705/M 10807 10805 10705/R 10705/C 10705/E 10805 10806 10799 10705/T 10705/D 10705/D 10705/C 10705/G 10799/G pict.
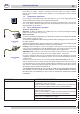
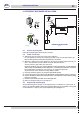
EN INSTALLER SECTION 2. DETERGENT DISPENSER INSTALLATION SEKO C Ø 10 Point B min 3 cm 15108/E B GERMAC A Ø8 pict. 6 2.1 15185 CONNECTION DIAGRAM pict. 5 Electrical connection Follow the wiring diagram attached to the machine. 2.2 Water connection a) A Ø12 hole must be made on the back of the appliance. In some appliances the hole has already been made and is closed with a plastic cap. Remove the cap from the hole and fit the delivery connection.
EN INSTALLER SECTION 3. TECHNICAL DATA AND USEFUL INFORMATION ON PUMPS 3.1 Emptying pump (optional) MAX 0,8m How installing, pay particular attention to the position of the emptying tube (see pict. 7). See chapter 5.3. for operations description. pict. 7 CAUTION: INCORRECT POSITIONING OF THE TUBE. CAUTION: CORRECT POSITIONING OF THE TUBE 3.2 Pressure increasing pump (optional) When the dishwasher has not been used for some time, check that the supplementary pressure increasing pump turns freely.
EN INSTALLER SECTION 3.3 Dataplate Code DW 999XXYYYY Model DESCRIPTION S/N DW A 1015770 400V 3N 3500W IPX3 50HZ CL/Part Type ..........
EN USER SECTION 4. CONTROL PANEL AND RELATIVE SYMBOLS CONTROLS INDICATORS Main switch 0-1 a Power on indicator Tub full indicator Cycle START button b Cooling glasses button (optional) c Washing cycle indicator Regeneration START button (optional) d Regeneration cycle indicator Manual empty button (optional) e Temperature indicator Wash type selector (if provided) 5. OPERATION • • • • • • A B pict. 9 • • • A B pict.
EN USER SECTION T G ER T 5.2 Use of rinse aid The machine is equipped with a rinse aid dispenser. The machine automatically draws the product. The amount dispensed can be regulated by operating the fine-adjustment screw on the dispenser. Reduce the amount by turning the screw clockwise, increase by turning it anticlockwise. The recommended amount is 2-5 cm of product measured on the suction tube. 1 cm of the product drawn into the tube is equal to about 0.13g.
USER SECTION EN In the case of water hardness above 35°f it is advisable to install an external water softener. 5.5 • • • • • • • Compliance with hygiene regulations and H.A.C.C.P. The machines are equipped with a temperature indicator (e - chap. 4) which lights up when the boiler and the tub have reached the preset temperature (values set by the manufacturer). It is recommended to wait for this light to go on before starting the next cycle.
EN USER SECTION 6. MAINTENANCE 6.1 Regular Maintenance WARNING: The machine is not protected against water jets, therefore do not use pressure cleaning systems. Contact your cleaning products retailer for detailed instructions on the methods and products to use for periodic sanitizing of your appliance. DO NOT use bleach or chlorine-based detergents for cleaning the appliance.
USER SECTION EN 8. ENVIRONMENTAL FEATURES 8.1 Packing The packing consists of the following: • a wood pallet; • a nylon bag (LDPE); • multi-layered cardboard; • polyurethane foam (PS); • polypropylene support (PP). We kindly advise you to dispose of the above-mentioned material in accordance with current environmental regulations. 8.2 Disposal The use of the WEEE Symbol indicates that this product may not be treated as householdwaste.
EN USER SECTION 10.