
Operation Manual


EN
page 31
USER SECTION
4. CONTROL PANEL AND RELATIVE SYMBOLS
5. OPERATION
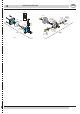
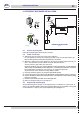
• Check that the lter (B) is correctly tted in its seat (pict. 9-10).
The lter must be cleaned after every 20 wash cycles and whenever necessary.
DO NOT use the appliance without the lter.
• Insert the overow tube (A) in the special seat inside the tub (pict. 9-10)
• Close the dishwasher door.
• Insert the special rinse aid dispenser tube in the liquid container and check that the
quantity of additive is sufcient for daily use (see chap. 5.2 "Use of rinse aid").
• Open the water tap and plug in the main switch.
• Turn switch 0-1 1(see chap. 4) to position 1 (pressed).
The operation is signalled by the switch indicator lighting up or by the indicator with the
symbol (a) (see chap. 4).
The machine will automatically ll the tub with water; (indicator (b) - see chap. 4 - when
present will turn on, indicating the tub is full) then the heating phase begins.
Indicator (e) (see chap. 4) comes on when the water temperature is reached.
• Insert the rack lled with dishes to wash.
The plates must be correctly placed in the rack (see pict. 11).
• On machines with selector 6 (see chap. 4), select the wash cycle required.
• Before starting the wash-cycle, in absence of an automatic dosing system, pour the
detergent in the wash-tank.
When the temperature indicator (e) will turn on, press the START 2 button (see chapter
4) for at least a second. The beginning of the cycle is indicated either by the light on the
button itself or on the (c) lamp.
At the end of the washing cycle, a hot rinse cycle will take place.
The indicator light of the START button 2 or the (c) lamp (see chap. 4) will turn off when
the cycle has nished.
At cycle end with the door closed, dishes do not get dried. Take out the baset or keep
the door open to allow the evaporation and the drying of the dishes.
To carry out a cooling glasses cycle, on appliances equipped with this option, press button 3
(see chap. 4) and hold it down for the desired length of time after the indicator light C goes
off. After this cycle, the glasses remain wet.
• The appliance is now ready for a new wash.
• At the end of the day, clean the machine (see chap. 6 "Maintenance").
• Turn off the machine and the water tap.
• Turn off the main wall switch.
CONTROLS
Cycle START button
Main switch 0-1
Cooling glasses button
(optional)
Manual empty button
(optional)
Wash type selector
(if provided)
Regeneration START
button (optional)
INDICATORS
Tub full indicator
Power on indicator
Washing cycle
indicator
Temperature
indicator
Regeneration cycle
indicator
a
b
c
d
e
B
A
B
A
pict. 10
pict. 11
pict. 9