
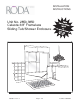
Installation Guide

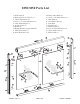

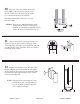

SHOWER HEAD LEFT SHOWER HEAD RIGHT
EXTERIOR
1 The 2850/3850 Celesta sliding enclosure
is supplied with pocketed wall jambs [A]. The
jambs are notched on both ends to fit over the
bottom track. It is important to determine the proper
orientation of the unit before marking and drilling
the walls. For maximum waterproofing, position
the “open” pocket of the wall jamb to the interior
for the shower head wall. This will force the interior
panel to be on the shower head side. (see illustration)
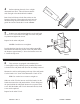
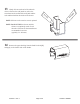
2 Measure the wall-to-wall opening along the
center of the threshold at the bottom. Cut the bottom
track (w/ vinyl silencer) [B] 1/16” short of that
dimension.
Position the bottom track in the center of the threshold
with the raised edge to the exterior. It may be necessary
to file a radius on the ends of the track and wall jambs
to match the corners of the opening.
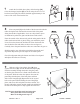
3 Place one wall jamb over the track and against
the wall. Using a level, plumb the wall jamb and mark the
hole locations on the wall with a pencil. Repeat this step
for the other wall jamb. (Be sure that the curb does not move)
Mark along both inside and outside of the track.
Remove all parts and drill the holes.
Tile, marble or solid surface walls:
Drill 3/16” diameter holes into the walls and insert the
plastic wall anchors [C].
Fiberglass or acrylic units can be done two different ways:
If the walls are not reinforced, drill 3/16” diameter holes
and insert the plastic wall anchors. (Toggle bolts may
be used instead but they are not provided).
If the walls are reinforced, only drill 1/8” diameter holes.
QCI0017 Rev. 2 Page 4 of 8 Certified 09/08/09