
Installation Guide


Interior
SILICONE
QCI0017 Rev. 2 Page 5 of 8 Certified 09/08/09
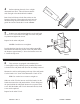
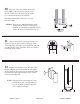
4 Before replacing the track, force a slight
downward bow into it. This will ensure that the
track fits tight to the threshold in the middle.
Run a bead of silicone on both flat surfaces on the
bottom of the track. Then replace the track onto the
threshold using the pencil marks from step #3 as a
guide. Be sure the raised side is on the exterior.
5 Replace one wall jamb and attach it to the wall with
the #8 x 1 1/2” truss head screws [D]. Check the wall jamb
for plumb and tighten the screws.
Repeat for the other wall jamb.
NOTE: Careful not to overtighten.
Peel the backing from four of the clear jamb bumpers [E]
and attach them inside the pockets of the wall jambs. Place
the bumpers approximately 1” above the bottom screw and
1” below the top screw
.
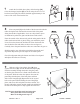
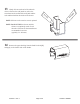
6 This enclosure is equipped with molded nylon
T-Locks [F] for safety. When properly installed, the header
is locked to the wall jambs and cannot be accidently removed.
Measure the wall-to-wall opening at the top of the wall jambs.
Cut the header 1/16” short of that dimension. Check for fit.
TIP: Use a miter box to ensure a straight cut
Slide one of the T-Locks into one end of the header. Set the
header down onto the wall jamb with the T-Lock fitting into
the space behind the wall jamb. Remove the top truss head
screw. Pull the header and T-Lock down until the truss head
screw can be replaced.
Repeat for the other T
-Lock.