
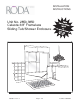
Installation Guide

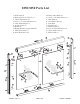


EXTERIOR
EXTERIOR
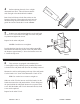
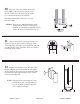
7 Attach the four black heavy-duty roller bearings [M]
to the door hanger brackets [H] as shown using the #8-32 x 3/8”
hex head screws [N]. The rollers should be approximately in the
center of the slots of the bracket fins.
8 Place one panel [J] on the inside of the shower/tub with the
rollers facing the back wall and the textured side of the panel
facing the outside (if applicable). Set it on a drop cloth or piece
of cardboard to protect the glass and the shower/tub surface.
From the outside of the shower/tub, grab the other panel with the
rollers (and textured side of glass) facing you and lift the panel.
Lower it into the shower/tub and then lift it into the header. Be
sure the bracket fins and rollers are above the track groove.
Carefully lower the panel until the rollers are seated into the groove.
Slide the panel to one side and step inside the shower/tub and
step inside. Repeat the previous steps for the inside panel.
Check for alignment along the bottom and sides of each panel
and adjust the rollers as necessary.
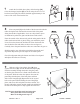
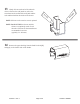
9 Slide one of the clear plastic discs [R], then
a glass hole sleeve [K] onto the threaded back plate [P].
Push the assembly through the hole in the glass panel
so that the glass hole sleeve is flush with the other side
of the panel. Slide the other clear plastic disc onto the
protruding threaded part of the back plate, and then
slide on the front plate [S]. Repeat this for the second
hole on the panel. While holding the towel bar [U] in
place, and screw the back plates into the towel bar. Use
the provided Allen wrench and the small hole drilled into
the side of the back plate to fully tighten the towel bars.
NOTE: Outer panel has towel bar facing Out.
Inner panel has towel bar facing In.
Refer to the diagram in step #1.
U
S
R
P
R
K
QCI0017 Rev. 2 Page 6 of 8 Certified 09/08/09