
Installation Instructions
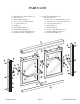


WALL
JAMB
NYLON
SPACER
1 1/2” TRUSS
HEAD SCREW
HEADER
WALL
JAMB
ROLLER
BEARING
3/8” HEX
HEAD SCREW
ROUGH
SURFACE
ROUGH
SURFACE
ROLLER
BEARING
EXTERIOR
GLAZED
DOOR PANEL
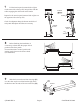
4 Replace one wall jamb and attach it to the wall
with two #8 x 1 1/2” truss head screws [D] inserted into
the top and bottom holes.
Slip a nylon spacer [E] over a #8 x 1 1/2” truss head screw
and insert it into the center hole of the wall jamb. Double
check wall jamb for plumb and tighten the screws.
NOTE: Do not overtighten the screws.
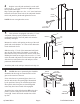
5 This enclosure is equipped with safety “T” lock
wall jambs. When properly installed, the header is
permanently locked to the wall jambs and cannot be
accidently dislodged.
Measure the wall to wall opening at the top of the wall
jambs and cut the header 1/16” short of this dimension.
Check the header for fit.
Slide the safety “T” lock of the unmounted wall jamb
into the end of the header. The header is reversible so
that either face may be turned to the exterior of the unit.
Holding the header at an angle, slide it over the “T” lock
of the mounted wall jamb. Pivot the header into place and
slide the loose wall jamb to the wall and press it into
position on the bottom track.
Attach the jamb to the wall per instructions in Step #4.
6 NOTE: Obscure or patterned glass should be
installed with the rough or textured surface of the
glass to the exterior of the unit.
Units with obscure or patterned glass, there is an
interior and exterior door panel [G] as determined
by the position of the top fin with the angled slots.
Door panels with clear glass are interchangeable
unless they have been treated with Aquaglide.
Attach the four nylon roller bearings [H] to the door
panels, as shown, using the #8-32 x 3/8” hex head
screws [J]. Center them in the outside slots of the
top fins.
QCI5023 REV. 0
Page 5
Certified 06/22/2016