
Installation Guide

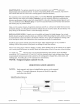


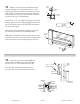

4 Wipe the shower walls, sill, curb & wall jambs
with a clean, dry cloth to remove any dust or debris. Apply
a 1/4” bead of silicone along the inside of the pencil
lines that were marked in Step #2. Carefully place the curb
on the sill, over top the silicone, in the position marked.
BE SURE THE WEEP HOLES FACE THE INTERIOR.
Silicone the inside of the curb at both ends where it meets
the wall. TIP: Angle the tip so that silicone fills under the
two “legs” in the curb that the wall jambs sit on.
Replace both wall jambs and attach them to the walls with
the six #8 x 1 1 /2” truss head screws [C].
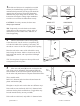
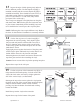
5 Place two setting blocks [E] into the curb, flat
side up, to support the stationary glass panel [F]. Position
the blocks to be 3” from each corner of the glass panel.
Set the glass panel in the curb on the setting blocks and slide
into the wall jamb approximately 1/2”. A piece of tape
positioned 1/2” from each vertical edge will help placement.
NOTE: Patterned glass panels should be installed with the
rough or patterned surface on the exterior of the enclosure.
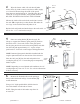
Place the 180º post [G] into the curb and position it to
overlap the glass by 1/2”. Use masking tape to temporarily
hold it in place.
NOTE: Depending on out-of-plumb wall conditions, the 1/2”
overlap might vary from 1/4” to 3/4”. Use a level to determine
if this is necessary.
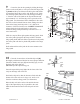
6 Measure the finished wall-to-wall opening at
the top where the header will go. Cut the header [H]
to that dimension.
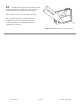
Using a 3/16” high speed drill bit, drill the interior
face of the header on both ends as shown.
NOTE: Filing the ends of the header may allow for
an easier fit.
#8 X 1/2”
SCREW
WALL
JAMB
WALL
SILICONE
SILICONE
WEEP
HOLE
CURB
INTERIOR
WALL
JAMB
1/2”
1/2”
GLASS
PANEL
180˚
POST
SETTING
BLOCK
CURB
GLASS
PANEL
MEASURE AT TOP
OF WALL JAMBS
HEADER
3/16” DIA.
3/8”
1/4”
INTERIOR
PIECES OF TAPE
SETTING
BLOCKS
GLASS PANEL
QCI5230 Rev 0 Page 5 Certified 06/20/2016