
Installation Guide


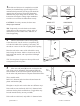

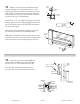

7 Slide the header over the wall jambs and 180˚
post. Plumb the 180˚ post, making sure to maintain the
proper coverage over the glass panel of 1/4” to 3/4” as
described in Step # 5. Mark its’ location on the header
and curb with a light pencil mark or a piece of tape.
Measure the door panel width. (see illustration)
Measure the horizontal door opening (between the
wall jamb and the 180˚ post) at the top, middle and
bottom of the opening.
The minimum horizontal dimension of the door
opening is the door panel width plus 1/2”.
The maximum horizontal dimension of the door
opening is the door panel width plus 1 1/4”.
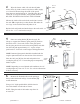
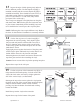
Using the two holes in the interior face of the header as
a guide, drill a 1/8” hole into each wall jamb.
TIP: Slide the glass panel out of the wall jamb before
drilling to prevent damaging the panel.
Drill a 1/8” hole through the header and curb into the
180˚ post, on the open side of the post, not the glass side.
Remove the header and enlarge the 1/8” hole to 3/16”
to allow clearance for the screw. Enlarge the hole in the
curb as well. (Careful not to enlarge the holes in the post).
Replace the header and secure it to the wall jambs and
secure the 180° post to the header and curb using four
#8 x 1/4” truss head screws [L].
Hinge
Jamb
Vinyl
Sleeve
Hinge
Rail
Vinyl
Glass
Door Panel Width
8 Slide the strike jamb [I] over the 180° post
or the wall jamb, depending on hinge orientation.
Use a piece of tape to temporarily hold in place.
Orient the door to the opening (either hinge right or
hinge left). Grab the door from the inside (the open
side of the hinge jamb should be away from you).
Carefully lift the door [J] into the opening and slide the
hinge jamb over the available wall jamb or 180° post.
Holding the door in the open position, press the snap-in
fillers [K] into the header and the curb, WITH THE
RAISED LIP TO THE EXTERIOR. (see illustration)
3/8”
1/4”
1/4”
OPENING
#8 x 1/4”
SCREW
OPENING
SNAP-IN
FILLERS
EXTERIOR
Strike
Rail
HEADER
CURB
QCI5230 Rev 0 Page 6 Certified 06/20/2016