
Installation Guide


#6-32 x 1 1/4”
HANDLE SCREWS
INTERIOR
HANDLE
DOOR
STRIKE
RAIL
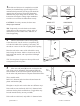
INTERIOR
HANDLE
EXTERIOR
HANDLE
EXTERIOR
HANDLE
MAGNETIC
VINYL
STRIKE
JAMB
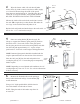
1/8”
TAPERED
DRIP VINYL
3/8”
1/8”
DRIP
RAIL
TAPERED
VINYL
#6 x 3/8”
SCREW
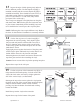
11 Hold the drip rail in place and adjust the drip
vinyl by sliding it left or right until it there is a 1/16”
gap between the bottom of the vinyl and the top of the
snap-in-filler. Trim the vinyl flush with the hinge side
of the rail and 3/8” longer on the strike side. Notch the
top of the drip vinyl. (see illustration)
Install the #6 x 3/8” screw [P] into the hinge side of the
drip rail. Seperate the two drip plugs [Q] and install the
correct one into the strike side of the drip rail. Discard
the other unused plug.
Peel off the tape backing and carefully press the drip
rail assembly to the door in the marked position.
TIP: Place a small bead of silicone along the top of the
drip rail between the rail and door frame to help prevent
water and cleaners from loosening the tape over time.
1/16”
CURB
SNAP IN
FILLER
DRIP
PLUGS
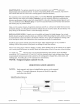
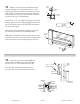
12 Attach the interior door handle [R] and
exterior door handle [S] to the door panel with
the two #6-32 x 1 1/4” round head screws [T].
Close the door and check the clearance with
the strike jamb. Loosen and adjust if necessary.
QCI5230 Rev 0 Page 8 Certified 06/20/2016