
Installation Guide
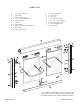


EXTERIOR
WALL
JAMB
TUB
TRACK
KLUAC
TUB
TRACK
LEVEL
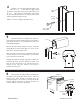
Measure the wall-to-wall opening at the center
of the tub rim. Cut the tub track [A] 1/16” short of this
dimension. An inexpensive miter box available at your
local hardware store will help you get clean square
cuts.
Position the tub track in the center of the tub rim with
the t all leg to the exterior. It may be necessary to file a
radius on the ends of the tub track and wall jambs to
match the corners of the tub.
Press both wall jambs [B] into position over the tub
track. Masking tape can be used to hold the parts in
place temporarily.
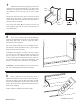
1
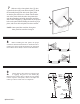
Use a level to plumb both wall jambs [B], then
mark the pre-drilled hole locations on the wall. Lightly
mark along both sides of the tub track [A] with a
pencil, then remove all parts.
For tile or marble walls, drill six 1/4” diameter holes
and insert the plastic wall anchors [C]. A center punch
helps locate the holes accurately.
Attachments to fiberglass or acrylic units can be made
in two ways. If a reinforcement is built into the wall of
the unit, drill six 1/8” diameter holes and install the
screws directly into the reinforce
ment. If the walls are
not reinforced, drill 1/4” holes and install plastic wall
anchors or molly bolts (molly bolts not supplied).
CAUTION: The t rack should never be screwed to the
tub. This will damage the tub a nd cause leakage.
2
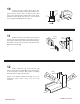
Before replacing the tub track [A], force a
slight downward bow in the extrusion. This will ensure
the track fits tight to the tub. Run two beads of caulk
inside the penciled marks on the tub rim. Place the tub
track in the exact position marked in Step #2 and seat it
firmly in the caulking.
NOTE: Improper caulking will result in leaks.
3
QCI5022 REV. 2
Certified 12/15/16