
Installation & Assembly_1


QCI0028 Rev. 2 Page 10 of 10 Certified 06/05/09
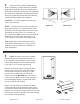
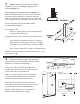
STEP 1 Using the provided Allen wrench, loosen the two set screws located on the under side of one
of the handles near the washers. Seperate the handle from the stud screws and collars.
STEP 2 Using a Phillips-head screwdriver, loosen and carefully remove the stud screws, collars, clear
discs and glass hole sleeve from the other handle.
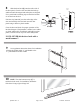
STEP 3 Remove the interior metal washer, large and small clear disc from the stud screw, leaving the
exterior washer, clear discs and hole sleeve on the stud screw with the collar. Careful not to
lose any of the pieces.
STEP 4 From the outside of the door, push the stud screw with collar through the hole in the glass. Be
sure the hole sleeve is between the threads of the screw and the glass.
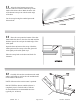
STEP 5 From the inside of the door, slide the large clear disc onto the screw. Next, slide the metal
washer then the small clear disc over the screw. Finally, thread the screw into the interior
handle (the one with the smaller threaded holes). Don’t tighten. Install the other stud screw
with collar and washers through the other handle hole in the glass. After both stud screws are
threaded into the interior handle, hold in position and tighten the stud screws with a Phillips-
head screwdriver pulling the interior handle tight to the glass.
STEP 6 From the outside of the door, position the exterior handle over the collars of both stud screws
and tighten the set screws with the Allen wrench.
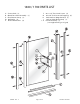
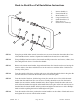
J Interior handle (1)
K Exterior handle (1)
L Metal washers (4)
M Large clear discs (4)
N Small clear discs (4)
O Hole sleeve (2)
P Stud screw w/ collar (2)
J
K
L
M
N
O
P
L
M
N
Back-to-Back Door Pull Installation Instructions