
Installation Guide


PIVOT-RIGHT
(HINGE-RIGHT)
PIVOT-LEFT
(HINGE-LEFT)
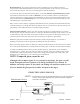
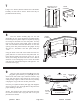
The BASCO 160 Quick-N-Stall Shower
Enclosure is completely reversible and may be installed
pivot-left or pivot-right. For maximum waterproofing, the
pivot jamb should be opposite the shower head. Using the
diagram, determine the correct position for the door in
your particular Quick-N-Stall installation. This
instruction sheet depicts a pivot-right installation.
CAUTION: For safety reasons, the door panel must
always open outward.
1
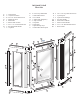
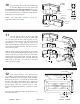
NOTE: If the curb and header sections come
pre-assembled, skip to Step #3.
Assemble the three curb sections [A] (with weep slots) by
sliding a 135° anchor plate [B] into the mitered ends and
forcing the sections together. The weep slots in the curb
must be to the inside. Screw four #8 x 1/4” truss head
screws [C] through the slots in the anchor plates into the
curbs. As you tighten the screws, be sure the mitered
ends are forced tightly together. To increase the rigidity
of the mitered joint, drill 1/8” holes into the curb through
the round holes in the anchor and install two more #8 x
1/4” screws.
Assemble the three header sections [D] in the same
manner and set the assembly aside.
2
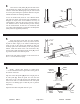
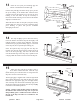
The curb should sit near the centerline of the sill.
If required, use a file to round the lower ends of the curb
assembly to fit the shower sill properly.
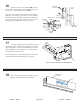
Using a 3/16” drill bit, drill the interior face of the curb
assembly on both ends as shown. These holes may be
predrilled from the factory.
Reposition the curb assembly on the shower sill and mark
its position with a pencil line along the interior and
exterior base.
3
ANCHOR
PLATE
#8 x 1/4”
SCREWS
MITERED
CURB END
MITERED
CURB END
MEASURE
SHOWER
SILL
CURB
ASSEMBLY
3/8”
1/4”
3/16” DIA
INTERIOR
QCI0012 REV. 1 Page 4 of 9 Certified 07/06/05