
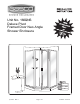
Installation Guide

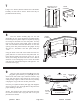

Place the two wall jambs [E] into the ends of the
curb assembly [A]. Plumb the jambs and mark the hole
locations on the wall. Masking tape may be used to hold
the curb in place during this operation. Remove all parts
and drill the walls for mounting hardware.
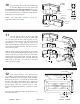
For tile or marble walls, drill six 3/16” diameter holes
and insert the plastic wall anchors [F]. Attachments to
fiberglass or acrylic units can be made in two ways. If
reinforcement is built into the wall of the unit, drill six
1/8” diameter holes to install mounting screws directly
into the reinforcement. If walls are not reinforced, drill
3/16” holes and install plastic wall anchors or Molly bolts
(Molly bolts not supplied by BASCO).
4
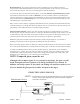
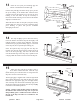
Wipe the shower walls and sill, curb assembly
[A] and wall jambs [E] with a clean, dry cloth to remove
any dust or debris. Apply a 1/4” bead of caulk along the
inside of both of the pencil lines marked in Step #3.
Carefully replace the curb assembly in the exact position
marked. Caulk the inside of the curb ends where they
meet the wall. Caulk around the anchor plates [B], screws
[C], and the insides of the mitered joints.
Replace both wall jambs and attach to the walls with six
#8 x 1 1/2” truss head screws [G].
5
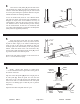
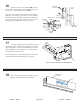
NOTE: Panels with obscure or etched glass
should be installed with the rough surface of the glass to
the exterior of the unit.
Snap one of the side panels [H] into the curb [A] next to
the wall jamb [E]. Slide the panel over into the wall
jamb. Press a 135° post [J] into the curb. Slide the side
panel across until it is centered between the wall jamb
and post. Use masking tape to hold the post in position
temporarily.
Repeat for the other side panel and 135° post.
6
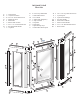
WALL
JAMB
CURB
WEEP SLOT
#8 x 1/2”
SCREW
WALL
JAMB
CURB
CAULK
WEEP SLOT
TO INTERIOR
CURB
PANEL
GLASS
SNAP-IN
VINYL
PANEL RAIL
PANEL
SIDE RAIL
WALL
JAMB
PANEL
GLASS
135
POST
QCI0012 REV. 1 Page 5 of 9 Certified 07/06/05