
Installation Guide
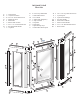

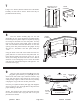

Attach the interior door handle [BB] and the
exterior door handle [CC] to the door panel [L] with
two #6-32 x 1 1/4” round head screws [DD].
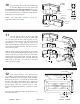
Close the door and check the clearance with the strike
jamb [N]. If necessary, loosen the set screws [W] on
the top and bottom slide bars and adjust the door panel
to align the strike magnets. When the door panel is
properly aligned, tighten the set screws securely.
16
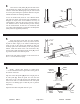
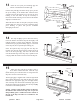
Carefully caulk the interior jamb-to-wall and
curb-to-base joints. Caulk the small gaps at the corners
of the side panels (see arrow on illustration) to prevent
water infiltration. For appearance, you may wish to
caulk the exterior joints as well.
We recommend you wait twenty-four hours before the
first shower to allow the caulking to cure properly.
17
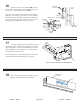
Peel off the backing on the BASCO decal
[EE] and apply to the inside surface of the header.
18
(2) HANDLE
SCREWS
INTERIOR
HANDLE
DOOR
PANEL
INTERIOR
HANDLE
EXTERIOR
HANDLE
EXTERIOR
HANDLE
MAGNETIC
VINYL
STRIKE
JAMB
1/8”
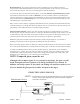
IDENTIFICATION
GROOVES
STRIKE
RAIL
CAULK
Note: Do not caulk over weep holes
INTERIOR FACE
OF HEADER
DECAL
QCI0012 REV. 1 Page 9 of 9 Certified 07/06/05