
Assembly Instruction
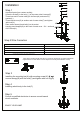

Installation
Step 3
Installing the mounting bar(A) with mounting screw(A1) £ ¬and
secure canopy(B) with the lock(C) and tighten with out ring(D)
Step 5
Consult a qualified electrician to ensure correct branch
circuit conductor
Step 1
Unpack all parts from cartons carefully
Screw the chain(E) to the lock( C ) of the center tube & canopy(F)
Thread one end of center tube(F)to the fixture(H) and screw by
spanner(L)
Thread metal cover(G) to another end of center tube(F) and tighten
with lo
ck(C1)
Place socket sleeve(I) and bulb(J) to the socket
Hanging wood dropper(G) to the hook of metal cover
(
G1
)
and hook
of the fixture(H)
ENJOY YOUR LAMP
Step 4
Installing whole body to the lock(C)
Connect,Hot,Black or Red outlet Supply Wire to:
Connect,Neutral,White Outlet Supply Wire to:
Black
* Parallel Cord(round & smooth)
Clear,Brown,Gold or Black without Tracer(colored stripes)
Insulated Wire(not green)
with copper metal conductor
* Parallel Cord(square& ridged)
White
Clear,Brown,Gold or Black without Tracer(colored stripes)
Insulated Wire(not green) with Silver metal conductor
*Note: When parallel wire(SPTI & SPT II) is used.The neutral wire is square shaped and
ridged and the hot wire will be round in shape and smooth.(See illustration on left.)
Step 2 Wire Connetion