
Use and Care Guide


WARNING
If growing soap bubbles persist throughout any portion of the Gas Leak Test, terminate use immediately.
For assistance, contact your propane dealer or the supplier of your cooker.
GAS LEAK TEST INSTRUCTIONS
Note: The gas leak test must be performed in an area that has
adequate lighting in order to see if bubbles are developing.
DO NOT use a flashlight to check for bubbbles.
1. Create a mixture of 50% water and
50% liquid dishwashing soap.
2. Turn the gas cylinder valve to the OFF position (clockwise).
Then turn regulator valve to OFF position.
3. To turn ON the fuel supply, turn the cylinder valve
knob one turn counter-clockwise. Gas will flow through
and stop at the closed regulator valve.
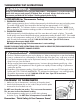
4. Using a clean brush, apply the soap water mixture
to the following:
Cylinder Valve to Cylinder
Connection Nut to Cylinder Valve
Back side of Connection Nut to Brass Nipple
Brass Valve next to Regulator, or on Regulator
Regulator connection to Gas Supply Hose
LP Cylinder Welds
Full length of Gas Supply Hose
Gas Supply Hose connection to Burner
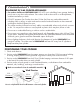
5. Check each place A - F for growing bubbles
which indicates a leak.
6. Next, turn ON regulator valve to permit gas to pass through
the hose. Apply soap water mixture to full length of
gas supply hose and connection to burner assembly.
Check each place for growing bubbles, G & H,
which indicates a leak.
7. Turn OFF gas supply valve (clockwise) on LP Gas Cylinder.
8. Turn regulator valve to OFF position.
9. Tighten any leaking connections.
10. Repeat soap water mixture test until no leaks are detected.
DO NOT use cooker if gas leaks cannot be stopped.
For assistance contact a qualified appliance repair service.
11. After you are certain there are no leaks, turn tank valve and
regulator valve to OFF position.
Wait 5 minutes for any gas fumes to evacuate before lighting the burner.
7
GAS SUPPLY HOSE
Watch for Bubbles
Burner
Jet Cooker
Orifice Bar