operation manual
table of contents Introduction 4 Using the Operators Manual Product Identification 5 5 Water Pump Engine Safety 6 6 Safety Rules Hazard Symbols and Meanings Water Pump Components 11 Component Chart Assembly 12 12 12 Connect Suction Hose to Pump Attach Suction Hose to Strainer Basket Connect Discharge Hose Operation 14 14 15 16 What is “Head” Move Water Pump to Safe Location Prime the Water Pump Locate Strainer Basket Into Water Source Starting The Water Pump 17 Starting the Water Pum
introduction Attention: Read through the complete manual prior to the initial use of your water pump Using the Operator’s manual The operating manual is an important part of your water pump and should be read thoroughly before initial use, and referred to often to make sure adequate safety and service concerns are being addressed. Reading the owner’s manual thoroughly will help avoid any personal injury or damage to your machine.
product identification Record Identification Numbers Water Pump If you need to contact an Authorized Dealer or Customer Service line (1-866-850-6662) for information on servicing, always provide the product model and identification numbers. You will need to locate the model and serial number for the machine and record the information in the places provided below.
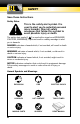
safety Save these Instructions Safety Rules This is the safety alert symbol. It is used to alert you to potential personal injury hazards. Obey all safety messages that follow this symbol to avoid possible injury or death. The safety alert symbol ( ) is used with a signal word (DANGER, CAUTION, WARNING), a pictorial and/or a safety message to alert you to hazards. DANGER indicates a hazard which, if not avoided, will result in death or serious injury.
safety warning Running engine gives off carbon monoxide, an odorless, colorless, poison gas. Breathing carbon monoxide can cause headache, fatigue, dizziness, vomiting, confusion, seizures, nausea, fainting or death. • Operate water pump ONLY outdoors. • Keep exhaust gas from entering a confined area through windows, doors, ventilation intakes, or other openings. • DO NOT start or run engine indoors or in an enclosed area, even if windows and doors are open.
safety warning Fuel and its vapors are extremely flammable and explosive. Fire or explosion can cause severe burns or death. When Adding or Draining Fuel • Turn water pump OFF and let it cool at least 2 minutes before removing fuel cap. Loosen cap slowly to relieve pressure in tank. • Fill or drain fuel tank outdoors. • DO NOT overfill tank. Allow space for fuel expansion. • If fuel spills, wait until it evaporates before starting engine.
safety warning Starter cord kickback (rapid retraction) can result in bodily injury. Kickback will pull hand and arm toward engine faster than you can let go. Broken bones, fractures, bruises, or sprains could result. Keep hands and body clear from discharge of pump. • When starting engine, pull cord slowly until resistance is felt and then pull rapidly to avoid kickback. • Secure discharge hose to avoid whipping. warning Contact with muffler area can result in serious burns.
safety Caution Excessively high operating speeds increase risk of injury and damage to water pump. Excessively low speeds impose a heavy load. • DO NOT tamper with the governed speed. • DO NOT modify the water pump. • DO NOT allow unqualified persons or children to operate or service water pump. NOTICE Improper treatment of water pump can damage it and shorten its life. • If you have questions about intended use, ask dealer or contact nearest authorized dealer.
water pump components Read this operator’s manual and safety rules before operating your water pump. 1. 2. 5. 7. 4. 6. 8. 3. 9. 10. 11. 12. 13. 14. 1. Fuel Tank Fill tank with regular unleaded fuel. Always leave room for fuel expansion. 2. Priming Plug Fill pump with water here to prime pump before starting. 3. Discharge Outlet Connect discharge hose here. 4. Choke Lever Prepares a cold engine for starting. 5. Air Cleaner Protects engine by filtering dust and debris out of intake air. 6.
assembly Your water pump requires some set up and is ready for use after it has been properly serviced with the recommended oil and fuel. If you have any problems with the set up of your water pump, please call the pressure washer help line at 1-866-850-6662 If calling for assistance, please have the model and serial number from the data tag available. B Attach Suction Hose to Strainer Basket Slide hose clamp over hose. Attach open end of suction ho to strainer hose barb.
ewdriver. hose with an inside diameter smaller than the pump’s discharge port size. discharge port size. 1. Slide barb cuff over hose barb. Insert rubber seal into 1. Slide barb cuff over hose barb.earler. Insert rubber seal into end of barb cuff as shown end of barb cuff as shown earler. assembly 2. Screw hose barb assembly onto pump in clockwise 2. Screw hose barb assembly onto pumpis in clockwise rotation until hose barb assembly tightened securely.
operation What is “Head” Head refers to the height of a column of water that can be delivered by the discharge of the pump. Suction Head is the vertical distance between the center of the pump and the surface of the liquid on the suction side of the pump. May also be referred to as “suction lift”. The atmospheric pressure of 14.7 psi at sea level limits suction head lift to less than approximately 26 feet for any pump.
operation Total Head Discharge Head Suction Head Prime the Water Pump 1. Remove priming plug from top of pump. 2. Fill pump with clean, clear water up to top of discharge outlet. 3. Replace priming plug. NOTICE Improper treatment of water pump can damage it and shorten its life. • Be sure chamber is filled with water before starting the engine.
operation Locate Strainer Basket Into Water Source Place strainer basket into water to be pumped. Basket must be fully immersed. NOTICE Improper treatment of water pump can damage it and shorten its life. • NEVER operate pump without strainer connected to end of suction hose. • Keep strainer out of sand or silt, place in bucket or on stones. • DO NOT let pump run dry or damage to seals may result.
starting the water pump Starting the Water Pump Use the following start instructions: 1. Make sure unit is on a flat, level surface and pump chamber is primed. 2. Turn fuel valve (1) to “On” position. The fuel valve handle will be vertical (pointing toward the ground). 1 3. Push on/off switch (2) to “On” position. 4. Move engine speed lever (3) to “Fast” ( ) position. 3 2 5. Move choke lever (4) to “On” position. 4 6. Grasp recoil handle and pull slowly until slight resistance is felt.
starting the water pump Important: If excessive fuel is present in the air/fuel mixture causing a “flooded” condition, move choke lever to “Run” position and pull handle repeatedly until engine starts. 7. Move choke lever to “Run” position a short distance at a time over several seconds in warm weather or minutes in cold weather. Let engine run smoothly before each change. Operate with choke in “Run” position. Important: It may take a few minutes for water pump to begin pumping water.
stopping the water pump Stopping the Water Pump 1. Move engine speed lever to “Slow” position. 2. Push on/off switch to “Off” position. 3. Turn fuel valve to “Off” position. warning Backfire, fire or engine damage could occur. • DO NOT stop engine by moving choke control to “Choke” position. Drain and Flush Water Pump 1. Disconnect and drain suction and discharge hoses. 2. Remove drain plug at bottom of pump. 3.
If you need assistance with the assembly or operation of this Water Pump please call 1-866-850-6662