Owner’s Manual Actual product appearance and functionality may vary from photographs, illustrations and descriptions included in this manual.
table of contents Disclaimers. . . . . . . . . . . . . . . . . . . . . . . . . . . . . . . . . . . . . . . . . . . . . . . . . . . . . . . . . . . . . . . . . . . . . . . . . . . . . . . . 1-2 Parts List . . . . . . . . . . . . . . . . . . . . . . . . . . . . . . . . . . . . . . . . . . . . . . . . . . . . . . . . . . . . . . . . . . . . . . . . . . . . . . . . . . . 3 Base Overview. . . . . . . . . . . . . . . . . . . . . . . . . . . . . . . . . . . . . . . . . . . . . . . . . . . . . . . . . . . . . . .
disclaimers Important Safety Information Read all instructions before using your adjustable base. Save these instructions. WARNING WARNING Always unplug the base from the electrical outlet before servicing any part of the base. To reduce risk of electric shock, unplug the base before cleaning. To safely disconnect, ensure the base is in a flat position with all motors off, and unplug from power source. For optimal safety and operation, plug bed base into a surge protector (not included).
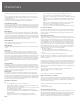
disclaimers the mattress support platform shall be ± 3°, which translates to a tolerance of up to 1 ½”. The angle (designated “B” in figure 1) between the flat section and foot section for various configurations of the mattress support platform shall be ± 3°, which translates to a tolerance of up to ¾”. Any adjustable foundation deemed to be within these allocated tolerances is considered to have met the manufacturer’s quality control standards.
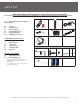
parts list Before discarding the packing materials- ensure all the parts are accounted for. All electronics and components that need to be installed are located in boxes under the base or attached to the frame.
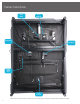
base overview Head Motor Head Massage Control Box Foot Motor Power Down Box Foot Massage 4 Actual product appearance and functionality may vary from photographs, illustrations and descriptions included in this manual.
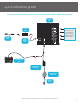
quick reference guide Not to scale. For illustration purposes only. Read all instructions before beginning installation. Control Box Power Supply Power Cord Connection ports to head and foot motors (massage and lift). Installed under the base. Input Power Cord Power Down Box Sleeptracker® Sensor(s)* Sleeptracker® Processor Power Cord *Queen/Full has two Sleeptracker Sensors. See page 16 for setup instructions.
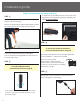
installation guide Always use two people when setting up the base STEP 1 Place the bed base box in a desired location with the bottom of the box facing up. To install the legs, thread the washer over the bolt of the leg with the recessed side facing the leg, and tighten by hand. Do not over tighten. Remove the binding straps and packing materials, making sure not to puncture the box with any sharp objects.
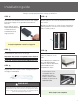
installation guide Always use two people when setting up the base STEP 6 STEP 9 Uncoil the Power Cord and connect to the Power Supply. Place Power Supply on the ground and extend from the base. Ensure batteries are correctly installed in the back of the remote. Ensure that the Power Supply and all attached cords are directed toward the desired surge protector. Quickly test functions to verify proper setup before placing mattress on base. Press FLAT to return the base to a flat position.
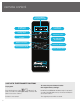
remote control 10, 20, 30 Minute Massage Timer Lights Head Massage (6 intensities) Turn on Head and Foot Massage Timer SNORE RELIEF Preset Position Foot Massage (6 intensities) TV Preset Position Turn on Head and Foot Massage FLAT Preset Position Lifts and Lowers Foot Lifts and Lowers Head Zero-G Preset Position SAVE UP TO THREE FAVORITE POSITIONS 8 To program: To restore the preset buttons back to their original factory settings: Press and hold one of the buttons for at least 5 seconds.
remote control MASSAGE FEATURE The MASSAGE button turns head and foot massage on and off. Press to cycle through 3 levels and off. The HEAD button adjust the head massage intensities. Levels 1-6. The FOOT button adjust the head massage intensities. Levels 1-6. The TIMER/ALL OFF button Starts massage at level 3. Select a 10, 20 or 30 minute massage interval. Pressing a fourth time will turn off massage. The light on the top of the remote indicates a 10, 20 or 30 minute timer setting.
headboard bracket installation guide (optional) A 9/16” (14 mm) & 1/2” (13 mm) socket and crescent wrench are necessary to complete installation. HEADBOARD BRACKET COMPONENTS Headboard Bracket (2) T-Bracket (2) Spacer (2) Long Bolt (8) Short Bolt (10) Nut (18) STEP 1 a.) Align the hole in the bracket to the brass sleeve into which the leg threads. Hold the bracket in place and screw the leg into the base until it is snug. DO NOT OVERTIGHTEN. Too much force may cause the leg to spin freely.
headboard bracket installation guide (optional) STEP 2 Attach the plastic spacer and T-Bracket. a.) Measure the distance between the mounting holes on the headboard and install the spacer and attachment plate to accommodate the headboard. b.)To install the plastic spacer and attachment plate, you will need (2) long bolts and (2) nuts. Place the spacer and attachment plate in the desired location and slip the bolts through the holes with the head of the bolt facing outward.
emergency power down box Store the power down box in a convenient location for emergency use. (2) 9 Volt batteries are required to operate the power down feature and are NOT included. FOR EMERGENCY USE ONLY. In the event that the base is stuck in an articulated position during a power outagethe Power Down Box will return the base to a flat position. The Power Down Box can only be used to bring the base to a flat position.
pair remote The original remote that comes in the box is already paired to the bed base. No further action is required. In the event that the remote is not paired with the base, follow the steps below. STEP 1 STEP 3 Remove back cover from remote control. Remove and replace batteries. Press and hold button on the back of the remote. The light will begin to flash then become a continuous solid light. STEP 2 STEP 4 Double click the button on the Power Down Box (this will not cause the base to move).
setting up two bases Connecting straps are secured to the base frame upon delivery. If a split setup is being installed, plastic connecting straps are provided (one per base) to secure the bases together. Use both straps to secure the head and foot portions together. STEP 1 With the bases in their desired location, slightly loosen both legs to allow the strap to fit on the leg bolt, between the leg washer and frame. STEP 2 Slide side (a) of the connecting strap onto leg bolt.
syncing two bases If simultaneous operation of two bases is desired, use the SmartSync™ Cord to connect the electronics of both bases together. Connect each power-down box male connection to the sync cord female connection (Refer to the illustration below). STEP 2 STEP 5 Disconnect the power-down box cable from each control box. Make note where the cable was plugged in. Plug base back into the power source. STEP 3 STEP 6 Connect the male end of the sync cord to each control box.
Sleeptracker® setup PART LIST *King bases will have a spare processor and 5v DC Power Please refer to Beautyrest Quick Start Guide for Sleeptracker® download and setup instructions. Visit help.beautyrest.com from your smartphone to download the app and view additional Sleeptracker® product information.
troubleshooting If one or more functions on the bed base have stopped operating: • Check under the bed base to verify that the wired connections are secure and that there are no cords or bedding obstructing the movement of the base. • Check to ensure the green LED light is illuminated on the control box. If there is no light, verify that the input and power cords are properly connected. • Unplug the base for 1 hour to reset the electronic components.
notes ________________________________________________________________________________ ________________________________________________________________________________ ________________________________________________________________________________ ________________________________________________________________________________ ________________________________________________________________________________ ________________________________________________________________________________ ____________________
notes ________________________________________________________________________________ ________________________________________________________________________________ ________________________________________________________________________________ ________________________________________________________________________________ ________________________________________________________________________________ ________________________________________________________________________________ ____________________
español PG 1-2 Sobre las precauciones y el uso: Atención: Restricciones importantes sobre la seguridad Lea todas las instrucciones antes de usar su base ajustable. Guarde estas instrucciones. ADVERTENCIA • Mantenga la cama en posición plana cuando no esté en uso. • Manténgase alejado de las piezas móviles mientras está en movimiento. • Antes de ajustar , asegúrese de que los niños y las mascotas estén alejadas de las partes móviles y no están bajo somier antes de ajustar.
español Procedimientos de prueba requieren pruebas de ciclo de vida útil de hasta 120kg de carga distribuida. El ángulo (designado “a” en la figura 1) entre la parte trasera y la sección plana para diversas configuraciones de la plataforma de soporte del colchón será de ± 3°, que se traduce en una tolerancia de hasta 1 ½”.
español • Consulte al distribuidor o a un técnico experimentado en radio. Importante: Cualquier cambio o modificación no aprobados expresamente por Serta Simmons Bedding , LLC (“ SSB “) podría anular el cumplimiento EMC y negar su derecho para utilizar este equipo. Este equipo se ha probado para cumplimiento FCC bajo condiciones que incluyen el uso de dispositivos periféricos SSB y cables de SSB y conectores entre los componentes del sistema.
español PASO 4: Si desea juntar dos bases con el cable SmartSync™, vea las páginas 17-18. Desenrosque el generador de corriente del marco e instale (2) pilas de 9 voltios (no incluidas). Ponga el generador en el piso. Asegúrese que resulte fácil acceder al generador cuando la base esté en la posición elevada. Pg. 6-7 - Guía de instalación PASO 5: Desenrosque el cable de entrada (conectado al puerto de energía de la caja de control) y conéctelo a la fuente de energía. Para servicio al cliente, visite www.
español ajustada, la pata se saldrá de rosca. b) Alinee la etiqueta con el hueco del marco (ubicado hacia los pies de la base) y use un tornillo u una tuerca pequeños para asegurar el soporte. Asegúrese de ajustar bien la tuerca. PASO 2: Fije el separador plástico y el soporte en forma de T. a) Mida la distancia entre los huecos del montaje de la cabecera e instale el separador y la placa de ajuste para acomodar la cabecera.
français Pg. 1-2 - Précautions de sécurité et déclarations d’utilisation AVERTISSEMENT • Gardez lit en position à plat lorsqu’il ne sert pas. • Restez à l’écart des pièces mobiles en mouvement. • Avant de régler , assurez-vous que les enfants et les animaux sont clairement de pièces mobiles et ne sont pas sous la base du lit avant de régler. • Ne pas laisser les enfants utiliser la base de lit sans supervision d’un adulte .
français équitablement. L’angle (désignée par « a » dans la figure 1) entre la section arrière et la section plate pour les diverses configurations du matelas/du support devraient être à ± 3°, ce qui se traduit en une tolérance de jusqu’à 1 ½”. L’angle (désigné par « B » dans la figure 1) entre la section plate et la section de pied, pour les diverses configurations du matelas et du support, devrait être à ± 3°, ce qui se traduit en une tolérance de jusqu’à 1 ½”.
français • Consulter le revendeur ou un technicien radio expérimenté. Important: Tous changements ou modifications non expressément approuvés par Serta Simmons Bedding, LLC («SSB») pourraient annuler la conformité EMC et vous interdire l’utilisation de cet appareil. Cet appareil a été testé pour la conformité FCC dans des conditions qui incluent l’utilisation de dispositifs périphériques SSB et câbles SSB et connecteurs entre les composants du système.
français accessible quand le sommier est retourné dans la position en haut à droite. Étape 5: Déroulez la corde d’entrée (connectée au port d’alimentation sur la boîte de contrôle) et branchez-la dans l’alimentation électrique. Pour service consommateurs, allez au site web www.ergomotion.com ou appelez le numéro vert : 1-888-550-3746 Étape 6 : Déroulez le cordon d’alimentation et branchez-le dans l’alimentation électrique. Placez l’alimentation électrique par terre et rallongez-la de la base.
français boulons longs dans les deux trous avec la tête des boulons vers l’extérieur. Positionnez les boulons diagonalement sur la cale d’espacement. Utilisez le 9/16’’ socket et la clé à molette pour serrer les boulons. Étape 3: Maintenant vous pouvez attacher le dosseret aux plaques d’attachement en utilisant les boulons courts et les écrous pour l’attacher dans les équerres. Les têtes des boulons doivent être vers l’extérieur. Utilisez le 9/16’’ socket et la ½’’ clé à molette pour serrer les boulons. Pg.
Use barcode to sync Sleeptracker® app. ©2015 Ergomotion Inc US/Canada Customer Service Phone Fax Email Web 1-888-550-3746 805-979-9399 info@ergomotion.com www.ergomotion.