
Use and Care Manual


6
installation guide
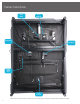
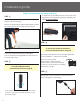
Place the bed base box in a desired location with the
bottom of the box facing up.
Remove the binding straps and packing materials, making
sure not to puncture the box with any sharp objects.
Remove the bed base from the box keeping the
bottom of the base facing upwards for easier access to
the beds components
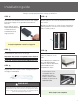
Legs adjust from 5-8in. Simply twist the bottom
portion of the leg to extend and retract to your
preferred height.
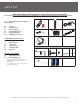
STEP
1
To install headboard brackets:
See detailed instructions on page 10
To install the legs, thread the washer over the bolt of the
leg with the recessed side facing the leg, and tighten by
hand. Do not over tighten.
Always use two people when setting up the base
STEP
2
STEP
3
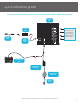
Uncoil the Power Down Box from the frame and install
(2) 9 Volt batteries - optional, not included.
Place box on the ground.
Ensure that it is easily accessible
when the base is turned to its upright
position. For power down box operating
instructions see page .
Uncoil input cord (connected to control box’s power
port) and plug into Power Supply.
STEP
4
STEP
5
To sync two bases with the SmartSync™
cord: see detailed instructions on page 14