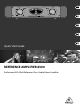
Quick Start Guide REFERENCE AMPLIFIER A500 Professional 600-Watt Reference-Class Studio Power Amplifier
REFERENCE AMPLIFIER A500 Important Safety Instructions Terminals marked with this symbol carry electrical current of sufficient magnitude to constitute risk of electric shock. Use only high-quality professional speaker cables with ¼" TS or twist-locking plugs pre-installed. All other installation or modification should be performed only by qualified personnel.
4 REFERENCE AMPLIFIER A500 Consignes de sécurité Les points repérés par ce symbole portent une tension électrique suffisante pour constituer un risque d’électrocution. Utilisez uniquement des câbles d’enceintes professionnels de haute qualité avec fiches Jack mono 6,35 mm ou fiches à verrouillages déjà installées. Toute autre installation ou modification doit être effectuée uniquement par un personnel qualifié.
6 REFERENCE AMPLIFIER A500 Instruções de Segurança Importantes Aviso! Terminais marcados com o símbolo carregam corrente elétrica de magnitude suficiente para constituir um risco de choque elétrico. Use apenas cabos de alto-falantes de alta qualidade com plugues TS de ¼" ou plugues com trava de torção pré-instalados. Todas as outras instalações e modificações devem ser efetuadas por pessoas qualificadas.
8 REFERENCE AMPLIFIER A500 9 Quick Start Guide REFERENCE AMPLIFIER A500 Controls (EN) Controls (1) The POWER switch is used to power up the A500. The POWER switch should always be in its “Off ” position when you connect the unit to the mains. (10) In addition to XLR or ¼" TRS connectors, you can also use binding posts for connecting speaker cables. When in monobridged mode, make sure to connect your cables to both middle connectors–as shown on the unit itself. (11) FUSE SWITCH/VOLTAGE SELECTION.
10 REFERENCE AMPLIFIER A500 11 Quick Start Guide REFERENCE AMPLIFIER A500 Controls (ES) Controles (1) Con el interruptor POWER se enciende el A500. Este interruptor debe estar en la posición de apagado al conectar el aparato a la red de corriente eléctrica. (11) PORTAFUSIBLES/SELECCIÓN DE VOLTAJE. (12) La conexión a la red eléctrica se realiza mediante el cable con conector de tres espigas suministrado con el equipo. Al encender el amplificador, se ilumina el LED POWER. (13) NÚMERO DE SERIE.
12 REFERENCE AMPLIFIER A500 13 Quick Start Guide REFERENCE AMPLIFIER A500 Controls (DE) Bedienelemente (1) Mit dem POWER-Schalter nehmen Sie den A500 in Betrieb. Der POWER-Schalter sollte sich in der Stellung “Aus” befinden, wenn Sie die Verbindung zum Stromnetz herstellen. (10) Die POWER-LED leuchtet, sobald Sie das Gerät einschalten. (2) (3) (4) (5) (6) Jeder Kanal besitzt einen Lautstärkeregler, mit dem Sie die Endverstärkung des A500 einstellen können.
14 REFERENCE AMPLIFIER A500 Quick Start Guide Other important information Specifications Output Power RMS Power Stereo Mode (both channels driven) 8 Ω / 1 kHz @ 1% THD 4 Ω / 1 kHz @ 1% THD Bridged Mono 8 Ω / 1 kHz @ 1% THD Peak Power Stereo Mode (both channels driven) 8 Ω / 1 kHz 4 Ω / 1 kHz Bridged Mono 8 Ω / 1 kHz Input Sensitivity Distortion Frequency Response Voltage Gain Damping Factor Input impedance Signal-to-Noise Important information 125 W 185 W 375 W 175 W 300 W 600 W 1.64 V <0.
Dedicate Your Life to MUSIC