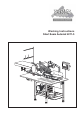
Short Seam Automat 2211-5 Working Instructions Beisler Automated Sewing Equipment Working Instructions Short Seam Automat 2211-5 -A1-
Short Seam Automat 2211-5 Working Instructions Beisler Automated Sewing Equipment Contents of the working instructions The working instructions are divided into four sections: A General notes: page A 1 - A 10 Safety instructions for the operating and service personnel and for the operator of the machine. B Operating instructions: page B 11 - B 36 Instructions for the personnel operating and handling the machine.
Short Seam Automat 2211-5 Working Instructions Section A Beisler Automated Sewing Equipment General notes -A3-
Short Seam Automat 2211-5 Working Instructions Beisler Automated Sewing Equipment Section A General notes Contents A.1 Safety instructions ............................................................................................................ 5 A.1.1 Symbols used in the working instructions .................................................................... 8 A.1.2 Symbols used on the machine ..................................................................................... 8 A.1.
Short Seam Automat 2211-5 Working Instructions A.1 Beisler Automated Sewing Equipment Safety instructions Important information for the operator! This machine has been manufactured in keeping with the latest technological developments and is operationally safe.
Short Seam Automat 2211-5 Working Instructions Beisler Automated Sewing Equipment A.1 Safety instructions Exclusion of liability Beisler GmbH warrants the faultlessness of the product as set forth by their advertisement, product information and these working instructions. Other product characteristics are not warranted.
Short Seam Automat 2211-5 Working Instructions A.
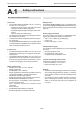
Short Seam Automat 2211-5 Working Instructions Beisler Automated Sewing Equipment A.1 Safety instructions A.1.1 Symbols used in the working instructions A.1.2 Symbols used on the machine WARNING! WARNING: DANGER! is used if non-observance may cause serious or even lethal injuries. Caution! Observe working instructions. WARNING: HIGH VOLTAGE! CAUTION! is used if non-observance may cause medium to minor injuries or damage. Caution! Prior to opening, pull out power plug.
Short Seam Automat 2211-5 Working Instructions A.1 Beisler Automated Sewing Equipment Safety instructions A.1.3 General safety instructions Correct use • The SHORT SEAM AUTOMAT 2211-5 is a sewing machine. It is to be used for: • Clipping the slash selvage and sewing the slash selvage to the left trousers component. • Sewing the slash selvage to the right trousers component. Optional: clipping of side pockets. • The machine can be used for processing all conventional materials for outerwear.
Short Seam Automat 2211-5 Working Instructions Beisler Automated Sewing Equipment A.
Short Seam Automat 2211-5 Working Instructions Section B Beisler Automated Sewing Equipment Operating Instructions - B 11 -
Beisler Automated Sewing Equipment Section B Short Seam Automat 2211-5 Working Instructions Operating Instructions Contents B.1 Description of the machine .............................................................................................. 13 B.1.1 Functional units ........................................................................................................... 13 B.2 Functions of the machine ............................................................................................
Short Seam Automat 2211-5 Working Instructions B.1 Beisler Automated Sewing Equipment Description of the machine Fig. 1 B.1.1 Functional units All functional units of the SHORT SEAM AUTOMAT 2211-5 are mounted to the height-adjustable table frame and freely accessible.
Beisler Automated Sewing Equipment B.2 Short Seam Automat 2211-5 Working Instructions Functions of the machine B.2.2 Machine cycle left slash selvage B.2.1 Sewing functions of the machine The short seam automat 2211-5 can perform six different, automated sewing functions: • Clipping and crimping over of the left slash selvage with subsequent sewing of the slash selvage to the left trousers component. • Sewing the slash selvage to the right trousers component.
Short Seam Automat 2211-5 Working Instructions B.2 Beisler Automated Sewing Equipment Functions of the machine B.2.3 Lining up the left slash selvage Fig. 2/3 Ideally, the slash selvage and the left trousers component are premarked by a gusset. If a gusset is not available, the line-up position is marked with tape or with a felt pen at the working plate or at the pick-up plate. Fig. 2 Slash selvage line-up position, Fig. 2: The slash selvage clamp 1 is open during the lineup process.
Beisler Automated Sewing Equipment B.2 Short Seam Automat 2211-5 Working Instructions Functions of the machine B.2.4 Left trousers component line-up Fig. 4/5 Line-up position of the left trousers component, Fig. 4: The left trousers component 3 is lined up with the gusset to the cutter 4 and parallel to the red marking line 2 of the guide laser 1. Fig. 4 Folder, Fig.
Short Seam Automat 2211-5 Working Instructions B.2 Beisler Automated Sewing Equipment Functions of the machine B.2.5 Left slash selvage/trousers component sewing Main clamp, Fig. 6: The main clamp 2 moves to the insertion position and picks up the trousers component. The folder moves up to its start position. The main clamp transports the trousers component on the working plate from the insertion station to the sewing head. Sewing head, Fig.
Beisler Automated Sewing Equipment B.2 Short Seam Automat 2211-5 Working Instructions Functions of the machine B.2.6 Machine cycle right slash selvage Fig. 7/8 The machine cycle "Sewing the right slash selvage to the right trousers component" is performed as follows: • The right trousers component is positioned manually on the working plate. • The trousers component is clipped, the stop for the slash selvage swivels onto the working plate. • The right slash selvage is lined up manually at the stop.
Short Seam Automat 2211-5 Working Instructions B.2 Beisler Automated Sewing Equipment Functions of the machine B.2.8 Right slash selvage Fig. 9 Stop, Fig. 9: After the cutter has clipped, the stop 1 swivels to the right trousers component. Line-up position of the right slash selvage, Fig 9: The right slash selvage 3 is lined up immediately at the stop rail 2 and flush with the right trousers component. - B 19 - Fig.
Beisler Automated Sewing Equipment B.2 Short Seam Automat 2211-5 Working Instructions Functions of the machine B.2.9 Sewing the right trousers component Fig. 10 Main clamp, Fig. 10: The main clamp 2 moves to the insertion station and picks up the trousers component. The folder moves up to its start position. The main clamp transports the trousers component on the working plate from the insertion station to the sewing head. Sewing head, Fig.
Short Seam Automat 2211-5 Working Instructions B.2 Beisler Automated Sewing Equipment Functions of the machine Fig. 11/12 B.2.10 Machine cycle left side pocket The machine cycle "Clipping left side pocket and sewing it to the left trousers component" is performed as follows: • The left side pocket is lined up manually at the pickup plate. • The cloth ledge is clipped, crimped over by the folder and picked up. • The left trousers component is positioned manually on the working plate.
Beisler Automated Sewing Equipment B.2 Short Seam Automat 2211-5 Working Instructions Functions of the machine B.2.12 Sewing left side pocket /trousers component Folder, Fig. 13: The folder 1 moves left to the working plate with the side pocket, lowers and puts the side pocket 2 onto the left trousers component 3. Fig. 13/14 Fig. 13 Main clamp, Fig. 14: The main clamp 2 moves to the insertion station and picks up the sewing pieces. The folder moves up to its start position.
Short Seam Automat 2211-5 Working Instructions B.2 Beisler Automated Sewing Equipment Functions of the machine Fig. 15/16 B.2.13 Machine cycle right side pocket The machine cycle "Clipping right side pocket and sewing it to the left trousers component" is performed as follows: • The right side pocket is lined up manually at the pickup plate. • The cloth ledge is clipped, crimped over by the folder and picked up. • The right trousers component is positioned manually on the working plate.
Beisler Automated Sewing Equipment B.2 Short Seam Automat 2211-5 Working Instructions Functions of the machine Fig. 17/18 B.2.15 Sewing the left side pocket /trousers component Folder, Fig. 17: The folder 1 moves left to the working plate with the side pocket, lowers and puts the side pocket 2 onto the right trousers component 3. Fig. 17 Main clamp and sewing head, Fig. 18: The main clamp 2 moves to the insertion station and picks up the sewing pieces. The folder moves up to its start position.
Short Seam Automat 2211-5 Working Instructions B.2 Beisler Automated Sewing Equipment Functions of the machine Fig. 19 B.2.16 Switches The short seam automat is equipped with three different types of switches: • Emergency switch for stopping a sewing program, • supply switch for voltage and vacuum pump, • control switches for controlling the machine operation. Emergency switch: Program stop key When the program stop key 1 is pressed, all machine movements and the sewing process are stopped immediately.
Beisler Automated Sewing Equipment B.2 Short Seam Automat 2211-5 Working Instructions Functions of the machine Fig. 20 B.2.17Operating panel Fig. 20 Display During the operation of the machine, the display 1 shows the values of the selected sewing program. If menus were requested, the menu symbol or the corresponding parameters of the function are displayed.
Short Seam Automat 2211-5 Working Instructions B.3 Beisler Automated Sewing Equipment Operation B.3.1 Safety instructions for operation Machine operation: Handling the guide laser: WARNING - Machine operation intervention! CAUTION - Damage of the retina! The machine is driven by electric motors and by compressed air. Any attempt to stop the moving parts of the machine or to tamper with the movements by hand may cause severe injuries.
Beisler Automated Sewing Equipment B.3 Short Seam Automat 2211-5 Working Instructions Operation B.3.2 Preparing the machine Fig. 21 Fig. 21 Prior to the production start, check the supply connections, connect the machine to the compressed air and power supply systems and prepare the sewing head. 1. Insert needle, pass top thread through needle and insert bobbin for bottom thread into sewing head (see working instructions of sewing head manufacturer or supplier). 2.
Short Seam Automat 2211-5 Working Instructions B.3 Beisler Automated Sewing Equipment Operation B.3.3 Selecting the sewing program Fig. 22/23 Fig. 22 After the machine has been turned on and the control program has been activated, the sewing program that had been selected last is set. Sewing programs are stored in the memory (M) where up to 50 sewing programs (M 01 M 50) can be programmed. To each sewing program, up to six seam numbers (01, 02, 03, 04, 05, 06) are assigned. Fig.
Beisler Automated Sewing Equipment B.3 Short Seam Automat 2211-5 Working Instructions Operation B.3.4 Activating additional seam numbers B.3.6 Setting the thread clamp manually 1. Select seam number of desired seam. Before the first start of a sewing program, the top thread clamp must be activated to protect the top thread from being pulled out of the needle when the machine starts. Move cursor to seam number: • Press . or Y key. • Confirm selection: • Press $ key.
Short Seam Automat 2211-5 Working Instructions B.3 Beisler Automated Sewing Equipment Operation B.3.8 Resetting the day counter to zero B.3.7 Testing the cutters Sharpness and function of the three cutters can be chekked individually. When the corresponding function key is pressed, a cutting movement is performed. Use this function to reset the day counter for a program cycle or for a completed working cycle to zero. 1. Move to level 1. 1. Request the cutter test menu. • Press key. Press key.
Beisler Automated Sewing Equipment B.3 Short Seam Automat 2211-5 Working Instructions Operation B.3.9 Quick stitch width setting Fig. 24 The quick stitch width adjustment makes the selection of 4 preadjusted different stitch widths possible. • Fig. 24: Use the handwheel 1 to adjust the stitch width to the required range. 2 trousers component 3 slash selvage or prefactured pocket bag - B 32 - Fig.
Short Seam Automat 2211-5 Working Instructions B.3 Beisler Automated Sewing Equipment Operation B.3.10 Controlling machine cycle Fig. 25 Fig. 25: The complete process of the sewing programs is controlled by using the two footswitches. 1 Footswitch for machine operation 2 Footswitch for slash selvage clamp Each sewing program offers several alternatives (modes) for controlling the process.
Beisler Automated Sewing Equipment B.3 Short Seam Automat 2211-5 Working Instructions Operation B.3.11 Start mode 04 / 05 Start mode for: • "Left slash selvage" • "Left and right side pocket" • "Right slash selvage for ladies' trousers" The machine cycle "Crimping over left slash selvage and sewing to left trousers component" can be performed in two different modes (Mode 04, Mode 05). Controlling machine cycle in Mode 04: 1. Line up left slash selvage. 2.
Short Seam Automat 2211-5 Working Instructions B.3 Beisler Automated Sewing Equipment Operation B.3.12 Start mode 06 / 07 Start mode for: • "Right slash selvage" • "Left slash selvage for ladies' trousers" The machine cycle "Sew right slash selvage to right trousers component" can be performed in two different modes (Mode 06, Mode 07). Controlling machine cycle in Mode 06: 1. Depress footswitch for machine operation: • The folder moves right to the pick-up plate.
Beisler Automated Sewing Equipment B.3 Short Seam Automat 2211-5 Working Instructions Operation B.3.13 Resetting line-up process B.3.16 Turning the machine off This function depends on the selected machine cycle mode. It only refers to machine movements that can be executed before the start of the automatic process. The machine movements can be reset gradually. • For extended work intermissions, the machine must be turned off completely. 1. Turn power supply off by moving main switch to 0 position.
Short Seam Automat 2211-5 Working Instructions Section C Beisler Automated Sewing Equipment Service Instructions - C 37 -
Beisler Automated Sewing Equipment Section C Short Seam Automat 2211-5 Working Instructions Service Instructions Contents C.1 Delivery of the machine .................................................................................................... 39 C.1.1 Packaging .................................................................................................................... 39 C.1.2 Scope of delivery ..............................................................................................
Short Seam Automat 2211-5 Working Instructions C.1 Beisler Automated Sewing Equipment Delivery of the machine C.1.1 Packaging C.1.2 Scope of delivery The machine is delivered in a solid packaging box on a pallet. All packaging materials can be separated and reused. • • • Pallet made of pine wood Packaging box made of plywood / transport carton Polyethylene film (PE) NOTE - Shipping braces! During shipping, moving machine parts are protected with shipping braces (cable ties).
Beisler Automated Sewing Equipment C.2 Short Seam Automat 2211-5 Working Instructions Storage and location requirements C.2.1 Floor quality C.2.4 Supply connections The floor of the room where the machine is to be installed must have a sufficient surface strength. The location of the machine must be free of vibrations. If several machines are to be installed in one room, the static load bearing capacity of the ceiling must be considered.
Short Seam Automat 2211-5 Working Instructions C.3 Beisler Automated Sewing Equipment Start-up C.3.1 Machine table alignment Fig. 1/2 After the machine has been installed at the desired location, the machine table must be aligned: • Set machine table to required height. • Align machine table horizontally on all sides. Fig. 1 Setting table height: 1. Fig. 1: Lift machine: Connect lifting device at lift points (arrows) below the crossmembers.
Beisler Automated Sewing Equipment C.3 Short Seam Automat 2211-5 Working Instructions Start-up Fig. 3/4 C.3.2 Compressed air / vacuum connections Fig. 3: The compressed air connection is preinstalled on the machine. It comprises the following components: • Pressure reducer 3 with manometer 5 and water separator 4, • Pressure hose with push-in plug 1. The pressure reducer is installed at the side mounting wall of the worktable. Fig. 3 Connecting the machine to the compressed air supply system: 1.
Short Seam Automat 2211-5 Working Instructions C.3 Beisler Automated Sewing Equipment Start-up C.3.3 Connecting the machine to the power supply The power cable and the power plug are preinstalled on the machine. The footswitches for controlling the machine operation and the bundle clamps are installed as well. C.3.4 Safety check Before the machine is released for operation, all safety devices must be checked for their correct operation.
Beisler Automated Sewing Equipment C.4 Short Seam Automat 2211-5 Working Instructions Operation and shut-down C.4.2 Machine shut-down C.4.1 Working with the machine Factory setting The program control of the machine is programmed at the factory with a sewing program with three different seams.
Short Seam Automat 2211-5 Working Instructions C.5 Beisler Automated Sewing Equipment Maintenance WARNING - Electric shock! C.5.2 Cleaning Contact with current-carrying components may cause a lethal electric shock. As moving parts of the machine may catch and wind up loose clothing if the machine is put in motion accidentally, make sure to stay away from the operating range of the machine to avoid injuries.
Beisler Automated Sewing Equipment C.5 Short Seam Automat 2211-5 Working Instructions Maintenance C.5.3 Service Fig. 5 The following service works must be carried out in weekly intervals. Oiling the clamp rail: 1. Disconnect machine from power supply. 2. Wipe clamp rails clean using a soft, oil-saturated cloth. The scope of delivery comprises 0.25 l of oil. When this oil is used up, you can order the special machine oil for service from the manufacturer or supplier of the machine.
Short Seam Automat 2211-5 Working Instructions C.5 Beisler Automated Sewing Equipment Maintenance C.5.4 Repairs Fig. 6 Any repairs to the machine must only be carried out by: • authorized Technical Service, • personnel that has been instructed about the setting up and maintenance of the machine on the occasion of a training by the supplier or manufacturer. Use only original spare parts for installing or replacing machine components.
Beisler Automated Sewing Equipment C.5 Short Seam Automat 2211-5 Working Instructions Maintenance Fig. 7/8 C.5.4 Repairs Clamp transport belt replacement: 1. Disconnect machine from power supply system. 2. Slide clamp to left until it reaches stop position. 3. Fig. 7: Remove retaining screws 3 from drive roller cover 2 and remove cover. 4. Remove two retaining screws from slide roller cover 8 and remove cover 9. 5. Loosen two belt lock screws 4 and release belt tension 7. 6.
Short Seam Automat 2211-5 Working Instructions C.5 Beisler Automated Sewing Equipment Maintenance Fig. 9/10 C.5.4 Repairs Clamp rail replacement: The clamp rail must be replaced if the protective lining at the bottom side of the rail is worn. Clamp rail removal: 1. Fig. 9: Lift main clamp 1. 2. Loosen retaining screw 2. 3. Pull clamp rail 1 down and remove. Clamp rail installation: 1. Insert clamp rail 1 into fixture and push up until it has reached the stop.
Beisler Automated Sewing Equipment C.5 Short Seam Automat 2211-5 Working Instructions Maintenance Fig. 11/12 C.5.4 Instandsetzung Assistance transport belt replacement: 1. Disconnect machine from power supply system. 2. Slide assistance transport to stop position. 3. Fig. 11: Remove retaining screws 1 of the cover 2 and remove cover. 4. Release belt tension, loosen the two belt lock screws 3 as well as set screw 4. 5. Remove the retaining screws 8 of the belt clamp 9. Remove belt. 6.
Short Seam Automat 2211-5 Working Instructions C.5 Beisler Automated Sewing Equipment Maintenance C.5.5 Machine set-up Fig. 13 Assistance transport stamp pressure adjustment: Fig. 13: Check to see if the stamps 4 exerts pressure onto the sewing piece evenly along the entire length of the transport section. Line up a piece of fabric to the insertion position and lower the stamps.
Beisler Automated Sewing Equipment C.5 Short Seam Automat 2211-5 Working Instructions Maintenance C.5.5 Machine set-up Fig. 14 Fig. 14 NOTE - Activating inputs/outputs! To allow for testing machine movements or interval operation, the individual stages of movement can be activated with the inputs/outputs of the machine control unit (see Section D.4.3., Service menu level 1).
Short Seam Automat 2211-5 Working Instructions C.5 Beisler Automated Sewing Equipment Maintenance C.5.5 Machine set-up Fig. 15 Clamp rail clamping pressure adjustment: After any works to the main clamp, the clamping pressure and the alignment of the clamp rail to the needle must be checked. 1. Check to see if the main clamp exerts pressure onto the sewing piece evenly along the entire length of the rail by lining up a piece of fabric to the insertion position and lowering the main clamp. 2.
Beisler Automated Sewing Equipment C.5 Short Seam Automat 2211-5 Working Instructions Maintenance Fig. 16/17 C.5.5 Machine set-up Adjustment of the clamp slide disengagement position: The disengagement position for the front and rear stop point of the clamp slide is set at the pedestal. Fig. 16: The front stop point 3 determines how far the clamp slide will approach the needle of the sewing head, the rear stop point 4 determines how far the clamp slide will return to its start position. Fig.
Short Seam Automat 2211-5 Working Instructions C.5 Beisler Automated Sewing Equipment Maintenance Fig. 18 C.5.5 Machine set-up Folder to clamp rail alignment: The lowered folder must be absolutely parallel to and in slight contact with the clamp rail along its entire length. Fig. 18 Folder position adjustment: 1. Move main clamp to position using input/output control functions: • Lower main clamp. 2. Move folder to position using input/output control functions: • Rotate folder. • Close folder clamp.
Beisler Automated Sewing Equipment C.5 Short Seam Automat 2211-5 Working Instructions Maintenance C.5.5 Machine set-up Fig. 19 The quick stitch width adjustment makes the presetting of 4 different stitch widths possible. Fig. 19: Turning the handwheel 1 the stitch width between: 5 trousers components and 6 slash selvage oder prefactured pocket bag can be presetted. Fig. 19 Folder lower position adjustment: 1. Fig. 19: Adjust stop screw 4 at revolver 2 for setting lower folder position.
Short Seam Automat 2211-5 Working Instructions C.5 Beisler Automated Sewing Equipment Maintenance C.5.5 Machine set-up Fig. 20 Folder to pick-up plate alignment: To ensure that the folder can pick up the left slash selvage evenly, the folder must lie evenly on the pick-up plate along its entire length when it is lowered. Fig. 20 Pick-up plate inclination adjustment: 1. Fig. 20: Fasten pick-up plate by rotating handwheel 4 completely to minus range. 2.
Beisler Automated Sewing Equipment C.5 Short Seam Automat 2211-5 Working Instructions Maintenance C.5.5 Machine set-up Fig. 21 Folder bar to folder clamp alignment: To ensure that the folder can crimp over the left slash selvage evenly, the folder clamp 1 must be positioned centrically above the folder bar 2. Fig. 21 Folder bar adjustment: 1. Fig. 21: Fasten pick-up plate by rotating handwheel 3 completely to minus range.
Short Seam Automat 2211-5 Working Instructions C.5 Beisler Automated Sewing Equipment Maintenance C.5.5 Machine set-up Fig. 22 Right slash selvage stop alignment: The position of the stop determines the line-up position of the right slash selvage to the right trousers component. Stop position adjustment: Fig. 22: The end position of the stop is set using the adjusting screw 1. 1. Loosen locknut 2. 2. Rotate adjusting screw 1. 3. Tighten locknut. - C 59 - Fig.
Beisler Automated Sewing Equipment C.5 Short Seam Automat 2211-5 Working Instructions Maintenance C.5.5 Machine set-up Fig. 23 Cutter adjustment: The depth of cut of the gusset is adjusted for all four cutters using different settings. • Fig 23: The depth of cut of the two cutters of the working plate for the gusset of the left and right trousers components is changed by rotating the adjusting wheel 1.
Short Seam Automat 2211-5 Working Instructions C.5 Beisler Automated Sewing Equipment Maintenance C.5.5 Machine set-up Fig. 24 Photocell light sensitivity setting: The photocell 1 at the sewing head controls the beginning and the end of the sewing process, provided that this function has been enabled as described in Section D.4.9. The sensitivity of the photocell must be set in accordance with the sewing material used. 1. Fig. 24: Make sure that the light beam 2 of the photocell is not interrupted. 2.
Beisler Automated Sewing Equipment C.5 Short Seam Automat 2211-5 Working Instructions Maintenance Fig. 25 C.5.5 Machine set-up Fig. 25 Adjustment PCB stepper motor: The PCB for controlling the stepper motor is installed in the control box. NOTE - Machine cycle! To prevent moving machine parts from colliding with each other or with other components when the machine is switched on again, move the machine manually into its start position before the PCB is replaced. 1.
Short Seam Automat 2211-5 Working Instructions C.5 Beisler Automated Sewing Equipment Maintenance Fig. 26 C.5.5 Machine set-up Setting the thread cutter: The three-digit value input (GP Par. 35) determines when the thread cutter is activated. The setting of the thread cutter must be checked during machine operation and corrected as required. Fig. 26 1. Rotate sewing head handwheel in direction of machine rotation until needle reaches highest point (pinning position C).
Beisler Automated Sewing Equipment C.5 Short Seam Automat 2211-5 Working Instructions Maintenance Fig. 27 C.5.5 Machine set-up Checking the rest thread monitor: The rest thread monitor is checked using a photocell. If the messages on the display do not match the filling state of the spool, the photocell sensitivity must be checked. Fig. 27 1. Fig. 27: Fill bobbin to half its capacity so that filling state indicators 2 of upper chamber 1 are covered. 2.
Short Seam Automat 2211-5 Working Instructions C.
Beisler Automated Sewing Equipment C.
Short Seam Automat 2211-5 Working Instructions C.6 Beisler Automated Sewing Equipment Troubleshooting Error 32: „Thread position does not come“ Error 33: „Sewing motor does not stop“ Error 34: „Needle not up“ Error 35: „Thread breakage“ Error 37: „Thread only rest“ Error 41: „No parts“ Error 42: „Photocell not lighted“ Error 43: „Photocell lighted too early“ Error 45 ...
Beisler Automated Sewing Equipment C.7 Specifications Power supply Supply voltage Power supply connection Power consumption Fusing Dimensions of the machine Width x Depth x Height in mm Table height Adjustable height in mm Weight Overall weight Short Seam Automat 2211-5 Working Instructions 230 V ±10 %, 50/60 Hz (1, N, PE) AC 1.
Short Seam Automat 2211-5 Working Instructions Section D Beisler Automated Sewing Equipment Programming Instructions - D 69 -
Beisler Automated Sewing Equipment Section D Short Seam Automat 2211-5 Working Instructions Programming Instructions Contents D.1 Operating panel ................................................................................................................. 72 D.1.1 Display and key functions .............................................................................................. 72 D.2 Fundamentals of programming ..................................................................................
Short Seam Automat 2211-5 Working Instructions Section D Beisler Automated Sewing Equipment Programming Instructions D.3.10 Level 3 special parameters / Functions ....................................................................... 92 Switching photocell for beginning of seam on or off .............................................. 92 Switching photocell for end of seam on or off ........................................................ 92 Switching folder on or off ...................................
Beisler Automated Sewing Equipment D.1 Short Seam Automat 2211-5 Working Instructions Operating panel D.1.1 Display and key functions Fig. 1 1 Display During machine operation, the display shows the values of the selected sewing program. If menus are activated, the menu symbols or the corresponding parameters of the function are displayed. Fig. 1 2 Numeric keypad All variable number values are entered using the numeric keypad. The desired sewing programs are requested using the M key.
Short Seam Automat 2211-5 Working Instructions D.2 Beisler Automated Sewing Equipment Fundamentals of programming D.2.1 Program control layout The program control is controlled using four different kinds of menus: 1. System menu, 2. Service menu, 3. Global parameter menu, 4. Special parameter menu.
Beisler Automated Sewing Equipment D.2 Short Seam Automat 2211-5 Working Instructions Fundamentals of programming D.2.1 Program control layout Factory setting The program control of the machine is programmed at the factory with a sewing program with three different seams. Access to menus The following menus are freely accessible: • Service menu, • Global parameter menu, • Special parameter menu. Except for three submenu pages, the entire system menu is controlled by access privileges.
Short Seam Automat 2211-5 Working Instructions D.2 Beisler Automated Sewing Equipment Fundamentals of programming D.2.2 Program level overview Fig.
Beisler Automated Sewing Equipment D.3 Short Seam Automat 2211-5 Working Instructions Programming D.3.1 System menu The system menu is divided into several submenus. The submenus themselves are divided into access-protected and open submenus. Access is protected by the service code.
Short Seam Automat 2211-5 Working Instructions D.3 Beisler Automated Sewing Equipment Programming D.3.1 System menu D.3.1 System menu Eprom seam parameters This function allows to copy the factory-programmed fixed seams from the Eprom back to the sewing program. • Press W key. • Press key (init parameters). • Copying seam numbers Use this function to copy the properties of a factory-programmed sewing program or of your self-configured sewing programs into an other sewing program.
Beisler Automated Sewing Equipment D.3 Short Seam Automat 2211-5 Working Instructions Programming D.3.1 System menu Entering seam names: A sewing program can be named using plain text. Copying sewing programs to the memory stick Programmed sewing programs can be copied to the memory stick (back-up copies). Request sewing program. • • • • Insert memory stick into USB slot. • Press W key. • Press key (init parameters). • Pess Machine <--> Stick.
Short Seam Automat 2211-5 Working Instructions D.3 Beisler Automated Sewing Equipment Programming D.3.1 System menu D.3.1 System menu Copying variables to the memory stick All variables (global parameters/special parameters) can be stored on the memory stick (backup copies). • Insert memory stick into USB slot. • Press W key. • • • Running clamp motor in permanent test The clamp motor can be run permanently to check for constant machine movement. • Press W key.
Beisler Automated Sewing Equipment D.3 Short Seam Automat 2211-5 Working Instructions Programming D.3.2 Service menu start level The service functions of the service menu are requested by direct access from the start level or from level 1. Service functions support the working process during machine production. Functions on the start level The function keys on the start level are assigned to the symbols below them. These symbols cannot be changed; they are always visible.
Short Seam Automat 2211-5 Working Instructions D.3 Beisler Automated Sewing Equipment Programming D.3.2 Service menu start level Photocell correction for end of seam, seam length and fixed seam end point: The settings control the end of the seam. They refer to the currently selected seam and are in close relation to the settings made using function F2 for the beginning of the seam.
Beisler Automated Sewing Equipment D.3 Short Seam Automat 2211-5 Working Instructions Programming D.3.2 Service menu start level Manual testing of the cutters Sharpness and function of the three cutters can be chekked individually. When the corresponding function key is depressed, a cutting movement is performed. 6. Filling spool. Insert thread and fill spool: 1. Request the cutter test menu. • P • O Press key. Acknowledge status messages on display: Press key.
Short Seam Automat 2211-5 Working Instructions D.3 Beisler Automated Sewing Equipment Programming D.3.3 Service menu level 1 Functions on level 1 The function keys on the start level are assigned to the symbols above them as shown on the display. The settings of the global parameter menu (GP) and of the special parameter menu (SP) which can also be requested from this level are described in separate sections.
Beisler Automated Sewing Equipment D.3 Short Seam Automat 2211-5 Working Instructions Programming D.3.3 Service menu level 1 Manual winding: This function is used to wind thread from the thread spool to the top thread spool. To start the function: • Select output: • Press key. Press key. 5 > • • Press key. Press key. Select number line: • To exit, press any key. • Press " or # key.
Short Seam Automat 2211-5 Working Instructions D.3 Beisler Automated Sewing Equipment Programming D.3.
Beisler Automated Sewing Equipment D.3 Short Seam Automat 2211-5 Working Instructions Programming D.3.5 Service menu level 1 Terminal assignment for lock stitch (1-4): S23 *Top thread monitor Terminal assignment for chain stitch (5-8): S24 *bottom thread monitor Terminal assignment *plug X2: yellow 1 green 2 white 3 brown 4 D.3.6 Global parameters Global parameters are values that control the basic functions of the machine.
Short Seam Automat 2211-5 Working Instructions D.3 Beisler Automated Sewing Equipment Programming D.3.7 List of global parameters No. Programmable global parameters (F2) 01 TILL CLAMP SIDEWAYS FWD: Scan and part pickup after clamp movement forward / time interval 02 TILL CLAMP DOWN ......: Lower clamp after clamp movement forward for part pickup / time interval 03 TILL VACUUM OFF ......
Beisler Automated Sewing Equipment D.3 Short Seam Automat 2211-5 Working Instructions Programming D.3.7 List of global parameters No.
Short Seam Automat 2211-5 Working Instructions D.3 Beisler Automated Sewing Equipment Programming D.3.8 List of special parameters Special parameters are values that refer to only one specific sewing program. Changes of these values affect only the currently selected sewing program for which the setting is made. Special parameters are edited in four different levels (level 2 to level 5). Special parameters can be functions that may be enabled or disabled or parameter values that are set in lists.
Beisler Automated Sewing Equipment D.3 Short Seam Automat 2211-5 Working Instructions Programming D.3.8 List of special parameters No. 17 18 Programmable special parameters in lists (F3) TACKING LENGTH SEAM END: Final bar tack length only for lock stitch STITCH LENGTH SEAM BEG: Stitch length at beginning of seam (input 5.0 mm max.) 19 DISTANCE OF THIS ST.LEN: Distance of stitch length at beginning of seam 24 ST.LENGTH OF MAIN SEAM: Stitch length for main seam (input 5.0 mm max.
Short Seam Automat 2211-5 Working Instructions D.3 Beisler Automated Sewing Equipment Programming D.3.9 Level 2 special parameters / Functions Fig. 3/4 Functions of level 2 submenus The following section describes the special parameters that can be enabled or disabled as functions. Fig. 3 %*0=1? F1 F2 Back to start level Enable / disable functions Enabling / disabling functions: Functions can be enabled or disabled for a selected sewing program.
Beisler Automated Sewing Equipment D.3 Short Seam Automat 2211-5 Working Instructions Programming D.3.10 Level 3 special parameters / Functions Switching folder on or off: The folder puts the pocket edge onto the pocket bag. If this function is disabled, the pocket edge must be put onto the pocket bag manually.
Short Seam Automat 2211-5 Working Instructions D.3 Beisler Automated Sewing Equipment Programming D.3.11 Level 4 special parameters / Functions %X,EFG7+ Enabling or disabling cutters: Sewing programs have been programmed at the factory with an individual cutter cut. For specific seams, this function can be enabled or disabled separately: 1. Working plate cutter (left trousers component).
Beisler Automated Sewing Equipment D.3 Short Seam Automat 2211-5 Working Instructions Programming D.3.12 Level 5 special parameters / Functions Switching the rest thread monitor on or off: Depending on the specifications of the sewing head, the machine is equipped with a rest thread monitor (for lock stitch upper part). Monitor can be switched on or off for testing purposes.
Short Seam Automat 2211-5 Working Instructions D.3 Beisler Automated Sewing Equipment Programming D.3.13 Level 2 special parameters / Lists Parameter setting for level 2 submenus The following section describes the special parameters that are set in lists. When a submenu is requested, only those positions of the parameter list are displayed that refer to the machine function.
Beisler Automated Sewing Equipment D.3 Short Seam Automat 2211-5 Working Instructions Programming D.3.13 Level 2 special parameters / Lists Setting stitch lengths and bar tacks: All settings for the configuration of the seam can be changed using this list. The minimum and maximum values of input are limited by the program control unit. Values that are not within the limits will not be accepted but reduced to the corresponding minimum or maximum value. 1 • Press key.
Short Seam Automat 2211-5 Working Instructions D.4 Beisler Automated Sewing Equipment Factory settings D.4.1 Factory settings global parameters M 01 Global parameters Pos. 01 Global parameters 2211-5 Value Unit TILL CLAMP SIDEWAYS FWD 0.3 sec 02 TILL CLAMP DOWN 0.1 sec 03 TILL VACUUM OFF 0.2 sec 04 Fadenlänge Spule voll 003 m 05 TILL CLAMP INSERTING 0.2 sec 06 SEWING END ->CL.SIDEW 0.1 sec 07 TIME AFTER CLAMP OPEN 0.1 sec 10 TILL FOLDING CL. CLOSED 0.
Beisler Automated Sewing Equipment D.4 Short Seam Automat 2211-5 Working Instructions Factory settings D.4.2 Factory settings special parameters M 01 Special parameters seam 01: Pos.
Short Seam Automat 2211-5 Working Instructions D.4 Beisler Automated Sewing Equipment Factory settings D.4.2 Factory settings special parameters M 01 Special parameters seam 02: Pos.
Beisler Automated Sewing Equipment D.4 Short Seam Automat 2211-5 Working Instructions Factory settings D.4.2 Factory settings special parameters M 02 Special parameters seam 11: Pos.
Short Seam Automat 2211-5 Working Instructions D.4 Beisler Automated Sewing Equipment Factory settings D.4.2 Factory settings special parameters M 02 Special parameters seam 12: Pos.
Beisler Automated Sewing Equipment D.4 Short Seam Automat 2211-5 Working Instructions Factory settings D.4.2 Factory settings special parameters M 03 Special parameters seam 19: Pos.
Short Seam Automat 2211-5 Working Instructions D.4 Beisler Automated Sewing Equipment Factory settings D.4.2 Factory settings special parameters M 03 Special parameters seam 20: Pos.