Inhoudsopgave Belangrijke informatie die u moet volgen: .............................3 De instelling van uw televisie: ................................................4 Veiligheidsinformatie: ............................................................5 Start: ..........................................................................................6 De antenne aansluiten ...............................................................6 Uw televisietoestel inschakelen en het eerste gebruik ...............
Belangrijke informatie die u moet volgen De LCD panelen worden met spitstechnologische middelen geproduceerd. Hoewel, onder bepaalde omstandigheden kunnen ontbrekende of schitterende vlekken op het scherm verschijnen. Dit betekent niet dat het product defect is. Het scherm en de kast schoonmaken… Nadat u de stroom heeft uitgeschakeld, maakt u het scherm en de kast schoon met een zachte droge doek.
Uw televisie Wij rekenen erop dat dit product, vervaardigd in moderne faciliteiten met volledige naleving van kwalitatief hoogstaande normen, u optimale prestaties zal leveren. Daarom vragen we u deze volledige handleiding te lezen voor u het product in gebruik neemt en bewaar hem voor eventuele raadpleging in de toekomst.
Voor uw beveiliging Dit apparaat is ontworpen en geproduceerd conform met internationale veiligheidsnormen. Hoewel, u moet voorzichting blijven voor optimale resultaten en om de veiligheid te verzekeren, net als bij ieder elektrisch apparaat. Lees daarom onderstaande punten voor uw eigen veiligheid. Deze informatie dient voor algemene doeleinden. Ze werd voorbereid u hulp te bieden met betrekking tot alle elektrische producten en sommige kunnen niet van toepassing zijn op de producten die u gekocht hebt.
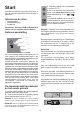
Start Verwijder de televisie zorgvuldig uit de doos. U kunt de verpakking bewaren om deze later te gebruiken. 7 Inhoud van de doos • Voedingskabel • Afstandsbediening • 2 batterijen Opmerking: The Scart, HDMI, VGA and RCA cables are not supplied with the device. 3. Druk de voeding aan/uit schakelaar in op de LCD TV. 4. Als u uw televisie wilt inschakelen, drukt u een numerieke toets in op de “/” “ afstandsbediening of de “ toets.
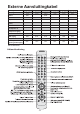
Bedieningseenheid TV Bedieningspaneel Menu toets MENU P- P+ Programma neer/op toets SOURCE Bronselectie toets TV/AV Stroom Aan/Uit toets Volume Up/Down toets V- Stand-by indicator V+ Externe aansluitingen Component video ingang (Pb) Pr COMPONENT VIDEO INPUT Component video ingang (Y) Pb AV1 scart Y Stroom invoer Or Component video ingang (Pr) Component geluid ingang (L) AV2 scart SPEAKER OUT Antenne ingang S-VHS ingang 26”/27”/32” HDMI Geluidsuitgang (Rechts/R) Video ingang CINCH
Externe Aansluitingkabel 26 ” Paneelgrootte 27 ” 32” 37 ” 40 ” 42 ” 26” 16:9 TFT-LCD 27” 16:9 TFT-LCD 32” 16:9 TFT-LCD 37” 16:9 TFT-LCD 40” 16:9 TFT-LCD 42” 16:9 TFT-LCD WXGA WXGA WXGA WXGA WXGA WXGA Paneeltype Scart 1 STD. STD. STD. STD. STD. STD. Scart 2 STD. STD. STD. STD. STD. STD. Koptelefoon aansluiting. STD. STD. STD. OPT. OPT. OPT. Audio/Video RCA (In/uit). STD. STD. STD. STD. STD. STD. S-Video contact: STD. STD. STD. STD. STD. STD.
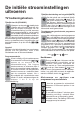
De initiële stroominstellingen uitvoeren Tijdelijke uitschakeling van het geluid (MUTE) Om het geluid van uw televisie tijdelijk te dempen, drukt u de ( ) toets in. In dat geval verschijnt het ( ) teken op het scherm. Wanneer u opnieuw op dezelfde toets drukt, schakelt het geluid opnieuw aan. Als u de ( ) toets indrukt in de Mute modus wordt het volume verhoogd en de Mute stand wordt geannuleerd.
Automatisch afstemmen en opslaan van televisiezenders met Autoprogram AUTOPROGRAM ZOEKEN Druk op de ( ) toets. Ga naar het instellingmenu door op de neerwaartse navigatietoets te drukken ( ). Als u het autoprogram tabblad selecteert met de op/neer ( )/( ) toetsen en u drukt op ( ) verschijnt het autoprogram menu op het scherm. In het land tabblad selecteert u het land waarvan u de uitzending prioritair wilt bekijken door de rechtse/linkse navigatietoetsen in te drukken ( )/( ) .
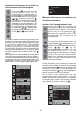
Indien u het kanaalnummer niet kent SET-UP Druk op de “MENU” toets. Ga naar het instellingmenu door op de neerwaartse navigatietoets te drukken. Selecteer het programma waarin u een installatie wilt uitvoeren met de links/rechts navigatietoetsen ( )/( ) of de numerieke toetsen. Selecteer het systeem waarin u de zoekopdracht wilt uitvoeren uit de systeem tabs. Ga naar het systeem tab door op de onderstaande navigatietoets ( ) te drukken. Hier kan uw TV ingesteld worden op één systeem.
Een programma verwijderen dat werd opgeslagen: Selecteer het programma dat u wilt verwijderen door op de op- en neerwaartse ( )/( ) of rechts – links navigatietoetsen ( )/( ) te drukken. Druk op de “blauwe” toets. De blauwe toets op het menu knippert voor goedkeuring. U kunt de verwijdering uitvoeren door op de “blauwe” toets te drukken of u kunt de verwijdering onderbreken door op de ( ) toets te drukken.
Balans: Om het geluid-evenwicht tussen de linker en rechter luidsprekers aan te passen tot het gewenste niveau, selecteert u het balans tabblad met de neerwaartse navigatietoets ( ). Met de rechts-links navigatietoetsen ( )/( ) kunt u de balans bijstellen. Opmerking: U kunt de equalizer optie rechtstreeks selecteren met de ( ) toets op de afstandsbediening. U kunt de equalizer weergave steeds verlaten door op ( ) te drukken.
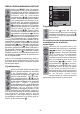
Smart beeld: U kunt een van de niet-aanpasbare standaardinstellingen selecteren in het geheugen (Beeldmodus) door op de toets te drukken op de afstandsbediening. Zacht, Natuurlijk en Rijk zijn standaardwaarden; de gebruiker vertegenwoordigt de waarden die in het geheugen werden opgeslagen. Beeldformaat: In deze optie kunt u het beeld van de uitzending visualiseren in een gewenst formaat. U kunt deze weergeven in Automatisch, 16:9, ondertitels, brievenbus en 4:3 formaten.
Menutaal: Selecteer het menutaal tabblad met de rechtse navigatietoets ( ). De menutalen verschijnen in het menu in volgorde. Selecteer de gewenste taal met de rechtse/linkse navigatietoetsen ( )/( ). Druk op de ( ) toets. Alle instellingen van uw televisie worden weergegeven in de taal die u hebt aangegeven. Opmerking: De zoommodus werkt niet als er een PIP beeld aanwezig is op het scherm en in de COMP/HDMI/PC ingangen.
PIP afmeting: Met deze optie kunt u in/uitzoomen op het PIP venster. Om die reden kunt u PIP SIZE de PIP afmeting wijzigen door de ( ) toets in te drukken terwijl er een PIP venster op het scherm is. PAT Modus: Terwijl u TV kijkt, kan naar u de PAT (Picture and Teletext – Beeld en PAT teletekst) modus gaan door op de ( ) toets van de afstandsbediening te drukken. Dankzij deze functie kunt u de teletekst uitzending volgen als de zender ook een teletekstuitzending bevat die weergegeven wordt.
Sub page pagina toets (SUB) Indien een agentschap dat teletekstuitzendingen verzorgt de subpagina’s van een teletekstpagina uitzendt, verschijnen de paginanummers die met 1 beginnen op het scherm. Met 5 de ( ) toets kunt u overschakelen op de subpagina’s. In dat geval wordt de ‘subpagina’ weergegeven in de “rode-“ en “groene +” kaders. U kunt de subpagina’s selecteren met de “RODE” en “GROENE” toetsen. U kunt dezelfde pagina annuleren door op dezelfde toets te drukken.
Koptelefoon De koptelefoon moet een impedantie hebben tussen 8 en 32 ohm en een 3.5 mm stereo jack stekker. Voer de koptelefoon in in het koptelefoon contact van de TV. High definition - HD klaar Uw televisie kan highdefinition signalen (HDTV) ontvangen. U kunt de ingang bronnen aansluiten (HDTV set-top box of HDTV DVD speler) op het (HDMI) contact of (DVI-D) (digitaal HDTV signaal). Hierdoor bent u zeker van een digitale weergave.
PC toegang instelling U kunt zich naar het beeldinstelling menu begeven door op ( ) te drukken in PC modus. Om de nodige aanpassingen aan te brengen in dit menu kunt u gebruik maken van de rechtslinks, op-neer navigatietoetsen ( )/( ) ( )/( ) van de afstandsbediening. Hier kunt u de volgende instellingen invoeren voor de monitor. Remark 1: Als u een afbeelding wilt weergeven in de HDMI modus moet u er voor zorgen dat uw computer uitgerust is met een HDMI ondersteunde schermkaart. X.
Help en tips: De televisie werkt niet Geen geluid Zorg ervoor dat de stroomkabel van de televisie aangesloten is op het netwerk en de stroom aan-uit schakelaar ingeschakeld is. • • • Slechte beeldkwaliteit • Is de antennekabel aangesloten? • Als u een satelliet antenne gebruikt, werd deze afgesteld om uitzendingen optimaal te ontvangen? • Zorg ervoor dat de antenne ver verwijderd is van de apparaten die elektromagnetische golven uitgeeft. (Neon lampen, luidsprekers, etc.
Technische specificatie tabel SCHERMGROOTTE 26” 27” 32” 37” 40” 42” 26” 16:9 actieve matrix TFT 27” 16:9 actieve matrix TFT 32” 16:9 actieve matrix TFT 37” 16:9 actieve matrix TFT 40” 16:9 actieve matrix TFT 42” 16:9 actieve matrix TFT Stroomverbruik 2x7 W 2x7 W 2x10 W 2x10 W 2x10 W 2x10 W Power consumption 120 W 120 W 145 W 175 W 240 W 240 W Stand-by stroomverbruik 1,5 W 1,5 W 1,5 W 1W 1W 1W Teletext page 12 12 12 12 12 12 Virtuele Dolby Surround OPT. OPT. OPT.
Sommaire Consignes importantes à respecter: ......................................3 Caractéristiques de votre nouvelle télévision: ......................4 Consignes de sécurité : ...........................................................5 Pour commencer : ....................................................................6 Branchement de l’antenne . .......................................................6 Première mise en marche et utilisation .....................................6 Piles .................
Consignes importantes à respecter Les écrans LCD sont fabriqués avec la dernière technologie de pointe. Il peut cependant y avoir des points manquants ou brillants sur l’écran dans certains cas. Cela ne signifie pas que le produit est défaillant. Pour nettoyer l’écran et le boîtier... Après avoir éteint le téléviseur, nettoyez l’écran et le boîtier avec un chiffon doux et sec.
Votre téléviseur Nous souhaitons vous offrir la meilleure performance avec ce produit fabriqué dans une usine moderne conformément aux principes de qualité. C’est pourquoi nous vous suggérons de lire ce manuel dans son intégralité avant de commencer à utiliser votre produit, et de le conserver pour une référence ultérieure.
Pour votre sécurité Cet appareil a été conçu et fabriqué conformément aux normes de sécurité internationales. Cependant, comme tout appareil électrique, il nécessite la prise de certaines précautions pour pouvoir vous offrir une performance optimale en toute sécurité. Par conséquent, veuillez lire les renseignements ci-dessous pour votre propre sécurité.
Pour commencer Retirez doucement le téléviseur de son carton. Vous pouvez garder l’emballage du téléviseur pour un usage ultérieur. 7 Contenu de la boîte • • • Un câble d’alimentation Une télécommande 2 piles 3. Appuyez sur le bouton marche/arrêt situé sur la TV LCD.. 4. Pour allumer le téléviseur, appuyez sur une des touches numériques ou sur la touche “ ”/” “. Vous pouvez aussi utiliser les boutons de la TV qui se trouvent sur votre téléviseur.
Unité de contrôle Panneau de Contrôle de la TV Touche Menu. MENU P- P+ Boutons de programme Bas/Haut SOURCE Bouton de sélection de la Source. TV/AV Bouton marche/arrêt Bouton pour Réduire/ Augmenter le volume.
TABLEAU DES CONNEXIONS EXTERNES Taille du panneau Type de panneau 26 ” 27 ” 32” 37 ” 40 ” 42 ” 26” 16:9 TFT-LCD 27” 16:9 TFT-LCD 32” 16:9 TFT-LCD 37” 16:9 TFT-LCD 40” 16:9 TFT-LCD 42” 16:9 TFT-LCD WXGA WXGA WXGA WXGA WXGA WXGA Scart 1 STD. STD. STD. STD. STD. STD. Scart 2 STD. STD. STD. STD. STD. STD. Prise pour écouteurs STD. STD. STD. OPT. OPT. OPT. Audio/Video RCA (Entrée/Sortie) Prise S-Video STD. STD. STD. STD. STD. STD. STD. STD. STD. STD. STD. STD.
Effectuer les premiers réglages Commandes du téléviseur: Coupure temporaire du son (MUTE) Pour couper temporairement le son du téléviseur, appuyez sur la touche ( ). Le symbole ( ) apparaît alors à l’écran. Lorsque vous appuyez de nouveau sur cette touche, le son est réactivé. Lorsque vous appuyez sur la touche ( ) en mode de coupure temporaire de son, le son est augmenté et le mode de coupure temporaire de son est interrompu.
Recherche automatique et mémorisation des chaînes TV avec l’autoprogrammation AUTOPROG. CHERCHER Appuyez sur la touche ( ). Sélectionnez le menu des réglages à l’aide de la touche directionnelle bas ( ). Lorsque vous sélectionnez la rubrique Autoprogrammation en appuyant sur les touches directionnelles haut/bas ( )/( ) puis en appuyant sur ( ), le menu Autoprogrammation s’affiche à l’écran.
Si vous ne connaissez pas le numéro de la chaîne Appuyez sur la touche MENU. Sélectionnez le menu des réglages à l’aide de la touche directionnelle bas. Sélectionnez le programme à régler à l’aide des touches directionnelles droitegauche ( )/( ) ou les touches numériques. Sélectionnez le systéme de recherche parmi les rubriques présentées. Sélectionnez la rubrique Système à l’aide de la touche directionnelle bas ( ).
Supprimer un programme mémorisé: Sélectionnez le programme à supprimer avec les touches haut/bas ( )/( ) ou droite-gauche ( )/( ). Appuyez sur la touche de couleur «bleue». Le bouton bleu sur le menu se met à clignoter comme confirmation. Vous pouvez supprimer le programme à l’aide de la touche bleue ou choisir d’interrompre l’opération en appuyant sur la touche ( ). Une fois la touche bleue enclenchée, le programme sélectionné est supprimé et toutes les chaînes le suivant sont déplacées d’un rang en avant.
NB: Vous pouvez sélectionner les options d’égaliseur directement avec la touche ( ) de votre télécommande. Vous pouvez quitter la fonction égaliseur, en appuyant sur ( ) à n’importe quel moment. Balance: Pour régler la balance des hautsparleurs gauche et droit de la manière que vous désirez, sélectionnez la rubrique Balance avec la touche directionnelle bas ( ). Utilisez les touches directionnelles droite / gauche ( )/( ) pour régler la balance.
Image intelligente: Vous pouvez sélectionner un des paramètres par défaut nonréglable dans la mémoire (Mode Image) en appuyant sur la touche “ “ de votre télécommande. Douce, Naturelle et Pleine sont les valeurs par défaut. Cependant vous pouvez mémoriser vos propres réglages dans la rubrique Utilisateur. Format d’image : Vous pouvez visualiser l’image transmise selon le format de votre choix. Les formats sont Automatique, 16:9, 14:9, Sous-titrage, Letterbox, et 4:3.
Menu langue: Appuyez sur la touche ( ) directionnelle droite pour sélectionner le menu langue. Les langues de menu sont affichées dans l’ordre à l’écran. Sélectionnez la langue de votre choix à l'aide des touches directionnelles droite/gauche ( )/( ). Appuyez sur la touche ( ). Toutes les fonctions de votre téléviseur s’afficheront dans la langue que vous avez indiquée.
Taille PIP: Cette fonction vous permet de réduire ou d’agrandir la taille de la fenêtre PIP. PIP SIZE Pour cela, réglez la taille PIP en appuyant sur la touche ( ) alors que l’image PIP est à l’écran. Mode PAT: Pendant que vous regardez une émission sur votre téléviseur, vous PAT pouvez choisir le mode PAT (Image et Télétexte) en appuyant sur la touche ( ) de la télécommande. Ainsi, la transmission télétexte de la chaîne est consultable en cours de visionnage des émissions de la chaîne.
Touche de sous-page (SUB) En cas de sous-pages de pages télétexte, les numéros de page commençant par 01 sont affichés en bas de l'écran. Utilisez la touche ( ) pour allez sur les sous-pages. Dans ce 5 cas, la rubrique sous-page est affichée dans les cadres “rouge-” et “vert+”. Vous pouvez sélectionner les sous-pages à l’aide des touches “ROUGE” ET “VERTE”. Vous pouvez quitter la même page en appuyant de nouveau sur la touche.
Casque Haute définition - HD prêt Le casque doit avoir une impédance entre 8 et 32 ohms et une prise stéréo de 3.5 mm. Branchez la prise du casque dans la prise d’entrée de casque de la TV. Votre télévision peut recevoir des signaux de haute définition (HDTV), Vous pouvez brancher les sources d’entrée (HDTV ou lecteur DVD HDTV) à la prise (HDMI). Ceci garantit la visualisation de programmes numériques HDTV même s’ils sont protégés contre copie (Protection de Copie Haute Définition HDCP).
Réglage d’accès PC Ouvrez le menu des réglages en appuyant sur la touche ( ) lorsque vous êtes en mode PC. Pour faire les réglages nécessaires dans ce menu, vous pouvez utiliser les boutons de direction droite-gauche, vers le haut-bas ( )/( ) ( )/( ) sur votre télécommande. Vous pouvez ensuite effectuer les réglages nécessaires pour le mode moniteur. X.position: Réglage de la position horizontale y.position: Réglage de la position verticale Clock: Ceci est le signal de fréquence pixel clock.
Aide et conseils Le téléviseur ne fonctionne pas Pas de son Vérifiez que le câble d’alimentation est branché à la source d’alimentation et que l’interrupteur est sur Marche. • Mauvaise qualité d’image • L’antenne est-elle branchée ? • Si vous utilisez une antenne satellite, l’antenne a-t-elle été réglée pour recevoir les transmission de la meilleure manière? • Vérifiez que l’antenne n’est pas à proximité d’appareils émettant des ondes électromagnétiques. (néons, hauts-parleurs, etc.
Tableau de détails techniques TAILLE DE L’ÉCRAN 26” Type de panneaux 26” 16:9 matrice Active TFT 27” 32” 37” 40” 42” 27” 16:9 matrice Active TFT 32” 16:9 matrice Active TFT 37” 16:9 matrice Active TFT 40” 16:9 matrice Active TFT 42” 16:9 matrice Active TFT Sortie son 2x7 W 2x7 W 2x10 W 2x10 W 2x10 W 2x10 W Consommation d’énergie 120 W 120 W 145 W 175 W 240 W 240 W Consommation d’énergie en mode de veille 1,5 W 1,5 W 1,5 W 1W 1W 1W Page du télétexte 12 12 12 12 12 12
Contents Important considerations to follow:...................................3 The features of your new television: .................................4 Safety warnings: ..................................................................5 Start:......................................................................................6 Connecting the antenna ........................................................6 Powering on your set and the initial use ................................6 Batteries...............
Important Considerations to Follow The LCD panels are produced with state-of-the-art technology. However, there might be missing or shiny spots on the screen under certain circumstances. That does not mean that the product is faulty. Cleaning the screen and the cabinet… After powering off, wipe the screen and the cabinet clean with a soft and dry cloth. We recommend that you do not use patented polishes or solvents on the screen or the cabinet since that might cause damage.
Your Television We would like this product, which has been manufactured in modern facilities in accordance with total quality principles, to offer you the best performance. Therefore, we would like you to read this entire manual carefully before you use your product and keep it for future reference.
For your security This device was designed and manufactured in line with international standards of security. However, it is required to be careful for obtaining the best results and ensuring security as in every electrical appliance. Hence, please read the following information for your own security. This information is for general purposes, it has been prepared to provide you with assistance concerning all the electrical products and some of them might not be related to the products you have purchased.
Start Remove your television carefully out of its box. You can keep the package of your television to use it later on. Contents of the box 7 • Power cable • Remote Control • 2 batteries Note: The Scart, , HDMI, VGA and RCA cables are not supplied with the device. Antenna connection 3. Press the Main power on/off button located on the LCD TV.. 4. To power on your television, press any numerical key on the remote control or the key “ “/” “. For this process, you can also use the TV.
Control Unit TV Control Panel Menu button. MENU P- P+ Program Down/Up button SOURCE Source selection button. TV/AV Main Power on/off button Volume Down/Up button.
27 ” 26 ” Panel Size 32” 37 ” 40 ” 26” 16:9 TFT-LCD 27” 16:9 TFT-LCD 32” 16:9 TFT-LCD 37” 16:9 TFT-LCD 40” 16:9 TFT-LCD WXGA WXGA WXGA WXGA WXGA P a n e l Ty p e 42 ” 42” 16:9 TFT-LCD WXGA Scart 1 STD. STD. STD. STD. STD. STD. Scart 2 STD. STD. STD. STD. STD. STD. Headphone socket STD. STD. STD. OPT. OPT. OPT. Audio/Video RCA (In/Out) STD. STD. STD. STD. STD. STD. S-Video socket STD. STD. STD. STD. STD. STD. Loudspeaker Out N/A N/A N/A OPT. OPT. OPT.
Performing the initial power-on settings TV controls: Temporary On-Off (STAND-BY) Return to Selected Button Program (SWAP) When you press the red ( ) stand-by button (Temporary power on-off function) located on the upper right hand side of your remote control of your television PR+ when it is switched on; the sound and the picture will go off. In the stand-by PRfunction, the power indicator of your television will glow more.
Automatic tuning and storing in the memory the TV channels via Autoprogram Press the ( ) button. Move onto the channel settings menu by pressing the down movement button ( ). When you select the autoprogram tab by pressing the Up/down direction ( )/( ) buttons and pres the button ( ), the autoprogram menu will be visualized on the screen. In the country tab, select the country of which you would like to watch the broadcast in priority by pressing the right/left direction buttons ( )/( ).
Fine Tuning SETUP SYSTEM BG CHANNEL C-- FINE TUNE 0 SEARCH PROGRAM NO P 01 STORE AUTOPROGRAM SELECT MENU EXIT If you do not know the channel number Press the MENU button. Move onto the channel settings menu by pressing the down movement button. Select the program in which you would like to perform an Installation using the rightleft movement ( )/( ) or numerical buttons. Select the system in which you would like to make the search from among the system tabs.
Deleting a program that has been stored: To name the programs The channels names might be automatically displayed on the programs in the table via Autoprogram, yet the channel number might also be displayed instead of the channel name. You can assign your program or programs of choice the names that have a maximum of five characters. Select Select the program you would like to delete by pressing the upwards-downwards ( )/( ) or Right-left direction buttons ( )/( ). Press the “blue” colored button.
Balance: To adjust the sound balance between the right and left loudspeakers to the desired level, select the balance tab by using the downward direction ( ) button. Using the right/left direction ( )/( ) buttons, adjust the balance. Note: You can choose the equalizer options directly using the ( ) button on your remote control. You can exit the Equalizer display by pressing the ( ) button at any given time. EQUALIZER Sound type: The program you watch might be stereo or in two different languages.
Smart picture: You can select one of the nonadjustable default settings in the memory (Picture Mode) by pressing the “ “ button on your remote control. Soft, Natural and Rich are default values; the user, however represents the values you saved in memory. Picture Format: You can visualize the broadcast picture you watch in this option in a format of your choice. You can visualize them in the Automatic, 16:9 14:9, Subtitle, Letterbox and 4:3 formats.
OK/ FREEZE Menu language: Selecting the Menu language tab, press the right movement ( ) button. The menu languages shall appear in the menu in order, select your desired language using the Right-left movement buttons ( )/( ). Press the ( ) button. All the setting displays of your television will be visualized in the language that you selected.
PIP Dimension: With this option, you may zoom in and zoom out the PIP window size. For this PIP SIZE purpose, you may change the PIP size by pressing the ( ) button while there is a PIP picture on the screen. PAT Mode: While watching a broadcast on your television, you can enter the PAT (Picture PAT and teletext) mode pressing the ( ) button on your remote control. Thanks to this feature, you can also follow the teletext broadcast if there is also a teletext broadcast in the program that is being watched.
with the figures 01, 02,03 and 04 on the bottom of the page. To view one of these pages longer, press the ( ) button. When you press the same button again, the cycle continues. Note: The fastext feature is not available for all the teletexts broadcasts. It is determined by the broadcasting agency whether it is to be broadcast or not. Sub page button (SUB) Toptext (optional) : At the bottom of the teletext screen is a row of subject headings in yellow and blue.
Headphones High definition - HD ready The headphones must have an impedance of between 8 and 32 ohms and have a 3.5 mm stereo jack plug. Plug the headphone jack into the headphone socket of the TV. Your television can receive highdefinition signals (HDTV) You can connect the input sources (HDTV set-top box or HDTV DVD player) to the (HDMI) socket (digital HDTV signal). This ensures that you can view digital HDTV programmes, even if they are copy-protected (HDCP High-Definition Copy Protection).
PC Accession Setting In the PC mode, enter the picture setting menu by pressing either the ( ) or Green ( ) button. In order to make the necessary adjustments in this menu, you can use the Right-left, Up-down direction ( )/( ) ( )/( ) buttons on your remote control. Here, you can not only make the brightness and contrast settings, you can also make the following settings related to the monitor. X. Position: Horizontal position setting Y.
Help and tips The television does not function No sound Make sure that the power cable of the television is connected to the network and the power on -off switch is turned on. • Low picture quality • Is the antenna cable connected? • If you are using a satellite antenna, has the antenna been adjusted to receive broadcast in the best way? • Be careful that the antenna is far from devices that emit electromagnetic waves. (Neon lights, loudspeakers etc.
Technical specifications chart SCREEN SIZE Panel type 26” 27” 26”, 16:9 Active 27”, 16:9 Active matrix TFT matrix TFT 32” 37” 42” 40” 32”, 16:9 Active 37”, 16:9 Active 40”, 16:9 Active matrix TFT matrix TFT matrix TFT 42”, 16:9 Active matrix TFT Sound output 2x7 W 2x7 W 2x10 W 2x10 W 2x10 W 2x10 W Power consumption 120 W 120 W 145 W 175 W 240 W 240 W Stand-by power consumption 1,5 W 1,5 W 1,5 W 1W 1W 1W Teletext page 12 12 12 12 12 12 Virtual dolby surround OPT. OPT.