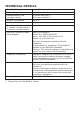
TECHNICAL DETAILS Free Field Range Up to 300 metres* Indoor Range Up to 50 metres* Handset Battery Life (average values) 10 hours talk time** 100 hours standby** Number of Handsets Up to 5 Intercom Mode Yes Three-Way Conference (1 outside correspondent + 2 internal correspondents) Yes Electrical Connection/Base Mains Adaptor Base main adaptor: Model No.: S004LV0600030 Input: 100-240 V/50-60 Hz/0.
TABLE OF CONTENTS 1 1.1 1.2 IMPORTANT SAFETY INSTRUCTIONS.......................................... 5 Package Contents..........................................................................6 Precautions...................................................................................6 2 2.1 2.2 2.3 INSTALLING YOUR PHONE ......................................................... 7 Installing and Charging the Batteries................................................7 Connecting the Base Station.........
7 PHONEMAIL.............................................................................. 21 8 8.1 8.2 8.3 8.4 8.5 8.6 PHONE SETTINGS..................................................................... 21 Date and Time Settings................................................................. 21 Alarm Settings............................................................................. 22 Handset Settings......................................................................... 23 Base Settings...........
1 IMPORTANT SAFETY INSTRUCTIONS When using your telephone equipment, basic safety precautions should always be followed to reduce the risk of fire, electric shock and injury, including the following: 1) Read and understand all the instructions. 2) Follow all warnings and instructions marked on the product. 3) Unplug this product from the wall outlet before cleaning. Do not use liquid cleaners or aerosol cleaners. Use a damp cloth for cleaning.
1.1 The • 1 • 1 • 1 • 1 • 2 • 1 • 1 Package Contents package contains the following items: Handset Base station Mains power adapter Telephone line cord rechargeable batteries User’s guide Telephone connector Please read this guide carefully to get to know the main features of your Twist 212, and read the safety instructions before using it. We also invite you to share the safety guidelines contained in this guide with all family members, and especially children. 1.
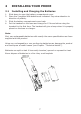
2 2.1 1. 2. 3. 4. INSTALLING YOUR PHONE Installing and Charging the Batteries Slide down to open the battery compartment cover. Place the 2 supplied AAA batteries as indicated. Pay extra attention to direction of polarity. Slide the battery compartment cover back. Put the handset on the base and charge for 15 hours before using the handset for the first time. The handset will give a beep when it is properly placed on the base or charger.
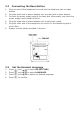
2.2 1. 2. 3. 4. 5. 6. 2.3 1. 2. 3. 4. Connecting the Base Station Plug one end of the telephone line cord into the telephone jack on base bottom. Plug the small end of power adapter into a power jack on base bottom. Connect the power supply plug to the base jack horizontally, and route the power supply cord through the slot. Plug the large end of power adapter into a wall power outlet. Plug the other end of the telephone line cord in to the telephone jack or micro-filter.
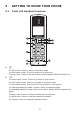
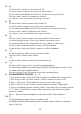
3 GETTING TO KNOW YOUR PHONE 3.1 Twist 212 Handset Overview 1. M In idle mode: Press to access the main menu In sub-menu mode: Press to confirm the selection During a call: Press to access Intercom/Phonebook/Redial list/Call list 2.
3. + In idle mode: Press to access the call list In menu mode: Press to scroll up the menu items In Phonebook list/Redial list/Call List: Press to scroll up the list During a call: Press to increase the volume In ringing: Press to increase the ringer volume 4.
During ringing: Press to answer a call *Subject to technical availability and to subscription from Belgacom. **See Chapter 8.3.8 on how to program the memory key. 3.2 1. Base Station Overview A Press A on the base station to page your handset. It will ring for approximately 60 seconds. Press and hold A on the base station for about five seconds, the base station is entered into registration mode and allows handset registration. 2. 3. ,@ Steadily on while the handset is charging or in use.
3.3 Display Icons and Symbols The LCD display gives you information on the current status of the telephone. h j k l x a g n b v [ ] s f Steadily on Flash when Steadily on Flash when when the handset is in range of the base. out of range of the base or not registered to the base. when an intercom is in progress. there is an incoming internal call. Indicates a call is in progress. Indicate that handsfree is being used. Steadily on when an alarm is set. Flash when the alarm time set before reaches.
4 USING YOUR PHONE 4.1 Make a Call 4.1.1 Preparatory Dialing Enter the phone number and press to clear the entry. T or S to dial the number. Press C 4.1.2 Direct Dialing Press T or S to take the line and enter the phone number. 4.1.3 Dial from Direct Memory Keys In idle or off hook mode, press and hold 1/2/3 to dial the direct memory number. You have to store number to the related key first. See section 8.3.8 for reference. 4.1.
4.3 End a Call During a call connection, press O to end the call. OR Put the handset on the base station to end the call. 4.4 Adjust Earpiece and Handsfree Volume There are 5 levels (VOLUME 1 to VOLUME 5). During a call: Press +/- to select volume 1-5. The current setting is shown. When you end the call, the setting will remain at the last selected level. 4.5 Mute a Call You can talk to someone nearby without letting the caller hear you during a call.
4.8.1 Redial a Number from the Redial List 1. In idle mode, press - to access the redial list. Remarks: If redial entry with name, press # to view the number. 2. Press +/- to browse the redial list. 3. Press T or S to dial to the selected redial number. Note: If there are no numbers in the redial list, the display shows “EMPTY”. 4.8.2 Store a Redial Number into the Phonebook 1. Follow Steps 1 and 2 in section 4.8.1. 2. Press M and +/- to select ADD TO PB. 3. Press M to enter the name. 4.
handset will return to standby mode. Note: If only one handset is registered to the base station, press display “NOT POSSIBLE” C will 4.10.1 Intercom Another Handset 1. In idle mode, press C and the registered handsets will display except the 2. 3. calling handset. Enter the desired handset number to intercom with. The called handset rings and press T on the called handset to establish the internal call.
5 PHONEBOOK Your phone can store up to 50 private phonebook entries with names and numbers. Each phonebook entry can have a maximum of 20 digits for the phone number and 12 characters for the name. You can also select different ringtones for your phonebook entries. Phonebook entries are stored alphabetically by name. 5.1 Add a New Phonebook Entry In idle: 1. Press P to access the phonebook. OR Press M and +/- to select PHONEBOOK main menu item and then press M to access the phonebook. 2.
5.4 Edit a Phonebook Entry In idle: 1. Press P to access the phonebook. 2. Press +/- to select the desired phonebook entry. 3. Press M and +/- to select EDIT. 4. Press M and the current contents of the selected phonebook entry displays. 5. Edit the name (press C to delete a character) and press M. 6. Edit the number (press C to delete a digit) and press M. 7. Press +/- to select the ringtone and press M to confirm. 5.5 Delete a Phonebook Entry In idle: 1. Press 2. Press 3. Press 4. Press 5.6 1. 2. 3.
6 CALLER DISPLAY This feature is available if you have subscribed the Caller Line Identification service with Belgacom. Your phone can store up to 20 received calls with date/ time information in the Call List. The number will be shown on the LCD when the phone is ringing. If the number matches with one of the entries in your Private Phonebook, the caller’s name stored in the private phonebook will be displayed alternatively with the number.
6.4 1. 2. 3. 4. 6.5 1. 2. 3. 4. 6.6 Delete the Entire List of the Call List Follow Steps 1 and 2 in Section 6.1. Press M and +/- to select DELETE ALL. Press M to confirm. Press M to re-confirm. View the Details of the Call List Entry Follow Steps 1 and 2 in Section 6.1. Press M and +/- to select DETAILS. Press M to display the date and time of the selected call list entry. Press M to go back to previous screen.
7 PHONEMAIL By subscription to Belgacom, you can have your calls diverted to Phonemail when you are absent. For more details, contact Belgacom. When new messages are received, the icon appears on the screen. The g icon disappears once you have consulted the voicemail messages. If the icon doesn't disappear, press and hold 4 during call list review will turn off the voicemail icon manually.
8.1.3 Set the Time 1. Press M and +/- to select HS SETTINGS. 2. Press M and +/- to select DATE & TIME. 3. Press M and +/- to select SET TIME. 4. Press M to enter the time information. The time entered will be in the 5. format you set in Section 8.1.2. Press M to confirm. Note: If time has been set before, the current time will display, otherwise, “HH:MM” will display. 8.1.4 Set the Date 1. Press M and +/- to select HS SETTINGS. 2. Press M and +/- to select DATE & TIME. 3.
8.3 Handset Settings 8.3.1 Set the Ringer Melody for Internal/External Calls 1. Press M and +/- to select HS SETTINGS. 2. Press M and +/- to select RING SETUP. 3. Press M and +/- to select INT RING or EXT RING. 4. Press M and +/- to select the desired ringer melody from the melody 5. list. Note: The respective ringer melody will be played while browsing the melody list. Press M to confirm. 8.3.2 Set the Ringer Volume 1. Press M and +/- to select 2. Press M and +/- to select 3.
8.3.5 Rename the Handset 1. Press M and +/- to select HS SETTINGS. 2. Press M and +/- to select RENAME HS. 3. Press M and enter the name of your handset. 4. Press M to confirm. 8.3.6 Choose the Information to be displayed in idle You can choose to display time or handset name in your idle screen. 1. 2. 3. 4. Press Press Press Press M and +/- to select HS SETTINGS. M and +/- to select HS DISPLAY. M and +/- to select HANDSET NAME or TIME. M to confirm. 8.3.
1. 2. 3. Press Press Press M and +/- to select BS SETTINGS. M and +/- to select DELETE HS. M and you are requested to enter the 4-digit system PIN. 4. 5. 6. 7. Enter the 4-digit system PIN (default PIN is 0000). Press M and a list of registered handsets is displayed. Press +/- to select one of the handsets that you want to de-register. Press M to confirm. 8.4.2 Change the Flash Time On the Belgian public network, the recall time is 120 ms (SHORT). M and +/- to select BS SETTINGS.
8.5 Registration Your handset and base station is pre-registered. Up to five handsets can be registered to a single base station. If for some reason, the handset is not registered to the base station (h flashes even when the handset is near the base station), register your handset according to the following procedure. 1. Press and hold 2. 3. station is entered into registration mode. Press M and +/- to select REGISTRATION. Press M and you are requested to enter the 4-digit system PIN (default 4. 5.
9 TROUBLESHOOTING If you have difficulty with your phone, please try the suggestions listed below. As a general rule, if a problem occurs, remove the batteries from all the handsets in your installation for about 1 minute, then disconnect and reconnect the power supply to the base and reinstall the handset batteries. Problem Cause No dialing tone when a. The connection cord of the base station is not pressing T key plugged in. “OUT OF RANGE’’ is displayed. The call does not work. No display. a.
10 GUARANTEE TERMS The Equipment you have bought has been carefully selected by Belgacom and is covered by a two-year warranty on spare parts and labor in the event of any material or manufacturing defect, unless otherwise specified. The warranty shall be valid from the date on which the equipment is collected or delivered.
Belgacom shall not be liable for any indirect or immaterial loss sustained by the Customer as a result of the malfunctioning of the terminal Equipment, such as any loss of production, revenue or contracts. ! The General Terms and Conditions for the Sale of Terminal Equipment can be obtained on request from any Belgacom service available to the public or at www.belgacom.be.
11 SAFETY In the event of an electrical hazard, the mains adapter acts as 230V power isolating device. It should therefore, as a precaution, be installed close to the appliance and be easily accessible. To disconnect the device from the primary power source, the mains adapter must be removed from the 230V AC/50 Hz socket. If the mains adapter fails, it must be replaced by an identical model.
12 ENVIRONMENT The equipment that you bought has required the extraction and use of natural resources for its production. It may contain hazardous substances for the health and the environment. In order to avoid the dissemination of those substances in our environment and to diminish the pressure on the natural resources, we encourage you to use the appropriate take-back systems. Those systems will reuse or recycle most of the materials of your end life equipment in a sound way.
Twist 212 A/W No.:10000545 Rev.