
Installation Guide

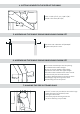


9. INSTALLATION OF THE INSIDE CASING (DOOR MOLDING)
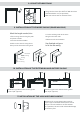
10. INSTALLATION OF THE EXTENSION AND OUTSIDE CASING
11. INSTALLATION OF THE LOCK AND DOOR HANDLE
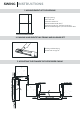
8. USING THE DOOR FOAM
recommended to use (not provided))
Wait until it dries and cut off excess foam
a. Place casing vertical along the jamb
and place a header
vertical to the frame header
b. Mark on the vertical casing where
the top of the horizontal casing ends
c. Cut the moldings and do the same
things for the other side
d. Measure and cut the header
Use finished nail guns
to fix the flat casing
Mark the length needed, trim.
Extention type 8 for wall thickness greater
then 5 1/8” (optional)
Horizontal
L-Casing
Vertical
L-Casing
Cutting
Extention type 8-1 for wall thickness greater
then 6 1/2” (optional)
Attention! If you purchased a door without
a pre-cut/pre-installed hardware, then entrust
the pre-cut and installation of the hardware
to a specialist, this will avoid undesirable damage
to the door parts.
Using the door foam (Use HILTI CF 812 door foam