
Installation Guide


A
A
Need Further Asistance?
For more help, please contact us and one of our trusted
experts will be more than happy to provide guidance.
800-509-5070
Monday-Friday from 9:00am-5:00pm (PST)
C
D
EPOXY
INSTALLATION GUIDE
P 2
MODEL
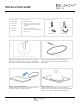
STEP 5 -
PREPARE & SET BOLTS
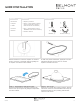
STEP 6 -
ATTACH UNDERMOUNT CLIPS
Fill in the small holes surrounding the sink basin with
epoxy. Immediately place the top of the bolt (PART A)
in the hole with the epoxy. Allow sufficient dry time &
follow the package directions on the epoxy before
moving to the next steps, typically 12 to 24 hours.
After following recommended drying time, attach the
undermount clips (PART B) facing down, place the
washer (PART C) on the clips & use the wing nuts
(PART D) to secure in place. Apply silicone to the wing
nut for added stability.
B
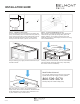
STEP 7 -
PREPARE BASE CABINET
STEP 8 -
SET COUNTERTOP IN PLACE
Using a caulking gun, apply silicone around the top of
the base cabinet.
Carefully place the countertop, with the sink attached,
onto the cabinet and press down firmly. Wipe away
and excess silicone immediately.
STEP 9 -
SET BACKSPLASH
After the vanity is in place, use a caulking gun to
apply silicone to the back and bottom unfinished sides
of the backsplash. Press firmly down and back to set
in place. Remove any excess silicone.