Electric Fryer 618L, 624, and 634 Operator’s Manual Belshaw Bros., Inc. 814 44th Street NW, Suite 103 Auburn, WA 98001 USA Phone: (206) 322-5474 • Fax: (206) 322-5425 Email: service@belshaw.com • http://www.belshaw.
If you accept the machine from the shipping company, you are, in effect, saying that the machine is in good condition, and you must pay for the machine. Belshaw cannot pay for shipping damage, because the freight company has accepted the machine from Belshaw in good condition, and is responsible for its safe delivery. For your protection, inspect the machine to see that no parts are bent, scratched, or otherwise damaged.
Contents Sections 1 Operation 1 2 Cleaning 3 Cleaning the Exterior Surfaces Cleaning the Frying Screen Cleaning the Kettle Removing the Shortening Washing Rinsing Drying 3 3 3 3 4 5 5 3 Donut-Making Helps 6 Tips on Making Quality Cake Donuts Calculating Correct Water Temperature Ratios of Plunger Sizes to Donut Weights Temperature Conversion 6 7 7 7 Belshaw Bros., Inc. • www.belshaw.
Preface The 618L, 624, and 634 Electric Fryers are designed to fry cake and yeast-raised donut products. Each must be bolted to a flat, dry floor. The operator should stand opposite the heater head. • Hot shortening can cause serious burns. Make sure that the system and the shortening are cool before attempting any cleaning, adjustment, disassembly, or repair. The operator must work safely at all times and read this manual and follow its instructions and warnings.
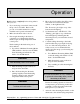
1 Operation Read each step completely before doing what it tells you to do. 1. If you are frying yeast-raised donuts, install the proofer or feed table. Refer to the proofer or feed table manual for complete installation and operation instructions. 2. Make sure the drain valve is closed. 3. Put enough shortening in the kettle to completely cover the heating elements, thermocouple, and high-temperature limit control probe. 4. The “Power On” pilot light on top of the heater head will light up. 5.
The “Heating” pilot light will go out if the high temperature limit control breaks the circuit. Note: If the high temperature limit control does break the circuit, push the red reset button on the back of the heater head. 8. Wait for the shortening to reach the desired temperature. WARNING To avoid serious burns, when the fryer is operating, do not any part of the fryer that is in contact with hot shortening. 9. If you are frying cake or French donuts, move the cutter into place over the fryer.
2 Cleaning For your safety, observe the following warnings throughout the entire cleaning process. Cleaning the Frying Screen 1. In a sink or a dishwasher, wash the frying screen using warm water and mild detergent. Do not use an abrasive cleaner or scraper. 2. Rinse the frying screen in clear water. 3. Dry the frying screen thoroughly, using a soft cloth, before using it again. WARNING Thoroughly clean and dry the floor if shortening, water, or other materials are spilled.
3. Place a Belshaw Shortening Filter or a large metal container under the drain valve of the fryer. 8. Tilt the heater head assembly out of the fryer and lock it in place. 9. Using a non-abrasive, non-metallic spatula, scrape the sediment and any remaining shortening through the drain valve. WARNING Do not use a plastic container. If the shortening is not cool enough, the container will melt, possibly causing you to be burned, and causing shortening to get on the floor. 4. 5.
6. Watch the container to make sure the cleaning solution does not overflow. If the container becomes full, close the drain valve, put another large metal container under the drain valve, and open the drain valve again. 4. Open the drain valve and allow the water to drain into the container. 5. Watch the container to make sure the water does not overflow the container.
3 Donut-Making Helps If the shortening is too cold, the donuts will spread too rapidly, will form large rings, will tend to crack open, will be too light in appearance, and will absorb too much shortening. Tips on Making Quality Cake Donuts • Use the correct batter temperature. In general, the correct batter temperature is 75°-80°F/24°-27°C. Check the mix manufacturer’s instructions, as the recommended temperature range may vary.
Calculating Correct Water Temperature The following is an example of how to calculate the correct water temperature to use. You must use your own room temperature, dry mix temperature, desired batter temperature, and, if you are making yeast-raised donuts, estimated temperature increase during mixing. Cake Donuts Yeast-Raised Donuts °F 72 +70 142 °C 22.2 +21.1 43.3 °F 72 +70 142 °C 22.2 +21.1 43.3 Total B 75 x3 225 23.9 x3 71.7 80 x3 240 26.7 x3 80.1 Total B -Total A Desired water temp.
Electric Fryer 618L, 624, and 634 Technical Supplement Belshaw Bros., Inc. 814 44th Street NW, Suite 103 Auburn, WA 98001 USA Phone: (206) 322-5474 • Fax: (206) 322-5425 Email: service@belshaw.com • http://www.belshaw.
If you accept the machine from the shipping company, you are, in effect, saying that the machine is in good condition, and you must pay for the machine. Belshaw cannot pay for shipping damage, because the freight company has accepted the machine from Belshaw in good condition, and is responsible for its safe delivery. For your protection, inspect the machine to see that no parts are bent, scratched, or otherwise damaged.
Contents Sections 1 Installation 1 Unpacking the Fryer Initial Cleaning Installing the Fryer Moving the Fryer Mounting the Drain Tray Attaching Handles to the Frying Screens 1 1 1 2 2 3 2 Troubleshooting 4 3 Electrical Components 7 Testing the Continuity of the Toggle Switch Testing the Continuity of the Thermostat 4 7 8 Appendix 9 Parts List Drawing Insert Page Insert Belshaw Bros., Inc. • www.belshaw.
Preface The 618L, 624, and 634 Electric Fryers are designed to fry cake and yeast-raised donut products. Each must be bolted to a flat, dry floor. The operator should stand opposite the heater head. • Hot shortening can cause serious burns. Make sure that the system and the shortening are cool before attempting any cleaning, adjustment, disassembly, or repair. The operator must work safely at all times and read this manual and follow its instructions and warnings.
1 Installation Unpacking the Fryer Installing the Fryer 1. Use a fork lift to transport the shipping crate to the work station. 1. 2. Break down the shipping crate. 3. Remove all the packing materials from the fryer. These include foam, tape, brown paper, plastic, and white protective coating. Make sure the power requirements of the machine, found on the data plate on the back of the heater head assembly, match your power source. 2. 4.
Moving the Fryer Mounting the Drain Tray If you ever want to move the fryer to a different workstation, follow this procedure: If you ever want to mount the drain tray on the opposite side of the fryer, follow the steps below. You cannot move the drain tray if your fryer has a Belshaw Shortening Melter (FM) mounted on it. 1. Turn off the fryer and disconnect it from the power source. 2. Allow the machine and the shortening to cool. 3. 1.
13. Install the drain tray mount brackets (removed in step 4) on the opposite side of the fryer. 14. Put the drain tray in place, so its holes line up with the holes in the mount brackets. 15. Slide the drain tray hinge shaft through the holes in the mount brackets and the drain tray. 16. Tighten the acorn nuts (removed in step 1) on the ends of the drain tray hinge shaft.
2 Troubleshooting If you have a problem with your fryer that you cannot solve, call your dealer or another qualified technician. If your dealer cannot help you, please call Belshaw Bros. at (206)322-5474. When you call, please specify the following: • The model name of the machine. • The serial number of the machine. • The voltage, phase, and cycle of the machine. CAUTION If you perform repairs yourself or have them performed by anyone other than a service technician authorized by Belshaw Bros.
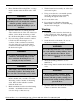
THE FRYER WILL NOT TURN ON OR HEAT Possible Causes What To Do The on/off switch is not in the ON position. Move the on/off switch to the ON position. The on/off switch is located inside the fryer cabinet, on the right hand side. The thermostat is not turned on. Turn the thermostat knob to a setting that is high enough to make the “Heating” pilot light come on. The high-temperature limit control switch has been tripped. Press the red reset button on the back of the heater head.
THE HEATING ELEMENTS WILL NOT HEAT Possible Causes What To Do The fryer’s circuit breaker has been tripped. Press the red reset button on the back of the heater head. The high-temperature limit control switch has been tripped. Press the red reset button on the back of the heater head. WARNING Before doing any of the following, turn off the machine and allow the shortening to cool. The contactor is defective. Replace the contactor. A heating element is defective.
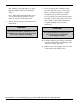
3 Electrical Components This appendix explains how to test the continuity of electrical components in your fryer. These include the toggle switch and the thermostat. switch terminals The appendix also contains a document by the Robertshaw Controls Company, the maker of the thermostat we use in the 618L, 624, and 634. It explains how to check, adjust, and recalibrate the thermostat.
Testing the Continuity of the Thermostat WARNING To avoid the possibility of electric shock, disconnect the machine from the power source before testing. 1. Disconnect the machine from the power supply. 2. Disconnect the terminal wires from the thermostat. 3. Connect the continuity tester across the B terminals indicated in Figure B-2. This set of contacts should be closed whenever the thermostat is on. To test, start with the thermostat in the OFF position.
4 Appendix See Parts List Drawing Insert Page. Belshaw Bros., Inc. • www.belshaw.