
Owner`s manual

Page 4
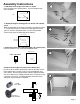
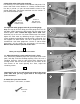
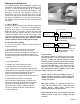
5. Attach the cabinet base panel.
Flip the cabinet over, as shown. Use the same 1/4" round head
bolts and cross dowels as above. When done, flip the unit right
side up. Note: the bottom side of the cabinet base panel has
counter bored holes to accept the bolt heads.
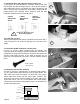
Drive the leveling screws
into the (12) small holes. Be
careful not to drive a leveling
screw into the two larger
insert holes!
!
7 x 40mm
leveling
screw
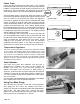
6. Install the (12) leveling screws (for the insert plate).
Place the routertop face down, as shown. Use a power drill, and
drive the screws in until they barely come through the other side.
You will fine adjust them in step 11. Some cracking of the
laminate's color layer may occur, but this will not affect the
product's performance.
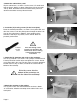
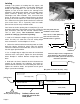
8 Attach the routertop to the cabinet.
Use (3) of the same 1/4" round head bolts and cross dowels
as used earlier. Attach the routertop to the cabinet sides and
back panel.
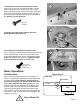
7. Attach the (2) aluminum trim strips to the routertop.
Use the (4) small #6 x 1/2 screws. Use a phillips screwdriver and
install by hand. Be careful not to over tighten the screws. Do not
use a power drill in this step! The trim strips are purely decorative.
Position the trim strip as shown, and drive the screws into the
bottom of the routertop.
Drive the screws into the
bottom of the routertop, not
into the side of the routertop!
!
5
6
7
8