
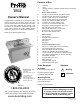
Owner`s manual

Page 6
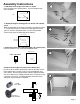
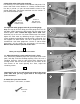
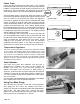
14. Install the dust port.
Pull the port along the two grooves extruded into the fence until it
snaps into place in the center bit opening area. The port will fit
tightly.
15. Install the (2) MDF subfences onto the fence.
Use the (4) 1/4-20 x 40mm shoulder bolts and t-knobs. The
subfences have no left/right or up/down designation. The bolts are
designed to fit snugly into the subfences to prevent the heads from
spinning. Light finger pressure on the head of the bolt may be
necessary. The bolt heads must recess into the subfence counter
bores.
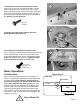
16. Attach the fence to the routertop.
Use the (2) 3/8-16 x 3" carriage bolts, (2) aluminum knob spacers,
(2) 3/8" nylon handle spacer washers, and (2) large t-knobs. The
bolts enter from inside the cabinet. To adjust the fence, simply
loosen both fence knobs until the fence slides smoothly. The
fence does not have to remain parallel to the front edge of the
router table unless you use it in conjunction with a miter gauge.
Loosening just one knob and pivoting the fence is an effective way
to attain fine adjustments.
14
15
1/4-20 x 40mm
shoulder bolt
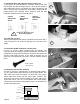
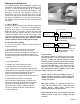
13. Clip-on the door and adjust the hinges if necessary.
If your hinges do need adjustment, see below. Please, take your
time to figure out how the hinges clip on. You'll get the hang of it
soon enough! Our "Euro" style hinges are strong, self-closing, and
clip on and off. Note, removing the door makes clamping to the
leading edge of the routertop easier. However, keep the door
installed to cut down on dust and router noise.
Don't force the hinges onto
the mounting plates!
!
Frontal
Adjustment
Screw
Vertical
Adjustment
Screws
Lateral
Adjustment
Screw
13
clamp handle
routertop
fence
3/8" nylon handle
spacer washer
handle spacer
3/8-16 x 3" carriage bolt
16