
Owner`s manual

Page 8
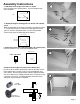
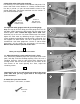
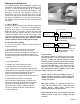
jointer bars
Here, the jointer bars are
mounted in slots 2 and 4.
Always use a push
stick or pad when jointing!
Note the small "v" grooves.
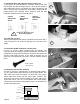
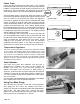
outfeed subfence
infeed subfence
Feed Direction
Stock (wood)
fence (top view)
straight edge - remove before jointing!!!
outfeed
subfence
router
bit
Outfeed subfence and
router bit are set to the
same plane!
Jointing
Jointing is the process of making two flat, square, and
straight mating edges. Jointing is usually done before two
boards are glued together. It is also used to "fit" pieces
together, as well as to trim stock to size. Jointing on the
routertop is not designed to replace a free standing power
jointer. However, jointing with your router table has
advantages over other methods. First, small and short
pieces of wood can be safely jointed because the throat
opening is also small: about 1/2". Second, the quality of the
cut is better than the typical jointer because the router bit
spins much faster. This is especially useful on woods
prone to tear-out, like curly or burled woods.
Your fence has built-in jointing slots to accept the (2) small
aluminum jointer bars shipped with your fence. Installed in
pairs, these bars "shim out" the out feed subfence either
1/32" or 5/64" (2mm). The instructions below are
specific to setting up your fence for jointing.
1. Install a 1/2" diameter straight or spiral up-cut bit in your
router. Use only 1/2" shank bits. The bit's cutting length
must not exceed 1". Set the height to 1" or less.
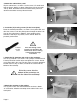
2. Loosen the outfeed subfence mounting knobs and slide
both bars (always installed in pairs!) under the outfeed
subfence in either the 2nd and 4th slots, or the 1st and 3rd.
See the upper right illustration.
3. Use a straight edge to adjust the router bit and outfeed
subfence to the same plane. Tighten the fence clamping
knobs. Readjust if needed. Remove straight edge when
done.
4. Slide both sub fences towards the bit to decrease the
amount of gap between the subfences and router bit.
Confirm that the subfences are not touching the router bit.
Tighten the subfence knobs, and position the bit guard.
Plug-in your router and begin.
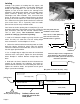
Slots 2 and 4 = 1/32" Cut
(Bit guard not shown for clarity, only!)
Slots 1 and 3 = 5/64" (2mm Cut)
1
2
3
4
!
If board "snipe" occurs, realign the out
feed subfence to the router bit. Don't be
surprised if it takes you one or two tries to
master this operation.
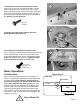
snipe
In this photo, the user is sliding the
second bar into position.