
Owner`s manual

Page 9
Adjusting the Subfences
1. Set the bit height and fence where you need
them. Confirm that the bit, router, insert hold-
down screws and fence are properly set and secure.
along the same plane. Final router bit height must
be set! At this point the subfences must not touch the
router bit.
2. Install the bit guard.
3. Connect your vacuum to the dust port.
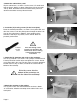
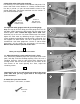
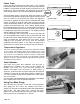
4. Start the router. From the back of the
fence, slightly loosen the subfence knobs until the
subfence can move. Carefully slide the infeed subfence
towards the router bit. Hold onto the subfence
knob as shown in the photo above. Never
push the subfence with your hands on the face of it.
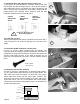
5. When the infeed subfence has stopped
on the routerbit's guide bearing, fully tighten the
subfence knobs and proceed with your operation.
If your bit has no guide bearing, (e.g., vertical
raised panel bits), slide the subfence half-way
into the bit. Tighten the knobs. Zero clearance
has been achieved.
The (2) MDF (medium density fiberboard) subfences are
designed to slide along the fence approximately 2". This
results in a router bit opening from 0" to 4". Adjusting
the subfences into the routerbit profile produces "zero
clearance". Essentially, zero clearance eliminates the
gap between your fence and the router bit, the major
reason your stock gets sucked into the fence just before
the router bit. Moreover, less chip-out occurs because
the subfence supports the fibers of the wood stock you
are cutting.
A. "Close" Setting
In many instances, adjusting the subfences close to the
router bit is all that is necessary, and accomplishes
about the same thing as a true zero clearance setting.
Before the router is turned on, and after the fence and
router bit height are properly adjusted, simply slide the
subfences towards the bit to reduce the gap. After
setting the subfences close to the bit, make absolutely
sure the router bit can freely move without running
into the subfences before turning on the router!
B. "Zero Clearance" Setting
If a true zero clearance setting is desired, follow the
instructions below.
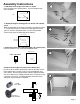
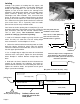
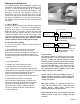
Outfeed Subfence Infeed Subfence
Bit
Outfeed Subfence Infeed Subfence
Bit
Router Bit Guide Bearing
Important Notes:
The outfeed subfence is almost never set to zero
clearance because a "close" setting usually works
just fine. Setting the outfeed subfence to zero
clearance requires great care because the router bit
can cause a portion of the outfeed subfence to chip-
out or break. Therefore, if you must use zero
clearance, slide the subfence very slowly into the
bit to minimize these affects. Otherwise, just set the
outfeed subfence close to the bit.
Flip the subfences when you change bit profiles or
heights. Purchase new subfences when all ends are
wasted, and when the ends cannot be trimmed to
provide a fresh edge.
MDF works perfectly as a subfence because it is
softer than most woods, and is much kinder on
delicate profiles. Razor edges remain after
producing lock miter and other profiles.
When adjusting the fence, ensure that no part of the
aluminum will be in the zone of contact with the
router bit.
In this drawing, above, the
infeed subfence is not set to
zero clearance.
In this drawing, above, the
infeed subfence is set to
zero clearance.