Federal Communications Commission (FCC) Statement This Equipment has been tested and found to comply with the limits fora Class B digital device, pursuant to Part 15 of the FCC rules. These limits are designed to provide reasonable protection against harmful interference in a residential installation. This equipment generates, uses and can radiate radio frequency energy and, if not installed and used in accordance with the instructions.
Copyright Copyright © 1998 by Amer Peripherals, Incorporated. All rights reserved. No part of this publication may be reproduced. transmitted, transcribed, stored in a retrieval system or translated into any language or computer language, in any form or by any means, electronic, mechanics, magnetic, optical, chemical, manual or otherwise, without the prior written permission of Amer Peripherals, incorporated.
Safety Instructions ~ The AC adapter isolates this equipment from the AC supply. Unplug this product from the wall outlet before cleaning, Do not use liquid or aerosol cleaners, Use a soft cloth to clean the monster housing and a tape to stick dust and fingerprints on the screen panel. Slots and openings on the back or top of the cabinet are provided for ventilation. They must not be blocked or covered.
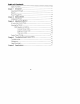
Table of Contents Table of Contents Chapter 1 Introduction Unpacking the Package. Features Power Management... Chapter 2 Getting Started Installing the Mentor. Chapter 3 Adjusting the Monitor A Look at the Control Panel. Adjusting the Monitor. OSD Operation procedure... Contrast hot-key mode Brightness hot-key med Main menu mode... Factory Preset Timings... Chapter 4 Troubleshooting and Useful Hints Troubleshooting. Maintenance... Need More Help’ Chapter 5 Specifications.
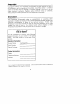
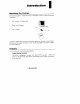
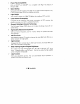
Introduction Unpacking the Package Check following terns. If they are missing or damaged, conduit your place of purchase immediately. v LCD monitor with signal cable v Power cord & adapter v User's manual A Locate the model name and the serial number labeled on the back of your monitor. Write down the related information of your monitor and dealer in the space or page it for future reference.
Plug'n Play Compatibility With its DDC and DDC2B™, it is compatible with Plug Play feature of Windows 95@. Space Saving Compared with CRT monitors, the depth of your LCD monitor footprint is only 170mm, saving at least 50% of your desktop real estate. Light Weight Your monitor weights only 5.8Kg, 70% lighter than traditional CRT monitors. Lower Power Consumption Compared to the maximum 75W power consumption of CRT mentors, this monitor consumes only 36W in cooperativeness.
Power Management The power management complies with VASE DIMS standard and handles the power saving modes according to pin 12 of D-sub connector { PVC ) recognition. The sawyer consumption at NORMAL and OFF modes are as follows. Mode Power Horizontal Vertical LED Consumption Synge. Synge.
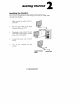
Getting Started Installing the Monitor This monster is equipped with an auto-sensing power supply for voltage ranges 100~240V AC, 50~60Hz, I. Make sure that the system power is turned off, 2. Plug the signal cable to the signal connector at the rear of PC, 3. Plug adapter output cable to the jack at the rear of LCD monitor and the power cord to the adapter. 4, Connect the power cord to power source. 5. Turn on the computer and the monitor.
Adjusting the Monitor A Look at the Control Panel Adjusting the Monitor There are 5 keys for user's control. The following descriptions are the introduction of these keys. ® Enter key : enter sub-menus or select items ® Exit key : Back to main menus (auto save), or leave OSD. ® Left/Contrast key : For left adjustment and enter contrast hot-key function.
OSD Operation procedure Contrast hot-key mode 1. Press Left/Contrast key to enter contrast hot-key mode 2. Press Left, Right key to do the adjustments. Contrast —— 75 [ARTY Brightness hot-key mode |. Press Right/Brightness key to enter brightness hot-key mode 2. Press Left, Right key to do the adjustments. 3% Brightness E75 Exit : save Main menu mode |. Press Enter or Exit keys to enter Main menu (there is one main menu) 2. Press Left or Right keys to scroll fight pane to desired items.
Detail page assignment of main menu is as below Main Menu : Press Enter or Exit keys to enter main menu Luminescence Enter to Select Exit to Exit This main menu includes five items : 1. "OC Luminescence adjustment Press Enter key to enter sub-menus.
Press Enter to select the items. Then press Left or Right keys to do adjustment. Contrast 75 Exit to save 2. SO Geometry 3 J ® poe [etc] ou] A Geometry Enter to Select Exit fo Exit Press Enter key to enter sub-menus, and press Left or Right keys to scroll light pane to desired items. There are 4 rems mw] Hor. (horizontal) Position Ver.
LBL Fay Geometry Enter to Select Exit to Exit Press Enter to select the items, and press Left or Right keys to adjust 3 [Jl 2 pod [ev] Hor.
3.22 Color Adjustment 2 ER vod [en] R 6 B pod Color Adjustment [CTR CRS [SOG eF = Press Enter key to enter RGB adjust function. Press Left or Right keys to scroll light panel to desired items, There are 4 items R G B Red gain adjustment Green gain adjustment bof Reset to Default Blue gain adjustment 2 7 IR vod [od] Color Adjustment Enter to Select Exit to Exit Press Enter to select the items, Then press Left or Right keys to do adjustment. When user changes the color setting.
B pod Green 7% Exit to save 3c £7 HR vod [ic] Recall Enter to Recall Exit to Exit 4. Reset to Default Preset Mode 1024X768 H.F.: 59.92 KHz Hz to recall to Exit 3.
The default picture shows the default resolution, horizontal and vertical frequency. Press Enter key to recall the default setting, etc. 5. Miscellaneous Ae A ED pod =] Miscellaneous to select to Exit [Eh Press Enter key ta enter sub-menus. Press Left or Right key to scroll ght pane to desired terns There are 3 items: | OSD Position Language Select Rome on/off Select OSD Position Enter to Select Exit to Exit Press Enter key to enter sub-menus.
A. For OSD Position adjustment : Press Left or Right keys to scroll light panel to desired items, ® OSD Hor (horizontal) Position |] ® OSD Ver (vertical) Position ™] Press Enter to select the items. Then press Left or Right key to adjustment, ¢ AY ED bod OSD Hor. Position TE) 75 Exit to save B. For Language Select : Press Left or Right key to scroll light pane to desired language, press Exit to save and exit.
C. For Room On/Off Select : Press Left or Right key to scroll light pane to choose On or Off mode. Press Exit to save and exit. ZOOM Exit to save i-bey For ate adjust V-Position, H-Position, Pixel Clock, Phase. and Color temperature. Just press £key to autocratically adjust all the settings.
Factory Preset Timings Input display data Multi-scan operation Resolution |H, Frequency|V. Frequency] Dot Clock Remark Actual display {Khz) (M2) Frequency resolution (MHz) 640 x 350 3147 70.06 25.17 640 % 350 37.86 85.10 31.50 £40 x 400 3147 7008 2832 720 x 400 3793 85.00 3550 640 x 430 35.00 57.00 3024 640 x 480 31.47 5000 25.18 £40 x 480 37.86 72.80 3150 full screen 640 x 430 37.50 75.00 3150 1024 x 768 €40 x 130 43.27 8500 3600 800 x 600 35.16 56.25 3600 00 x 600 37.88 8032 40.00 0 x 600 43.
When you set the magnification in 1.5 or [.25, the screen doesn't show fully sized images. Tne proportion of the screen size is as follows, PC : Dis data i i once Display size Display S52 1 Display size BAOBAB expand 9680 X 720 i Google ween [i 1000 X 750 wea X1.5) ad (X1.
> in the resolution of 832 x 624, the OSD can not support automatic adjustment, position and image. In the main menu, these three items will show in red. In the resolution of 1024 x 768, the screen may appear imperfect or unclear. tis not a defect. You can improve it by automatic adjustment or manually adjusting. In some rare cases, the screen will appear little noise. It might be caused by nonstandard signal frequency from the VGA card. Iris not defect.
Troubleshooting and Useful Hints Troubleshooting Make sure that your monitor is properly installed if you have encountered ary trouble using this product (For hardware installation, see Chapter 2, Getting Started). If the problems persist, check this chapter for possible solutions, There is no picture on the screen. Check: UJ Power saving mode. Press any key and move the mouse to deactivate the mode. CO Signal cable connector pins. If there are bent or missing pins, consult your place of purchase.
Maintenance ¥ Do not expose the monitor to direct sunlight or heat. ¥ Do not split liquid on the monitor. X Do not attempt to pane the monitor. You may be hurt by electric shock For service, call your place of purchase. ¥ Do not use your monitor when magnets or electronic products are operating nearby. X Do not use harsh chemicals or strong cleaning solvents to clean the monitor screen. Wipe it with clean, soft clothes applied with midi solution, X Do not place anything on your monitor.