
Instruction manual


19
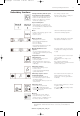
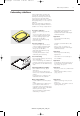
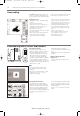
Embroidery hoops
Attaching the embroidery hoop
Needle and presser foot
· raise the needle and presser foot
· hold the hoop with the right side of
the fabric uppermost and the
attaching mechanism to the left
· pass it under the presser foot
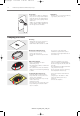
Attaching the hoop
· squeeze the ends of the attaching
mechanism on the side of the hoop
· position the center points of the
hoop (small raisings) over the
brackets of the embroidery arm
·press down on the hoop until it
engages
·release the attaching mechanisms
of the hoop
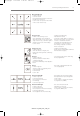
Removing the hoop
·press both ends on the hoop atta-
ching mechanism towards each
other
· pull up to remove the hoop
Adjusting the embroidery hoop
If the embroidery module was not
bought with the sewing computer
but as a later addition, it is necessary
to adjust the embroidery hoop
before using it for the first time. This
adjustment calibrates the needle to
the center of the embroidery hoop.
Preparation
· the embroidery module must be
attached directly to the sewing
computer without the adapter
· attach the large or medium hoop to
the module with the corresponding
template
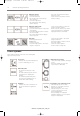
Open Setup
·press the external setup button
· the menu appears
· select “Service”
· the menu appears
· select “Adjustment of hoop”
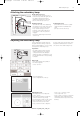
Adjusting the hoop
· the adjustment screen appears
· touch “check”
· the sewing computer follows the
contours of the hoop, finally
positioning the needle in the center
· if the needle does not come to a
stop in the exact center of the
hoop, use the arrows to adjust it
· touch “ok”– close the screen
· close setup with “esc”
· touch "check" in Layout 1 until the
embroidery area length has been
confirmed (reference position esta-
blished)
185_SM_engl 19.04.2004 9:18 Uhr Seite 19
030867.51.04_EMB_0401_a185_EN